一、第一种创建uiswitch控件的方法,在代码中动态创建。
1、打开xcode 4.3.2, 新建项目switch,选择single view application。
2、打开viewcontroller.m文件在viewdidload方法里添加代码:
- (void)viewdidload
{
[super viewdidload];
uiswitch *switchbutton = [[uiswitch alloc] initwithframe:cgrectmake(50, 100, 20, 10)];
[switchbutton seton:yes];
[switchbutton addtarget:self action:@selector(switchaction:) forcontrolevents:uicontroleventvaluechanged];
[self.view addsubview:switchbutton];
// do any additional setup after loading the view, typically from a nib.
}
代码中selector中的switchaction:需要我们自己实现,就是按下时接收到的事件。
记得把switchbutton加到当前view,调用[self.viewaddsubview:switchbutton];
3、监听uiswitch按下事件
实现代码如下:
-(void)switchaction:(id)sender
{
uiswitch *switchbutton = (uiswitch*)sender;
bool isbuttonon = [switchbutton ison];
if (isbuttonon) {
showswitchvalue.text = @"是";
}else {
showswitchvalue.text = @"否";
}
}
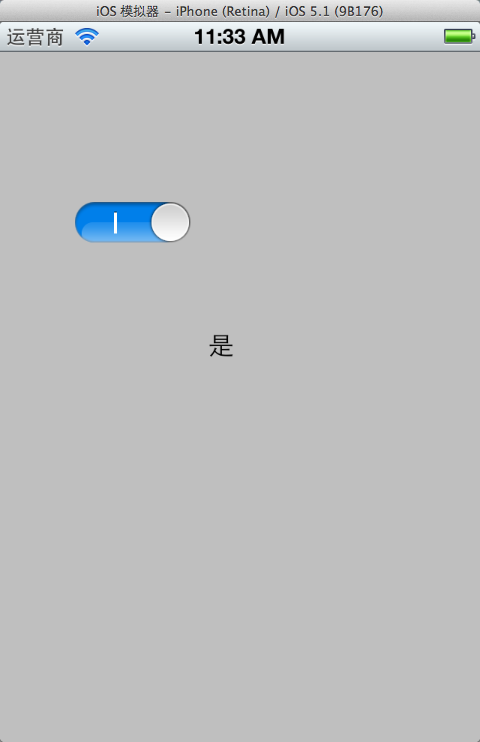
showswitchvalue是我通过拖拽控件方法放到界面上的label,方便显示效果
运行,效果:
二、通过拖拽方法使用uiswitch
1、往xib文件上拖拽一个uiswitch控件。
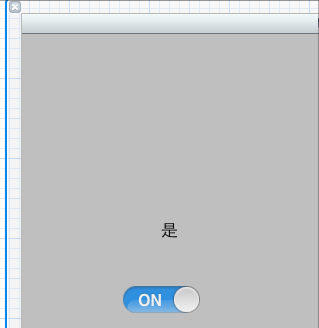
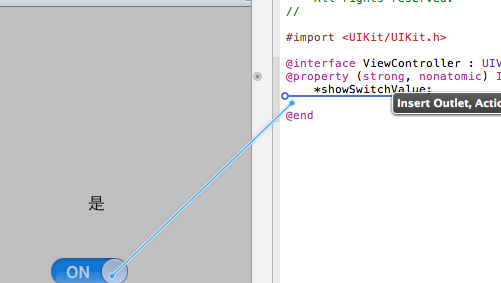
2、按alt+command + return键开启assistant editor模式,选中uiswitch控件,按住control键,往viewcontroller.h拖拽
3、选action方式
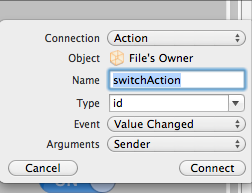
4、.m文件中实现switchaction 。刚才动态创建的时候也用到这个方法名称,可以先注释掉刚才的。
- (ibaction)switchaction:(id)sender {
uiswitch *switchbutton = (uiswitch*)sender;
bool isbuttonon = [switchbutton ison];
if (isbuttonon) {
showswitchvalue.text = @"是";
}else {
showswitchvalue.text = @"否";
}
}
这里我们来看一下.m文件的源码:
#import "hmcustomswitch.h"
@implementation hmcustomswitch
@synthesize on;
@synthesize tintcolor, clippingview, leftlabel, rightlabel;
+(hmcustomswitch *)switchwithlefttext:(nsstring *)lefttext andright:(nsstring *)righttext
{
hmcustomswitch *switchview = [[hmcustomswitch alloc] initwithframe:cgrectzero];
switchview.leftlabel.text = lefttext;
switchview.rightlabel.text = righttext;
return [switchview autorelease];
}
-(id)initwithframe:(cgrect)rect
{
if ((self=[super initwithframe:cgrectmake(rect.origin.x,rect.origin.y,95,27)]))
{
// self.clipstobounds = yes;
[self awakefromnib]; // do all setup in awakefromnib so that control can be created manually or in a nib file
}
return self;
}
-(void)awakefromnib
{
[super awakefromnib];
self.backgroundcolor = [uicolor clearcolor];
[self setthumbimage:[uiimage imagenamed:@"switchthumb.png"] forstate:uicontrolstatenormal];
[self setminimumtrackimage:[uiimage imagenamed:@"switchbluebg.png"] forstate:uicontrolstatenormal];
[self setmaximumtrackimage:[uiimage imagenamed:@"switchoffplain.png"] forstate:uicontrolstatenormal];
self.minimumvalue = 0;
self.maximumvalue = 1;
self.continuous = no;
self.on = no;
self.value = 0.0;
self.clippingview = [[uiview alloc] initwithframe:cgrectmake(4,2,87,23)];
self.clippingview.clipstobounds = yes;
self.clippingview.userinteractionenabled = no;
self.clippingview.backgroundcolor = [uicolor clearcolor];
[self addsubview:self.clippingview];
[self.clippingview release];
nsstring *leftlabeltext = nslocalizedstring(@"on","custom uiswitch on label. if localized to empty string then i/o will be used");
if ([leftlabeltext length] == 0)
{
leftlabeltext = @"l"; // use helvetica lowercase l to be a 1.
}
self.leftlabel = [[uilabel alloc] init];
self.leftlabel.frame = cgrectmake(0, 0, 48, 23);
self.leftlabel.text = leftlabeltext;
self.leftlabel.textalignment = nstextalignmentcenter;
self.leftlabel.font = [uifont boldsystemfontofsize:17];
self.leftlabel.textcolor = [uicolor whitecolor];
self.leftlabel.backgroundcolor = [uicolor clearcolor];
// self.leftlabel.shadowcolor = [uicolor redcolor];
// self.leftlabel.shadowoffset = cgsizemake(0,0);
[self.clippingview addsubview:self.leftlabel];
[self.leftlabel release];
nsstring *rightlabeltext = nslocalizedstring(@"off","custom uiswitch off label. if localized to empty string then i/o will be used");
if ([rightlabeltext length] == 0)
{
rightlabeltext = @"o"; // use helvetica uppercase o to be a 0.
}
self.rightlabel = [[uilabel alloc] init];
self.rightlabel.frame = cgrectmake(95, 0, 48, 23);
self.rightlabel.text = rightlabeltext;
self.rightlabel.textalignment = nstextalignmentcenter;
self.rightlabel.font = [uifont boldsystemfontofsize:17];
self.rightlabel.textcolor = [uicolor graycolor];
self.rightlabel.backgroundcolor = [uicolor clearcolor];
// self.rightlabel.shadowcolor = [uicolor redcolor];
// self.rightlabel.shadowoffset = cgsizemake(0,0);
[self.clippingview addsubview:self.rightlabel];
[self.rightlabel release];
}
-(void)layoutsubviews
{
[super layoutsubviews];
// nslog(@"leftlabel=%@",nsstringfromcgrect(self.leftlabel.frame));
// move the labels to the front
[self.clippingview removefromsuperview];
[self addsubview:self.clippingview];
cgfloat thumbwidth = self.currentthumbimage.size.width;
cgfloat switchwidth = self.bounds.size.width;
cgfloat labelwidth = switchwidth - thumbwidth;
cgfloat inset = self.clippingview.frame.origin.x;
// nsinteger xpos = self.value * (self.bounds.size.width - thumbwidth) - (self.leftlabel.frame.size.width - thumbwidth/2);
nsinteger xpos = self.value * labelwidth - labelwidth - inset;
self.leftlabel.frame = cgrectmake(xpos, 0, labelwidth, 23);
// xpos = self.value * (self.bounds.size.width - thumbwidth) + (self.rightlabel.frame.size.width - thumbwidth/2);
xpos = switchwidth + (self.value * labelwidth - labelwidth) - inset;
self.rightlabel.frame = cgrectmake(xpos, 0, labelwidth, 23);
// nslog(@"value=%f xpos=%i",self.value,xpos);
// nslog(@"thumbwidth=%f self.bounds.size.width=%f",thumbwidth,self.bounds.size.width);
}
- (uiimage *)image:(uiimage*)image tintedwithcolor:(uicolor *)tint
{
if (tint != nil)
{
uigraphicsbeginimagecontext(image.size);
//draw mask so the alpha is respected
cgcontextref currentcontext = uigraphicsgetcurrentcontext();
cgimageref maskimage = [image cgimage];
cgcontextcliptomask(currentcontext, cgrectmake(0, 0, image.size.width, image.size.height), maskimage);
cgcontextdrawimage(currentcontext, cgrectmake(0,0, image.size.width, image.size.height), image.cgimage);
[image drawatpoint:cgpointmake(0,0)];
[tint setfill];
uirectfillusingblendmode(cgrectmake(0,0,image.size.width,image.size.height),kcgblendmodecolor);
uiimage *newimage = uigraphicsgetimagefromcurrentimagecontext();
uigraphicsendimagecontext();
return newimage;
}
else
{
return image;
}
}
-(void)settintcolor:(uicolor*)color
{
if (color != tintcolor)
{
[tintcolor release];
tintcolor = [color retain];
[self setminimumtrackimage:[self image:[uiimage imagenamed:@"switchbluebg.png"] tintedwithcolor:tintcolor] forstate:uicontrolstatenormal];
}
}
- (void)seton:(bool)turnon animated:(bool)animated;
{
on = turnon;
if (animated)
{
[uiview beginanimations:nil context:nil];
[uiview setanimationduration:0.2];
}
if (on)
{
self.value = 1.0;
}
else
{
self.value = 0.0;
}
if (animated)
{
[uiview commitanimations];
}
}
- (void)seton:(bool)turnon
{
[self seton:turnon animated:no];
}
- (void)endtrackingwithtouch:(uitouch *)touch withevent:(uievent *)event
{
nslog(@"preendtrackingwithtouch");
[super endtrackingwithtouch:touch withevent:event];
nslog(@"postendtrackingwithtouch");
m_touchedself = yes;
[self seton:on animated:yes];
}
- (void)touchesbegan:(nsset*)touches withevent:(uievent*)event
{
[super touchesbegan:touches withevent:event];
nslog(@"touchesbegan");
m_touchedself = no;
on = !on;
}
- (void)touchesended:(nsset*)touches withevent:(uievent*)event
{
[super touchesended:touches withevent:event];
nslog(@"touchesended");
if (!m_touchedself)
{
[self seton:on animated:yes];
[self sendactionsforcontrolevents:uicontroleventvaluechanged];
}
}
-(void)dealloc
{
[tintcolor release];
[clippingview release];
[rightlabel release];
[leftlabel release];
[super dealloc];
}
@end
看代码可以知道,其实它是通过继承uislider控件实现的,uislider的左右分别是个uilabel,当yes的时候,滑块滑到了最右边,no的时候滑到了最左边。
所以在代码中使用它呢?这里再举一个例子:
- (void)loadview
{
uiview *contentview = [[uiview alloc] initwithframe:[[uiscreen mainscreen] applicationframe]];
self.view = contentview;
contentview.backgroundcolor = [uicolor whitecolor];
// standard on/off
hmcustomswitch *switchview = [[hmcustomswitch alloc] initwithframe:cgrectzero];
switchview.center = cgpointmake(160.0f, 20.0f);
switchview.on = yes;
[contentview addsubview:switchview];
[switchview release];
// custom yes/no
switchview = [hmcustomswitch switchwithlefttext:@"yes" andright:@"no"];
switchview.center = cgpointmake(160.0f, 60.0f);
switchview.on = yes;
[contentview addsubview:switchview];
// custom font and color
switchview = [hmcustomswitch switchwithlefttext:@"hello " andright:@"abc "];
switchview.center = cgpointmake(160.0f, 100.0f);
switchview.on = yes;
[switchview.leftlabel setfont:[uifont boldsystemfontofsize:13.0f]];
[switchview.rightlabel setfont:[uifont italicsystemfontofsize:15.0f]];
[switchview.rightlabel settextcolor:[uicolor bluecolor]];
[contentview addsubview:switchview];
// multiple lines
switchview = [hmcustomswitch switchwithlefttext:@"hello\nworld" andright:@"bye\nworld"];
switchview.center = cgpointmake(160.0f, 140.0f);
switchview.on = yes;
switchview.tintcolor = [uicolor orangecolor];
switchview.leftlabel.font = [uifont boldsystemfontofsize:9.0f];
switchview.rightlabel.font = [uifont boldsystemfontofsize:9.0f];
switchview.leftlabel.numberoflines = 2;
switchview.rightlabel.numberoflines = 2;
switchview.leftlabel.linebreakmode = nslinebreakbywordwrapping;
switchview.rightlabel.linebreakmode = nslinebreakbywordwrapping;
[contentview addsubview:switchview];
switchview = [[hmcustomswitch alloc] init];
switchview.center = cgpointmake(160.0f, 180.0f);
switchview.on = yes;
switchview.tintcolor = [uicolor purplecolor];
[contentview addsubview:switchview];
[switchview release];
switchview = [hmcustomswitch switchwithlefttext:@"l" andright:@"o"];
switchview.center = cgpointmake(160.0f, 220.0f);
// customswitch.tintcolor = [uicolor colorwithred:125.f/255.f green:157.f/255.f blue:93.f/255.f alpha:1.0];
// customswitch.tintcolor = [uicolor colorwithred:125.f/255.f green:157.f/255.f blue:93.f/255.f alpha:1.0];
[contentview addsubview:switchview];
// standard on/off
switchview = [[hmcustomswitch alloc] init];
switchview.center = cgpointmake(160.0f, 260.0f);
switchview.tintcolor = [uicolor colorwithred:125.f/255.f green:157.f/255.f blue:93.f/255.f alpha:1.0];
[switchview addtarget:self action:@selector(switchflipped:) forcontrolevents:uicontroleventvaluechanged];
[contentview addsubview:switchview];
[switchview release];
uitoolbar *toolbar = [[uitoolbar alloc] initwithframe:cgrectmake(0, 420, 320, 40)];
toolbar.tintcolor = [uicolor colorwithred:125.f/255.f green:157.f/255.f blue:93.f/255.f alpha:1.0];
[contentview addsubview:toolbar];
[contentview release];
}
-(void)switchflipped:(hmcustomswitch*)switchview
{
nslog(@"switchflipped=%f on:%@",switchview.value, (switchview.on?@"y":@"n"));
}


