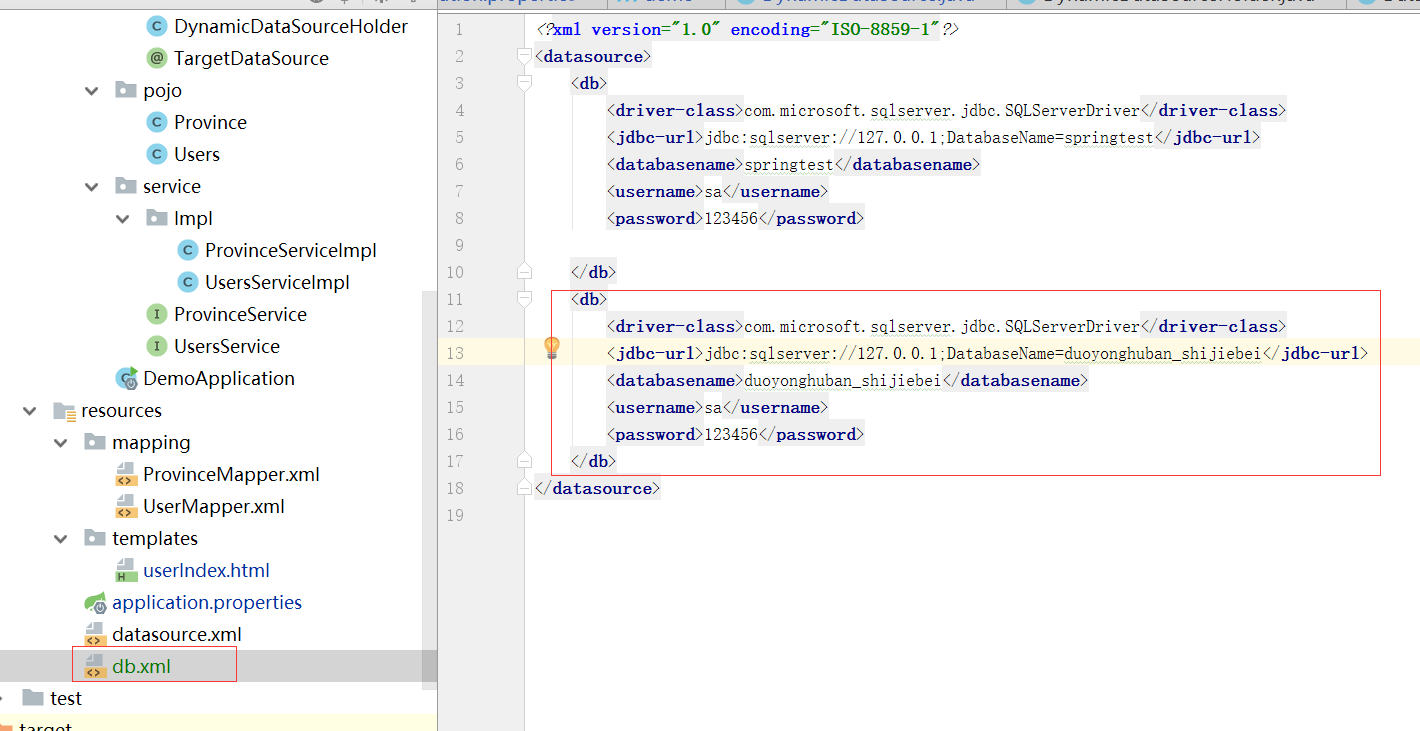
由于公司业务划分了多个数据库,开发一个项目会同事调用多个库,经过学习我们采用了注解+aop的方式实现的
1.首先定义一个注解类
|
1
2
3
4
5
|
@retention(retentionpolicy.runtime)@target(elementtype.method)public @interface targetdatasource { string value();//此处接收的是数据源的名称} |
2.然后建一个配置类,这个在项目启动时会加载数据源,一开始采用了hikaricp,查资料说是最快性能最好的,然后又发现了阿里的druid,这个功能比较全面,而且性能也还可以,最主要他还有监控功能,具体实现看如下代码
|
1
2
3
4
5
6
7
8
9
10
11
12
13
14
15
16
17
18
19
20
21
22
23
24
25
26
27
28
29
30
31
32
33
34
35
36
37
38
39
40
41
42
43
44
45
46
47
48
49
50
51
52
53
54
55
56
57
58
59
60
61
62
63
64
65
66
67
68
69
70
71
72
73
74
75
76
77
78
79
80
81
82
83
84
85
86
87
88
89
90
91
92
93
94
95
96
97
98
99
100
101
102
103
104
105
106
107
108
109
110
111
112
113
114
115
116
117
118
119
120
121
122
123
124
125
126
127
128
129
130
131
132
133
134
135
136
137
138
139
140
141
142
143
144
145
146
147
148
149
150
151
152
153
154
155
156
157
158
159
160
161
162
163
164
165
166
167
168
169
170
171
172
173
174
175
176
177
178
179
180
181
182
183
|
package com.example.demo.datasource; import com.alibaba.druid.pool.druiddatasource;import com.alibaba.druid.support.http.statviewservlet;import com.alibaba.druid.support.http.webstatfilter;import com.example.demo.datasource.dynamicdatasource;import com.zaxxer.hikari.hikariconfig;import com.zaxxer.hikari.hikaridatasource;import lombok.extern.slf4j.slf4j;import org.mybatis.spring.annotation.mapperscan;import org.springframework.beans.factory.annotation.autowired;import org.springframework.beans.factory.annotation.qualifier;import org.springframework.beans.factory.annotation.value;import org.springframework.boot.web.servlet.filterregistrationbean;import org.springframework.boot.web.servlet.servletregistrationbean;import org.springframework.context.annotation.bean;import org.springframework.context.annotation.configuration;import org.springframework.jdbc.datasource.datasourcetransactionmanager;import org.springframework.scheduling.annotation.enablescheduling;import org.springframework.scheduling.annotation.scheduled;import org.springframework.transaction.platformtransactionmanager;import org.w3c.dom.nodelist;import org.w3c.dom.document;import org.w3c.dom.element;import org.w3c.dom.node; import javax.servlet.annotation.webinitparam;import javax.servlet.annotation.webservlet;import javax.sql.datasource;import javax.xml.parsers.documentbuilder;import javax.xml.parsers.documentbuilderfactory;import java.lang.reflect.field;import java.lang.reflect.method;import java.util.hashmap;import java.util.map;import java.io.file;import com.alibaba.druid.support.http.statviewservlet;/** * author: wangchao * version: * date: 2017/9/11 * description:数据源配置 * modification history: * date author version description * -------------------------------------------------------------- * why & what is modified: */ @configuration@enableschedulingpublic class datasourceconfig { /*@autowired private dbproperties properties;*/ @value("${datasource.filepath}") private string filepath;//数据源配置 @bean(name = "datasource") public datasource datasource() { //按照目标数据源名称和目标数据源对象的映射存放在map中 map<object, object> targetdatasources = new hashmap<>(); //查找xml数据连接字符串 targetdatasources=getdatamap(filepath); //动态获取dbproperties类申明的属性 /*field[] fields=properties.getclass().getdeclaredfields(); for(int i=0;i<fields.length;i++) { targetdatasources.put(fields[i].getname(), getfieldvaluebyname(fields[i].getname(),properties)); }*/ //采用是想abstractroutingdatasource的对象包装多数据源 dynamicdatasource datasource = new dynamicdatasource(); datasource.settargetdatasources(targetdatasources); //设置默认的数据源,当拿不到数据源时,使用此配置 //datasource.setdefaulttargetdatasource(properties.getuzaitravel()); return datasource; } @bean public platformtransactionmanager txmanager() { return new datasourcetransactionmanager(datasource()); } /** *获取数据源集合 */ private map<object, object> getdatamap(string fiepath) { try { map<object, object> targetdatasources = new hashmap<>(); file xmlfile = new file(fiepath); documentbuilderfactory builderfactory = documentbuilderfactory.newinstance(); documentbuilder builder = builderfactory.newdocumentbuilder(); document doc = builder.parse(xmlfile); doc.getdocumentelement().normalize(); system.out.println("root element: " + doc.getdocumentelement().getnodename()); nodelist nlist = doc.getelementsbytagname("db"); for(int i = 0 ; i<nlist.getlength();i++) { node node = nlist.item(i); element ele = (element)node; /*hikariconfig config = new hikariconfig(); config.setdriverclassname(ele.getelementsbytagname("driver-class").item(0).gettextcontent()); config.setjdbcurl(ele.getelementsbytagname("jdbc-url").item(0).gettextcontent()); config.setusername(ele.getelementsbytagname("username").item(0).gettextcontent()); config.setpassword(ele.getelementsbytagname("password").item(0).gettextcontent()); //config.adddatasourceproperty("password", ele.getelementsbytagname("password").item(0).gettextcontent()); hikaridatasource datasource = new hikaridatasource(config);*/ druiddatasource datasource = new druiddatasource(); datasource.setdriverclassname(ele.getelementsbytagname("driver-class").item(0).gettextcontent()); datasource.setusername(ele.getelementsbytagname("username").item(0).gettextcontent()); datasource.setpassword(ele.getelementsbytagname("password").item(0).gettextcontent()); datasource.seturl(ele.getelementsbytagname("jdbc-url").item(0).gettextcontent()); datasource.setinitialsize(5); datasource.setminidle(1); datasource.setmaxactive(10);// 启用监控统计功能 datasource.setfilters("stat");//设置是否显示sql语句 targetdatasources.put(ele.getelementsbytagname("databasename").item(0).gettextcontent(), datasource); } return targetdatasources; } catch (exception ex) { return null; } } //访问的ip @value("${druid.ip}") private string ip; //登录名 @value("${druid.druidlgoinname}") private string druidlgoinname; //密码 @value("${druid.druidlgoinpassword}") private string druidlgoinpassword; @bean public servletregistrationbean druidstatviewservle() { //org.springframework.boot.context.embedded.servletregistrationbean提供类的进行注册. servletregistrationbean servletregistrationbean = new servletregistrationbean(new statviewservlet(), "/druid/*"); //添加初始化参数:initparams //白名单: servletregistrationbean.addinitparameter("allow",ip); //ip黑名单 (存在共同时,deny优先于allow) : 如果满足deny的话提示:sorry, you are not permitted to view this page. // servletregistrationbean.addinitparameter("deny", "192.168.1.73"); //登录查看信息的账号密码. servletregistrationbean.addinitparameter("loginusername",druidlgoinname); servletregistrationbean.addinitparameter("loginpassword",druidlgoinpassword); //是否能够重置数据. servletregistrationbean.addinitparameter("resetenable","false"); return servletregistrationbean; } /** * 注册一个:filterregistrationbean * @return */ @bean public filterregistrationbean druidstatfilter2(){ filterregistrationbean filterregistrationbean = new filterregistrationbean(new webstatfilter()); //添加过滤规则. filterregistrationbean.addurlpatterns("/*"); //添加不需要忽略的格式信息. filterregistrationbean.addinitparameter("exclusions","*.js,*.gif,*.jpg,*.png,*.css,*.ico,/druid/*"); return filterregistrationbean; } } |
3.动态数据源,从之前已加载的数据源中选取,dynamicdatasource和dynamicdatasourceholder配合使用
|
1
2
3
4
5
6
7
8
9
10
11
12
13
14
15
16
17
18
19
20
21
22
23
24
25
26
27
|
public class dynamicdatasource extends abstractroutingdatasource{ //数据源路由,此方用于产生要选取的数据源逻辑名称 @override protected object determinecurrentlookupkey() { //从共享线程中获取数据源名称 return dynamicdatasourceholder.getdatasource(); }}public class dynamicdatasourceholder { /** * 本地线程共享对象 */ private static final threadlocal<string> thread_local = new threadlocal<>(); public static void putdatasource(string name) { thread_local.set(name); } public static string getdatasource() { return thread_local.get(); } public static void removedatasource() { thread_local.remove(); }} |
4.就是使用aop,在dao层切换数据源
|
1
2
3
4
5
6
7
8
9
10
11
12
13
14
15
16
17
18
19
20
21
22
23
24
25
26
27
28
29
30
31
32
33
34
35
36
|
@component@aspectpublic class datasourceaspect { //切换放在mapper接口的方法上,所以这里要配置aop切面的切入点 @pointcut("execution( * com.example.demo.dao.*.*(..))") public void datasourcepointcut() { } @before("datasourcepointcut()") public void before(joinpoint joinpoint) { object target = joinpoint.gettarget(); string method = joinpoint.getsignature().getname(); class<?>[] clazz = target.getclass().getinterfaces(); class<?>[] parametertypes = ((methodsignature) joinpoint.getsignature()).getmethod().getparametertypes(); try { method m = clazz[0].getmethod(method, parametertypes); //如果方法上存在切换数据源的注解,则根据注解内容进行数据源切换 if (m != null && m.isannotationpresent(targetdatasource.class)) { targetdatasource data = m.getannotation(targetdatasource.class); string datasourcename = data.value(); dynamicdatasourceholder.putdatasource(datasourcename); } else { } } catch (exception e) { } } //执行完切面后,将线程共享中的数据源名称清空 @after("datasourcepointcut()") public void after(joinpoint joinpoint){ dynamicdatasourceholder.removedatasource(); }} |
数据连接都配置在xml里面
xml路径在配置文件里面配置,这样适用读写分离和多个不同的数据源,而且多个项目可以共用这一个配置

最后引用注解,需要注意的是注解的数据库名称和xml里面databasename节点是一一对应的,可以随便自定义,比如读写是一个数据库名字,这时候就可以定义成pringtest_r表示读库

至此多数据源就配置完成,至于阿里的druid下次再分享,代码都贴出来,如果大家感觉还有哪些不足的地方,欢迎指正。
以上这篇spring boot+mybatis 多数据源切换(实例讲解)就是小编分享给大家的全部内容了,希望能给大家一个参考,也希望大家多多支持服务器之家。
原文链接:http://www.cnblogs.com/ok123/archive/2017/09/14/7523106.html


