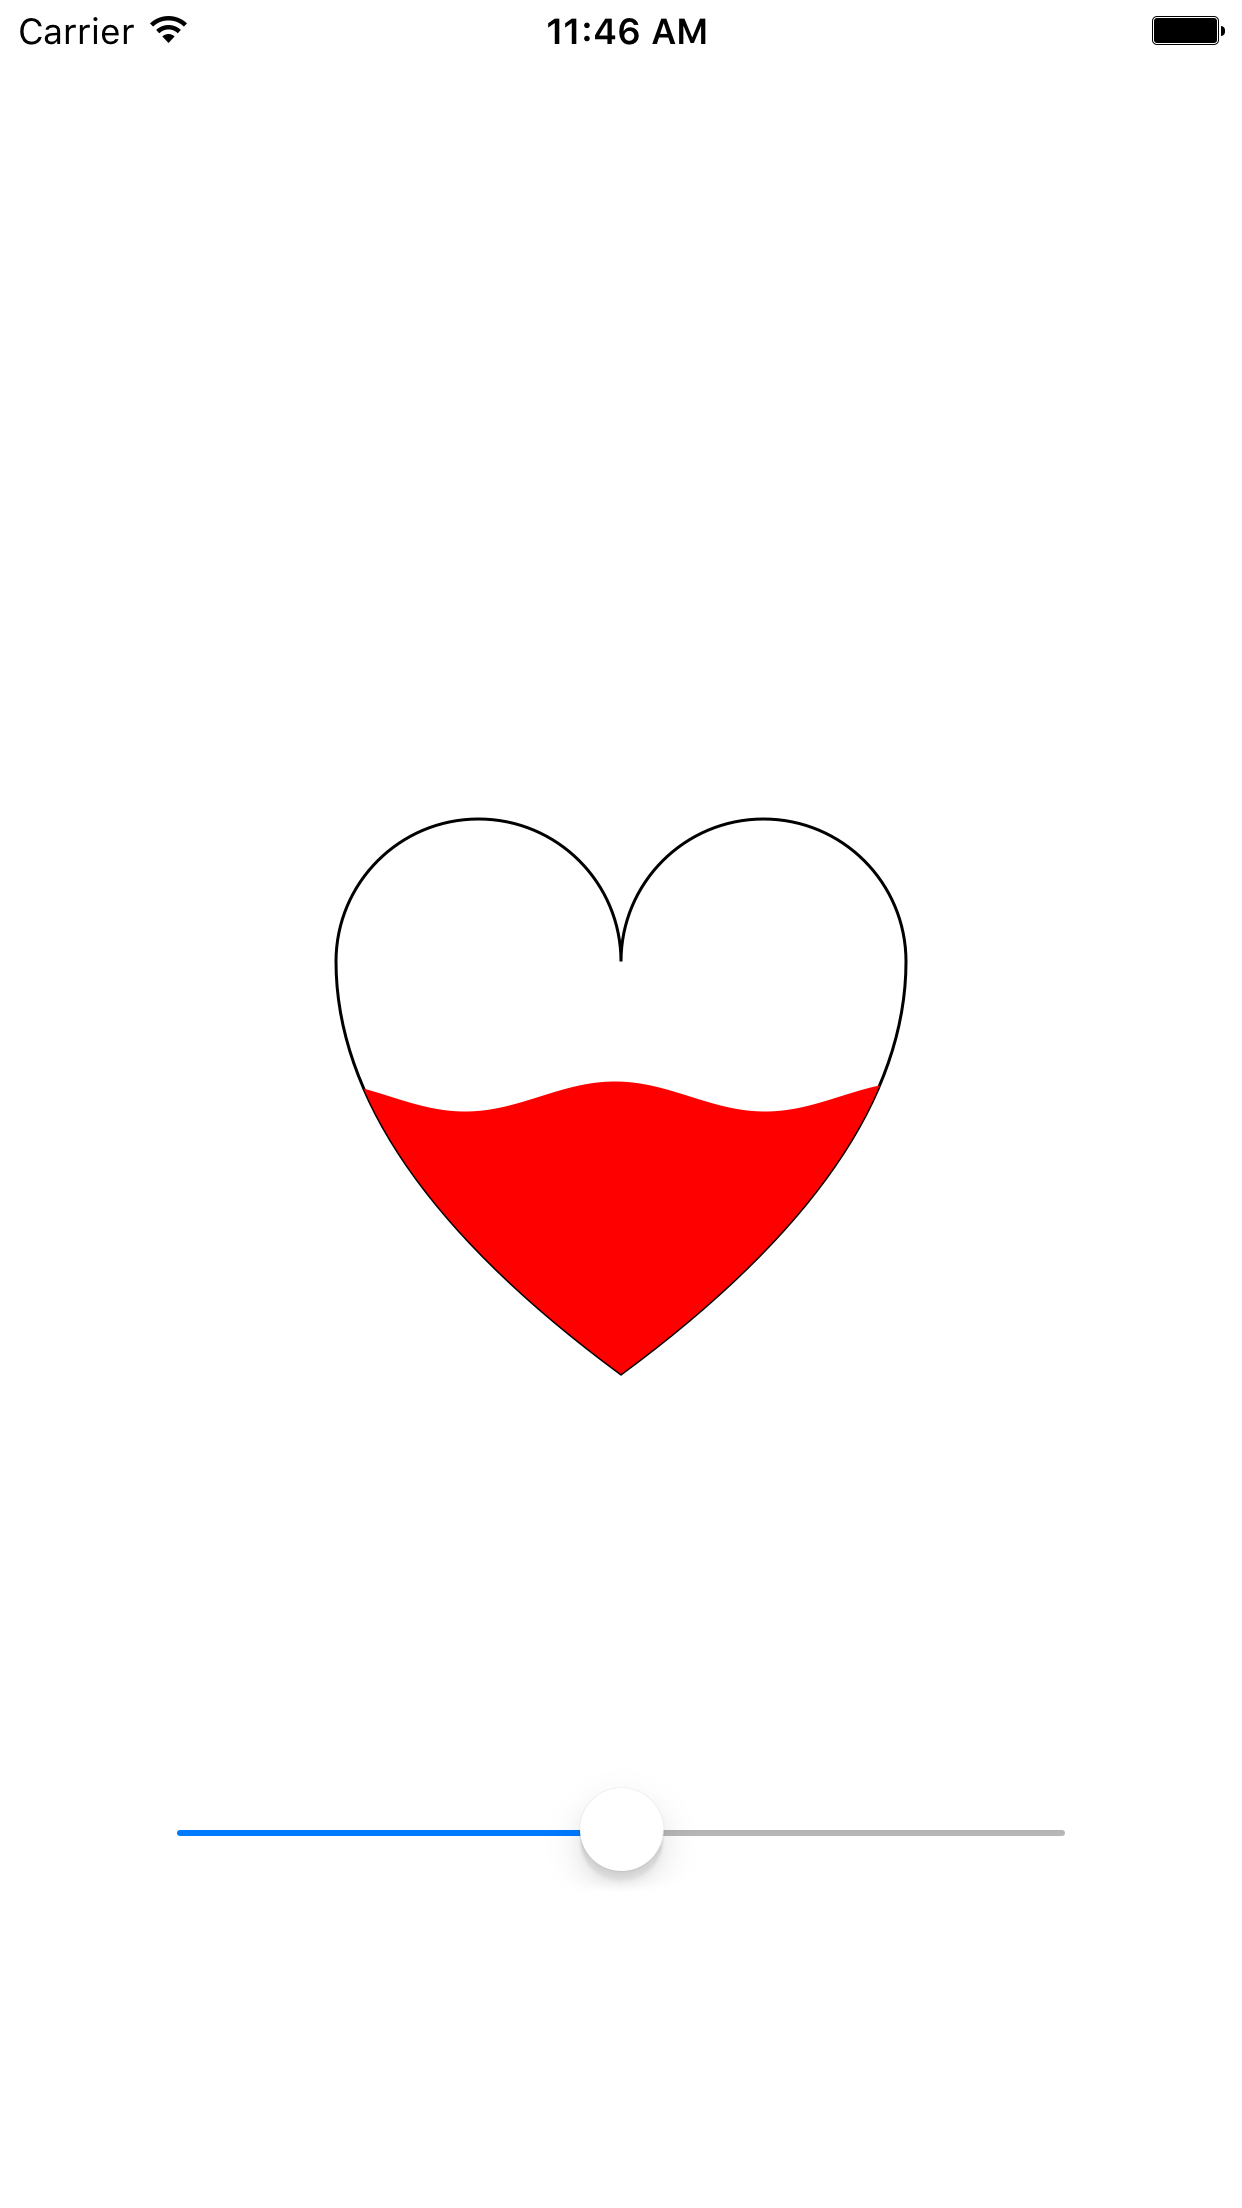
近来无事,想想it该怎样才能彰显浪漫情怀,不能口头上说说而已,最关键的是要有可视化的东西展示出来才行~
废话不多说,直接上demo
heartview.h
|
1
2
3
4
5
6
7
8
9
10
11
12
13
14
15
16
17
18
19
20
21
22
23
24
25
26
27
28
|
//// heartview.h// drawheart//// created by wql on 16/3/1.// copyright © 2016年 wql. all rights reserved.//#import <uikit/uikit.h>@interface heartview : uiview/** * 比率 */@property (nonatomic,assign) cgfloat rate;/** * 填充的颜色 */@property (nonatomic,strong) uicolor *fillcolor;/** * 线条的颜色 */@property (nonatomic,strong) uicolor *strokecolor;/** * 线条的宽度 */@property (nonatomic,assign) cgfloat linewidth;@end |
heartview.m文件:
|
1
2
3
4
5
6
7
8
9
10
11
12
13
14
15
16
17
18
19
20
21
22
23
24
25
26
27
28
29
30
31
32
33
34
35
36
37
38
39
40
41
42
43
44
45
46
47
48
49
50
51
52
53
54
55
56
57
58
59
60
61
62
63
64
65
66
67
68
69
70
71
72
73
74
75
76
77
78
79
80
81
82
83
84
85
86
87
88
89
90
91
92
93
94
95
96
97
98
99
100
101
102
103
104
105
106
107
108
109
110
111
112
113
114
115
116
117
118
119
120
121
122
123
124
125
126
127
128
129
130
131
132
133
134
135
136
137
138
139
140
141
142
143
144
145
146
147
148
149
150
151
|
//// heartview.m// drawheart//// created by wql on 16/3/1.// copyright © 2016年 wql. all rights reserved.//#import "heartview.h"//间距nsinteger const spacewidth = 5;//波浪的振幅nsinteger const waveamplitude = 5;@interface heartview (){ cgfloat t;}@end@implementation heartview- (instancetype)initwithframe:(cgrect)frame{ self = [super initwithframe:frame]; if (self) { [self loadtimer]; } return self;}- (void)drawrect:(cgrect)rect{ [super drawrect:rect]; //上面的两个半圆 半径为整个frame的四分之一 cgfloat radius = min((self.frame.size.width-spacewidth*2)/4, (self.frame.size.height-spacewidth*2)/4); //左侧圆心 位于左侧边距+半径宽度 cgpoint leftcenter = cgpointmake(spacewidth+radius, spacewidth+radius); //右侧圆心 位于左侧圆心的右侧 距离为两倍半径 cgpoint rightcenter = cgpointmake(spacewidth+radius*3, spacewidth+radius); //左侧半圆 uibezierpath *heartline = [uibezierpath bezierpathwitharccenter:leftcenter radius:radius startangle:m_pi endangle:0 clockwise:yes]; //右侧半圆 [heartline addarcwithcenter:rightcenter radius:radius startangle:m_pi endangle:0 clockwise:yes]; //曲线连接到新的底部顶点 为了弧线的效果,控制点,坐标x为总宽度减spacewidth,刚好可以相切,平滑过度 y可以根据需要进行调整,y越大,所画出来的线越接近内切圆弧 [heartline addquadcurvetopoint:cgpointmake((self.frame.size.width/2), self.frame.size.height-spacewidth*2) controlpoint:cgpointmake(self.frame.size.width-spacewidth, self.frame.size.height*0.6)]; //用曲线 底部的顶点连接到左侧半圆的左起点 为了弧线的效果,控制点,坐标x为spacewidth,刚好可以相切,平滑过度。y可以根据需要进行调整,y越大,所画出来的线越接近内切圆弧(效果是越胖) [heartline addquadcurvetopoint:cgpointmake(spacewidth, spacewidth+radius) controlpoint:cgpointmake(spacewidth, self.frame.size.height*0.6)]; //线条处理 [heartline setlinecapstyle:kcglinecapround]; //线宽 [self setheartlinewidthwithpath:heartline]; //线条的颜色 [self setheartstrokecolor]; //根据坐标点连线 [heartline stroke]; //cliptobounds 切掉多余的部分 [heartline addclip]; //初始化波浪的构成 uibezierpath *waves = [uibezierpath bezierpath]; //首先 把起始点设置为左侧 x坐标为spacewidth 心形从下往上填充,y坐标需要满足一定的函数关系式,当rate为0时,位置为总高度-2倍的留白距离(spacewidth)+波浪的振幅;当rate为1时,位置为留白距离(spacewidth)-振幅。由这两个状态构建函数表达式,即可得到如下表达式 cgpoint startpoint = cgpointmake(spacewidth, (self.frame.size.height-3*spacewidth+waveamplitude*2)*(1-self.rate)+spacewidth-waveamplitude); [waves movetopoint:startpoint]; //关键的地方来了 波浪线怎么画? //首先,x坐标是从左往右连续的 y坐标是起始的高度加上一定的波动 这里选择了cos函数。5是波动的幅度大小,50控制的是波峰的间距,t是为了让其动起来,随时间发生波动 for (int i = 0; i<self.frame.size.width-spacewidth*2+self.linewidth*2; i++) { //x是要考虑线宽的 不然的话,会导致填充的宽度不够 y就是在某个值附近波动 cgpoint middlepoint = cgpointmake(spacewidth+i-self.linewidth, startpoint.y+waveamplitude*cos(m_pi/50*i+t)); [waves addlinetopoint:middlepoint]; } //画波浪线的右端 到底部的垂直线 [waves addlinetopoint:cgpointmake(self.frame.size.width-spacewidth*2, self.frame.size.height-spacewidth*2)]; //画右侧底部的点 到达左侧底部的点之间的横线 [waves addlinetopoint:cgpointmake(spacewidth, self.frame.size.height-spacewidth*2)]; //设置填充颜色 [self setheartfillcolor]; //填充 [waves fill]; }//设置线条宽度 默认为1- (void)setheartlinewidthwithpath:(uibezierpath*)path{ cgfloat linew; if (self.linewidth) { linew = self.linewidth; }else{ linew = 1; } [path setlinewidth:linew];}//设置线条颜色- (void)setheartstrokecolor{ uicolor *strokcolor; if (self.strokecolor) { strokcolor = self.strokecolor; }else{ strokcolor = [uicolor blackcolor]; } [strokcolor set];}//设置填充的颜色- (void)setheartfillcolor{ uicolor *fillcolor; if (self.fillcolor) { fillcolor = self.fillcolor; }else{ fillcolor = [uicolor orangecolor]; } [fillcolor set];}//为了实现动态的效果,加一个timer- (void)loadtimer{ nstimer *timer = [nstimer scheduledtimerwithtimeinterval:0.02 target:self selector:@selector(timeraction) userinfo:nil repeats:yes]; [timer fire];}//t 是一个影响波浪线的参数,每次修改之,再画,则每次的都不一样,则有动态的效果- (void)timeraction{ t += m_pi/50; if (t == m_pi) { t = 0; } //修改了t之后 要调用draw方法 [self setneedsdisplay];}@end一些关键点,我已经注释啦~ |
下面就是看看怎么使用这个视图了:
viewcontroller.m中:
|
1
2
3
4
5
6
7
8
9
10
11
12
13
14
15
16
17
18
19
20
21
22
23
24
25
26
27
28
29
30
31
32
33
34
35
36
37
38
39
40
41
42
43
44
45
46
47
48
49
50
51
52
53
54
55
56
57
58
|
//// viewcontroller.m// drawheart//// created by wql on 16/3/1.// copyright © 2016年 wql. all rights reserved.//#import "viewcontroller.h"#import "heartview.h"nsinteger const heartwidth = 200;nsinteger const heartheight = 200;@interface viewcontroller (){ heartview *heartview;}@end@implementation viewcontroller- (void)viewdidload { [super viewdidload]; heartview = [[heartview alloc]initwithframe:cgrectmake((self.view.frame.size.width-heartwidth)/2, (self.view.frame.size.height-heartheight)/2, heartwidth, heartheight)]; heartview.rate = 0.5; heartview.linewidth = 1; heartview.strokecolor = [uicolor blackcolor]; heartview.fillcolor = [uicolor redcolor]; heartview.backgroundcolor = [uicolor clearcolor]; [self.view addsubview:heartview]; [self loadslider];}- (void)loadslider{ uislider *valueslider = [[uislider alloc]initwithframe:cgrectmake((self.view.frame.size.width-300)/2, self.view.frame.size.height-150, 300, 50)]; valueslider.minimumvalue = 0.0; valueslider.maximumvalue = 1.0; valueslider.value = 0.5; [valueslider addtarget:self action:@selector(valuechangedaction:) forcontrolevents:uicontroleventvaluechanged]; [self.view addsubview:valueslider];}- (void)valuechangedaction:(uislider*)slider{ heartview.rate = slider.value;}- (void)didreceivememorywarning { [super didreceivememorywarning]; // dispose of any resources that can be recreated.}@end |
这里我添加了一个slider,为了实现随意设置爱心填充的rate。
哈,下面就是看看效果了:

以上就是本文的全部内容,希望对大家的学习有所帮助,快点制作属于自己浪漫爱心送给自己吧。


