环境准备:
vmware+centos,jdk
一、校验系统磁盘大小
1.命令 df -h
保证可用磁盘大小15gb(包括oracle安装时需要空间7.5gb + oracle安装zip包接近3g+安装包解压文件3g)

如果磁盘不满足,安装会失败,需要扩容!
二、安装准备
1.创建运行oracle数据库的系统用户和用户组
|
1
2
3
|
groupadd oinstallgroupadd dbauseradd -g oinstall -g dba -m oracle |
passwd oracle #不用管提示,连续输入两次密码就可成功

2.创建oracle数据库安装目录,并将目录赋权给oracle用户
|
1
2
3
4
5
|
mkdir -p /opt/oracle/database #oracle安装包解压的文件mkdir -p /opt/oracle/product/orainventory #mkdir -p /opt/oracle/product/12.2.0/db_1 #oracle安装目录chown -r oracle:oinstall /opt/oracle #更改oracle目录的属主chmod 755 -r /opt/oracle #更改oracle目录的权限 |

3.安装oracle数据库依赖的软件包
3.1.安装
|
1
|
yum -y install binutils compat-libstdc++-33 elfutils-libelf elfutils-libelf-devel glibc glibc-common glibc-devel gcc gcc-c++ libaio-devel libaio libgcc libstdc++ libstdc++-devel make sysstat unixodbc unixodbc-devel pdksh numactl-devel glibc-headers |
3.2.查看是否安装成功
|
1
|
rpm -q \binutils \compat-libstdc++-33 \elfutils-libelf \elfutils-libelf-devel \expat \gcc \gcc-c++ \glibc \glibc-common \glibc-devel \glibc-headers \libaio \libaio-devel \libgcc \libstdc++ \libstdc++-devel \make \pdksh \sysstat \unixodbc \unixodbc-devel | grep "not installed" |

4.关闭selinux,需要重启生效(可以在最后安装oracle之前再重启) vim /etc/selinux/config

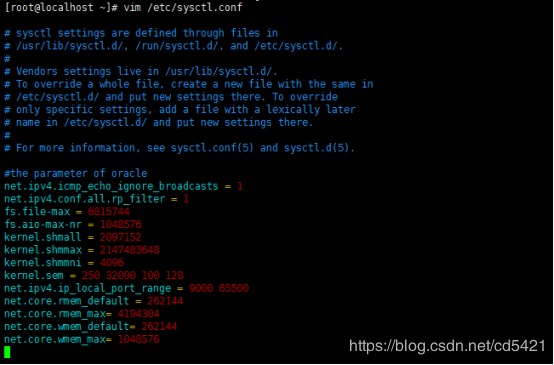
5.修改内核参数 vim /etc/sysctl.conf
添加如下内容:
net.ipv4.icmp_echo_ignore_broadcasts = 1
net.ipv4.conf.all.rp_filter = 1
fs.file-max = 6815744
fs.aio-max-nr = 1048576
kernel.shmall = 2097152
kernel.shmmax = 2147483648
kernel.shmmni = 4096
kernel.sem = 250 32000 100 128
net.ipv4.ip_local_port_range = 9000 65500
net.core.rmem_default = 262144
net.core.rmem_max= 4194304
net.core.wmem_default= 262144
net.core.wmem_max= 1048576
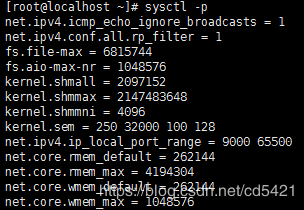
sysctl -p #使配置生效
6.对oracle用户设置限制,提高系统运行性能
vim /etc/security/limits.conf
添加如下内容:
|
1
2
3
4
|
oracle soft nproc 2047oracle hard nproc 16384oracle soft nofile 1024oracle hard nofile 65536 |

7.配置用户环境变量
vim /home/oracle/.bash_profile
添加如下内容:
export oracle_base=/opt/oracle
export oracle_home=$oracle_base/product/12.2.0/db_1
export oracle_sid=orcl
export oracle_term=xterm
export path=$oracle_home/bin:/usr/sbin:$path
export ld_library_path=$oracle_home/lib:/lib:/usr/lib
export lang=c
export nls_lang=american_america.zhs16gbk

source /home/oracle/.bash_profile #使配置失效
8.解压oracle安装文件的压缩包,在/opt/oracle/目录下解压
unzip 文件名(unzip不存在,可用命令进行安装: yum install unzip)加压较慢,需要等会

9.配置应答文件
vim /opt/oracle/database/response/db_install.rsp
10.配置orainventory目录位置
存放oracle软件安装的目录信息,oracle的安装和升级都需要用到这个目录(最好放在oracle_base对应的目录下边)
vim /etc/orainst.loc
添加或修改成如下内容:
inventory_loc=/opt/oracle/product/orainventory
inst_group=oinstall

11.重启centos,reboot
12.关闭防火墙,systemctl stop firewalld
三、静默安装oracle12
1.已oracle用户登陆linux系统
2.静默安装
|
1
|
/opt/oracle/database/runinstaller -silent -force -ignoreprereq -responsefile /opt/oracle/database/response/db_install.rsp |
执行过程需要等待几分钟。

可监控日志:
|
1
2
|
tail -f/opt/oracle/product/orainventory/logs/installactions2018-11-22_11-04-03am.log |

3.切换root用户登陆
4.执行两个sh文件
4.1. sh /opt/oracle/product/orainventory/orainstroot.sh

如果目录下没有改脚本,可以新建一个,脚本内容为:
|
1
2
3
4
5
6
7
8
9
10
11
12
13
14
15
16
17
18
19
20
21
22
23
24
25
26
27
28
29
30
31
32
33
34
35
36
37
38
39
40
41
42
43
44
45
46
47
48
49
50
51
52
53
54
55
56
57
58
59
60
61
62
63
64
65
66
67
68
69
70
71
72
73
74
75
76
77
78
79
80
81
82
83
84
85
86
87
88
89
90
91
92
93
94
95
96
97
98
99
100
101
102
103
104
105
106
107
108
109
110
111
112
113
|
# cat /oracle/orainventory/orainstroot.sh#!/bin/shawk=/bin/awkchmod=/bin/chmodchgrp=/bin/chgrpcp=/bin/cpecho=/bin/echomkdir=/bin/mkdirruid=`/usr/bin/id|$awk -f ′ print$2 ′ |$awk−f ′print$2′|$awk−f '{print $2}'|$awk -f '{print $1}'`if [ ${ruid} != "root" ];then $echo "this script must be executed as root" exit 1fiif [ -d "/etc" ]; then$chmod 755 /etc;else$mkdir -p /etc;fiif [ -f "/oracle/orainventory/orainst.loc" ]; then$cp /oracle/orainventory/orainst.loc /etc/orainst.loc;$chmod 644 /etc/orainst.locelseinvptr=/etc/orainst.locinvloc=/oracle/orainventorygrp=oinstallptrdir="`dirname $invptr`";# create the software inventory location pointer fileif [ ! -d "$ptrdir" ]; then $mkdir -p $ptrdir;fi$echo "creating the oracle inventory pointer file ($invptr)";$echo inventory_loc=$invloc > $invptr$echo inst_group=$grp >> $invptrchmod 644 $invptr# create the inventory directory if it doesn't existif [ ! -d "$invloc" ];then $echo "creating the oracle inventory directory ($invloc)"; $mkdir -p $invloc;fifi$echo "changing permissions of /oracle/orainventory.adding read,write permissions for group.removing read,write,execute permissions for world.";$chmod -r g+rw,o-rwx /oracle/orainventory;if [ $? != 0 ]; then $echo "oui-35086:warning: chmod of /oracle/orainventoryadding read,write permissions for group.,removing read,write,execute permissions for world. failed!";fi$echo "changing groupname of /oracle/orainventory to oinstall.";$chgrp -r oinstall /oracle/orainventory;if [ $? != 0 ]; then $echo "oui-10057:warning: chgrp of /oracle/orainventory to oinstall failed!";fi$echo "the execution of the script is complete." |
4.2. sh /opt/oracle/product/12.2.0/db_1/root.sh

5.切换oracle用户登陆
6.安装监听
$oracle_home/bin/netca /silent /responsefile /opt/oracle/database/response/netca.rsp

7.启动监听程序
lsnrctl start

8.查看监听状态
lsnrctl status

9.通过dbca创建数据库
/opt/oracle/product/12.2.0/db_1/bin/dbca -silent -createdatabase -templatename general_purpose.dbc -gdbname orcl -sid orcl -responsefile no_value -characterset zhs16gbk -memorypercentage 30 -emconfiguration local
(删除:dbca -silent -deletedatabase -sourcedb orcl -sid orcl)
10.启动实例(创建完,一般会自动启动)
|
1
2
3
|
sqlplus / as sysdbasql> startupsql> select instance_name,version from v$instance; |
查看数据库文件dbf
sql> select name from v$datafile;
总结
以上所述是小编给大家介绍的vmware下centos静默安装oracle12.2详细图文教程,希望对大家有所帮助,如果大家有任何疑问请给我留言,小编会及时回复大家的。在此也非常感谢大家对服务器之家网站的支持!
原文链接:https://blog.csdn.net/cd5421/article/details/84341237

