一、MySQL安装包下载
官网地址:https://dev.mysql.com/downloads/mysql/
下载步骤:
过滤操作系统版本
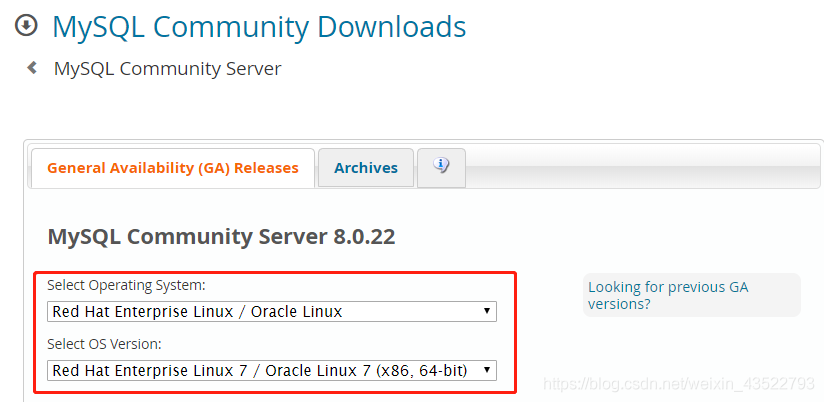
选择归档安装包
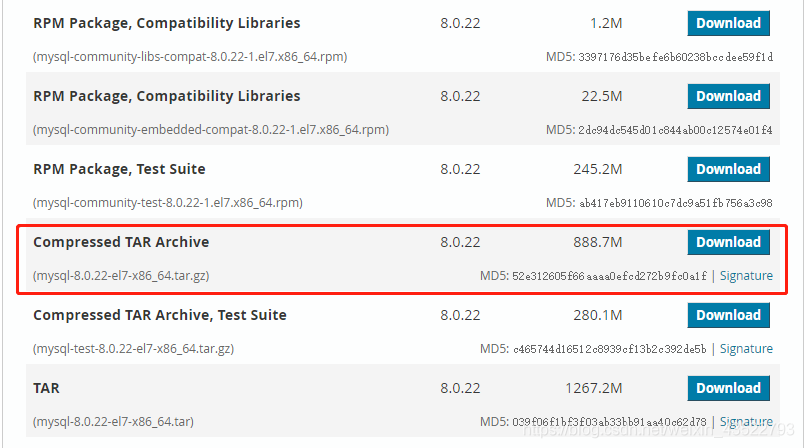
下载后,上传并md5校验安装包是否与上图官方提供的值一致,确保传输过程安装包无损害
|
1
2
3
|
[root@MyDB1 ~]# cd /usr/local/software/[root@MyDB1 software]# md5sum mysql-8.0.22-el7-x86_64.tar.gz 52e312605f66aaaa0efcd272b9fc0a1f mysql-8.0.22-el7-x86_64.tar.gz |
解压安装包
|
1
2
|
[root@MyDB1 software]# tar -zxvf mysql-8.0.22-el7-x86_64.tar.gz[root@MyDB1 software]# ln -s mysql-8.0.22-el7-x86_64/ mysql #创建链接,方便操作 |
二、MySQL卸载说明
- 只有rpm安装方式是需要卸载旧版本的mysql,二进制安装和编译安装不需要,但是要注意端口冲突
- rpm若不卸载旧版本,在安装时,它会提示你mysql已安装,此时是无法再次安装的,只有通过yum更新版本
- 为了保证后续操作不会产生其他冲突,我们卸载原有的mysql
注:在卸载旧的MySQL之前,注意备份数据
|
1
2
3
|
[root@MyDB1 ~]# rpm -qa|grep mysql #查看是否已安装mysql数据库[root@MyDB1 ~]# rpm -qa|grep mysql|xargs rpm -e --nodeps #卸载mysql [root@MyDB1 software]# rpm -qa|grep mariadb-libs|xargs rpm -e --nodeps #卸载mariadb |
三、创建用户和组
新建组和用户
|
1
2
3
4
5
6
|
[root@MyDB1 ~]# groupadd -g 2000 mysql[root@MyDB1 ~]# useradd -u 2000 -g mysql -c "MySQL Server" -s /sbin/nologin mysql[root@MyDB1 ~]# cat /etc/group|grep mysqlmysql:x:2000:[root@MyDB1 ~]# cat /etc/passwd|grep mysqlmysql:x:2000:2000:Mysql software:/home/mysql:/sbin/nologin |
注:若组和用户已存在,则删除系统默认组和用户,再次创建!
删除组和用户
|
1
|
[root@MyDB1 ~]# userdel mysql #删除用户同时会删除相应的组 |
赋权给mysql路径
|
1
2
|
[root@MyDB1 ~]# cd /usr/local/software/[root@MyDB1 software]# chown -R mysql:mysql mysql* |
初始化之前的目录结构

注:此时是没有data目录
四、MySQL初始化
初始化之前先编辑好配置文件
|
1
2
3
4
5
6
7
8
9
10
11
12
13
14
15
16
17
18
19
20
21
22
23
|
[root@MyDB1 ~]# vi /etc/my.cnf[root@MyDB1 ~]# cat /etc/my.cnf内容如下:(其他的根据实际需求配置)[mysqld]basedir = /usr/local/software/mysqldatadir = /usr/local/software/mysql/datalog_error = /usr/local/software/mysql/mysql-error.logport = 3306socket = /usr/local/software/mysql/mysqld.sockpid_file = /usr/local/software/mysql/mysqld.pidcharacter-set-server=utf8lower_case_table_names=1max_connections=1000sql_mode='STRICT_TRANS_TABLES,NO_ZERO_IN_DATE,NO_ZERO_DATE,ERROR_FOR_DIVISION_BY_ZERO,NO_ENGINE_SUBSTITUTION'[mysql]default-character-set=utf8[client]default-character-set=utf8 |
初始化开始
|
1
|
[root@MyDB1 ~]# /usr/local/software/mysql/bin/mysqld --initialize --user=mysql --basedir=/usr/local/software/mysql --datadir=/usr/local/software/mysql/data |
初始化过程,输出日志文件中有root用户的临时密码

初始化之后的目录结构

五、MySQL启动服务
方式1——init.d: 启动服务
|
1
2
|
[root@MyDB1 ~]# cp /usr/local/software/mysql/support-files/mysql.server /etc/init.d/mysqld[root@MyDB1 ~]# /etc/init.d/mysqld start |
验证服务
|
1
|
[root@MyDB1 ~]# ps -ef|grep mysql |

解释说明
图中有两个进程,一个主进程,一个守护进程。当mysql意外停止时,守护进程会自动重启mysql服务
演示demo
|
1
|
[root@MyDB1 ~]# kill -9 75341 #直接杀死进程 |

方式2——systemctl: 编辑启动配置文件
|
1
2
3
4
5
6
7
8
9
10
11
12
13
14
15
16
17
18
|
[root@MyDB1 subsys]# vi /etc/systemd/system/mysqld.service内容如下:(缺点:当kill掉时,无法自动启动恢复)[Unit]Description=MySQL ServerDocumentation=man:mysqld(8)Documentation=http://dev.mysql.com/doc/refman/en/using-systemd.htmlDocumentation=https://www.freedesktop.org/software/systemd/man/systemd.unit.htmlAfter=network.targetAfter=syslog.target[Install]WantedBy=multi-user.target[Service]User=mysqlGroup=mysqlLimitNOFILE = 5000ExecStart=/usr/local/software/mysql/bin/mysqld --defaults-file=/etc/my.cnf |
启动服务
|
1
2
|
[root@MyDB1 ~]# systemctl start mysqld.service[root@MyDB1 ~]# systemctl status mysqld.service |
六、安全效率优化
启动权限限制
|
1
2
3
4
5
|
[root@MyDB1 ~]# cd /usr/local/software/mysql/bin/[root@MyDB1 bin]# chmod 700 mysqld mysqld_safe [root@MyDB1 bin]# ll mysqld mysqld_safe -rwx------. 1 mysql mysql 441010738 Sep 24 03:42 mysqld-rwx------. 1 mysql mysql 29157 Sep 24 03:18 mysqld_safe |
注:现在只要root用户才能够启动停止MySQL服务!
服务随系统启动
|
1
2
|
systemctl enable mysqld.servicesystemctl list-unit-files|grep mysql |
七、配置环境变量
|
1
2
3
4
5
6
7
|
[root@MyDB1 ~]# vi /etc/profile追加内容如下:MYSQL_HOME=/usr/local/software/mysqlexport PATH=.:$PATH:$MYSQL_HOME/bin[root@MyDB1 ~]# source /etc/profile #重新加载,生效! |
八、修改root初始密码
创建socket链接
|
1
|
[root@MyDB1 ~]# ln -s /usr/local/software/mysql/mysqld.sock /tmp/mysql.sock |
使用临时密码登录
|
1
2
3
4
5
6
7
8
9
10
11
12
13
14
15
|
[root@MyDB1 ~]# mysql -uroot -pEnter password: Welcome to the MySQL monitor. Commands end with ; or \g.Your MySQL connection id is 10Server version: 8.0.22Copyright (c) 2000, 2020, Oracle and/or its affiliates. All rights reserved.Oracle is a registered trademark of Oracle Corporation and/or itsaffiliates. Other names may be trademarks of their respectiveowners.Type 'help;' or '\h' for help. Type '\c' to clear the current input statement.mysql> |
注:当临时密码含有特使符号时,可能命令行输入会产生歧义。此时,交互时输入密码即可!
修改root密码
|
1
2
3
4
5
|
mysql> alter user root@'localhost' identified by 'MyDB12@com';Query OK, 0 rows affected (0.00 sec)mysql> flush privileges;Query OK, 0 rows affected (0.00 sec) |
注:MySQL8密码必须符合一定复杂度,否则无法修改;退出当前会话后,重启登录生效!
九、配置mysql远程登录
- 关闭防火墙或开放MySQL端口
- 查看允许访问MySQL的用户和地址
|
1
2
3
4
5
6
7
8
9
10
|
mysql> select user,host from mysql.user;+------------------+-----------+| user | host |+------------------+-----------+| mysql.infoschema | localhost || mysql.session | localhost || mysql.sys | localhost || root | localhost |+------------------+-----------+4 rows in set (0.00 sec) |
遇到的问题
|
1
2
3
|
mysql> grant all privileges on *.* to root@'%' identified by 'MyDB12@com';ERROR 1064 (42000): You have an error in your SQL syntax; check the manual that corresponds to your MySQL server version for the right syntax to use near 'identified by 'MyDB12@com'' at line 1 |
注:该错误并不是语法错误,是因为mysql该版本不支持直接创建用户和赋权,而需要分别实现
创建远程登录用户
|
1
2
|
mysql> create user 'root'@'%' identified by 'MyDB12@com';Query OK, 0 rows affected (0.01 sec) |
赋权
|
1
2
3
4
5
|
mysql> grant all privileges on *.* to 'root'@'%';Query OK, 0 rows affected (0.01 sec)mysql> flush privileges;Query OK, 0 rows affected (0.01 sec) |
到此这篇关于Redhat7.3安装MySQL8.0.22(二进制安装)的文章就介绍到这了,更多相关Redhat7.3安装MySQL8.0.22内容请搜索服务器之家以前的文章或继续浏览下面的相关文章希望大家以后多多支持服务器之家!
原文链接:https://blog.csdn.net/weixin_43522793/article/details/112524460

