一、前言
用java开发企业应用软件, 经常会采用spring+mybatis+mysql搭建数据库框架。如果数据量很大,一个mysql库存储数据访问效率很低,往往会采用分库存储管理的方式。本文讲述如何通过spring+mybatis构建多数据库访问的架构,并采用多线程提升数据库的访问效率。
需要说明一下,这种方式只适合数据库数量、名称固定,且不是特别多的情况。针对数据库数量不固定的情况,后面再写一篇处理方案。
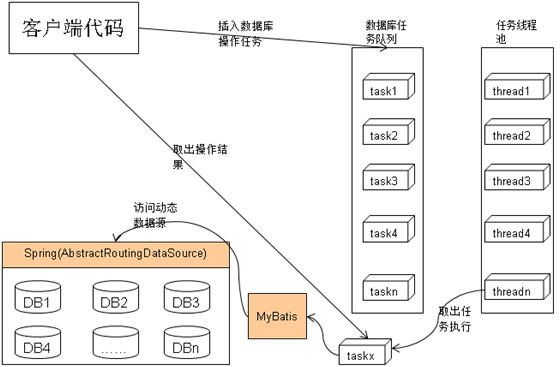
二、整体方案
三、开发环境准备
3.1 下载spring、mybatis、mysql组件。
3.2 eclipse:java开发ide。引入如下jar包:
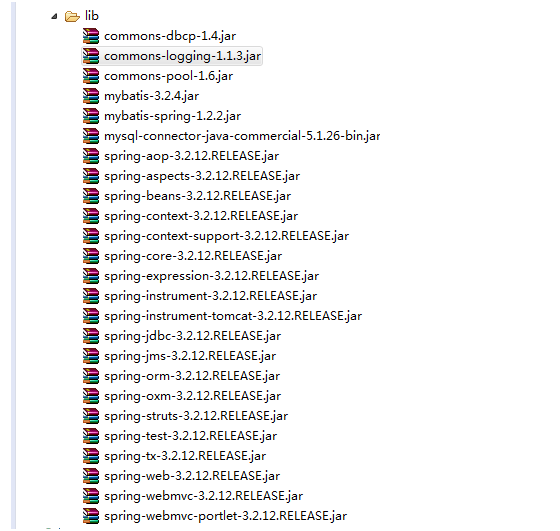
代码结构如下:
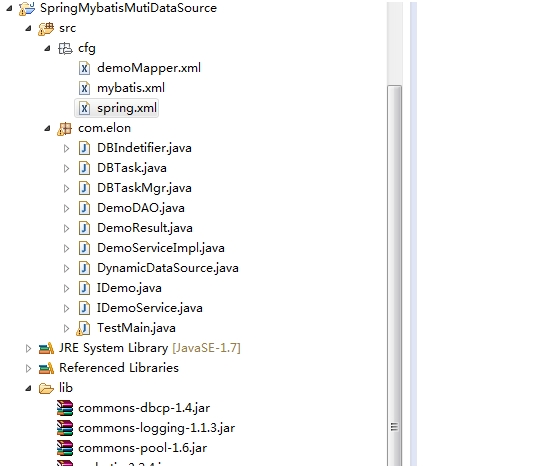
四、构建数据库集群
在mysql中创建11个数据库(test1/2/3/4/5/6/7/8/9/10/11)创建一个简单的表:
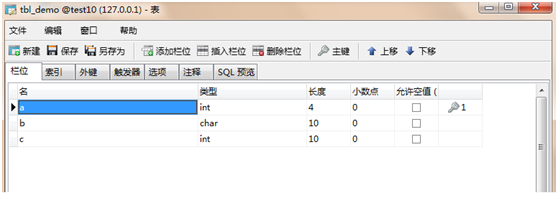
在test1的tbl_demo表中插入5千万条数据,其它10个数据库的tbl_demo表中分别插入5百万条数据(用函数)。
在test1的tbl_demo表中插入5千万条数据,其它10个数据库的tbl_demo表中分别插入5百万条数据(用函数)。
五、创建mybatis数据库映射接口
|
1
2
3
4
5
6
7
8
9
10
11
12
13
14
15
16
17
18
19
20
21
22
23
24
25
26
27
28
29
30
31
32
33
34
35
36
37
38
39
40
41
42
43
44
45
46
47
48
|
/** * mybatis 映射接口 * * * @author elon * @version 1.0, 2015年10月23日 */public interface idemo { public void insertdemo(demodao demo); public list<integer> selectgroup();}/** * * mybatis 映射服务接口 * * @author elon * @version 1.0, 2015年10月23日 */public interface idemoservice{ public void insertdemo(demodao demo); public list<integer> selectgroup();}/** * * mybatis 映射服务实现 * * @author elon * @version 1.0, 2015年10月23日 */public class demoserviceimpl implements idemoservice{ private idemo idemo = null; public void setidemo(idemo idemo) { this.idemo = idemo; } @override public void insertdemo(demodao demo) { idemo.insertdemo(demo); } @override public list<integer> selectgroup() { return idemo.selectgroup(); }} |
六、创建数据库标识管理和动态数据源
|
1
2
3
4
5
6
7
8
9
10
11
12
13
14
15
16
17
18
19
20
21
22
23
24
25
26
27
28
29
30
31
32
33
34
|
/** * * 保存数据库标识。每个线程由独立的对象存储 * * @author elon * @version 1.0, 2015年10月23日 */public class dbindetifier{ private static threadlocal<string> dbkey = new threadlocal<string>(); public static void setdbkey(final string dbkeypara) { dbkey.set(dbkeypara); } public static string getdbkey() { return dbkey.get(); }}/** * * 动态数据源。可根据不同的数据索引连接不同的数据库 * * @author elon * @version 1.0, 2015年10月23日 */public class dynamicdatasource extends abstractroutingdatasource{ @override public object determinecurrentlookupkey() { return dbindetifier.getdbkey(); }} |
七、创建数据库访问对象
|
1
2
3
4
5
6
7
8
9
10
11
12
13
14
15
16
17
18
19
20
21
22
23
24
25
26
27
28
29
30
31
32
33
34
35
36
37
38
39
40
41
42
43
44
45
46
47
48
49
50
51
52
53
54
55
56
57
58
59
60
61
62
63
64
65
66
|
/** * * 数据库访问对象。用于插入数据。 * * @author elon * @version 1.0, 2015年10月23日 */public class demodao{ private int a; private string b; private int c; public int geta() { return a; } public void seta(int a) { this.a = a; } public string getb() { return b; } public void setb(string b) { this.b = b; } public int getc() { return c; } public void setc(int c) { this.c = c; }}/** * * 映射结果定义 * * @author elon * @version 1.0, 2015年10月23日 */public class demoresult implements serializable{ /** * comment for <code>serialversionuid</code><br> * */ private static final long serialversionuid = -413001138792531448l; private long sum; public long getsum() { return sum; } public void setsum(long sum) { this.sum = sum; } @override public string tostring() { return string.valueof(sum); }} |
八、创建数据库访问任务
|
1
2
3
4
5
6
7
8
9
10
11
12
13
14
15
16
17
18
19
20
21
22
23
24
25
26
27
28
29
30
31
32
33
34
35
36
37
38
39
40
41
42
43
44
45
46
47
48
49
50
51
52
53
54
55
56
57
58
59
60
61
62
63
64
65
66
67
68
69
70
71
72
73
74
75
76
77
78
79
80
81
82
83
84
85
86
87
88
89
90
91
92
93
94
95
96
97
98
99
100
101
|
/** * 数据库访问任务定义。将每一个对数据库访问的请求包装为一个任务对象,放到任务管理中, * 然后等待任务执行完成,取出执行结果。 * * @author elon * @version 1.0, 2015年10月23日 */public class dbtask implements runnable{ // 操作数据库标识,用于指定访问的数据库。与spring配置文件中的数据动态数据源定义一致。 private final string dbkey; // mybatis数据库访问对象 private final object dbaccessobject; // mysbatis数据库访问方法名称,用于反射调用 private final string methodname; // 存储可变参数的值 private final object[] paraarray; // 存储可变参数类型 @suppresswarnings("rawtypes") private final class[] paraclassarray; // 数据库操作结果。查询操作返回查询结果; 插入、删除、修改操作返回null。 private object operateresult; // 操作数据库抛出的异常信息 private exception exception; // 标识任务是否已经执行 private boolean finish; /** * 构造函数 * @param dbkey 数据库标识 * @param dbaccessobject 数据库访问对象 * @param methodname 数据库访问方法名称 * @param paraarray 参数列表 */ public dbtask(final string dbkey, final object dbaccessobject, final string methodname, final object... paraarray) { this.dbkey = dbkey; this.dbaccessobject = dbaccessobject; this.methodname = methodname; this.paraarray = paraarray; finish = false; exception = null; paraclassarray = new class[paraarray.length]; for (int index = 0; index < paraarray.length; ++index) { paraclassarray[index] = paraarray[index].getclass(); } operateresult = null; } /** * * 任务执行函数 * */ @override public void run() { try { dbindetifier.setdbkey(dbkey); method method = dbaccessobject.getclass().getmethod(methodname, paraclassarray); // 查询操作返回查询结果; 插入、删除、修改操作返回null operateresult = method.invoke(dbaccessobject, paraarray); } catch (exception e) { exception = e; e.printstacktrace(); } finish = true; } /** * * 返回操作结果。查询操作返回查询结果; 插入、删除、修改操作返回null * * @return 操作结果 */ public object getretvalue() { return operateresult; } /** * 抛出数据库操作异常 * * @return 异常 */ public exception getexception() { return exception; } /** * * 返回任务是否已执行 * * @return 标记 */ public boolean isfinish() { return finish; }} |
九、创建数据库任务管理器
|
1
2
3
4
5
6
7
8
9
10
11
12
13
14
15
16
17
18
19
20
21
22
23
24
25
26
27
28
29
|
/** * 数据库访问任务管理。将数据库访问任务放到线程池中执行。 * * * @author elon * @version 1.0, 2015年10月23日 */public class dbtaskmgr{ private static class dbtaskmgrinstance { public static final dbtaskmgr instance = new dbtaskmgr(); } public static dbtaskmgr instance() { return dbtaskmgrinstance.instance; } private threadpoolexecutor pool; public dbtaskmgr() { pool = new threadpoolexecutor(10, 50, 60, timeunit.seconds, new arrayblockingqueue<runnable>(10000), new threadpoolexecutor.callerrunspolicy()); } public void excute(runnable task) { pool.execute(task); }} |
十、创建mybatis配置文件
10.1 mybatis.xml
|
1
2
3
4
5
6
7
8
|
<?xml version="1.0" encoding="utf-8" ?><!doctype configuration public "-//mybatis.org//dtd config 3.0//en""http://mybatis.org/dtd/mybatis-3-config.dtd"><configuration> <mappers> <mapper resource="cfg/demomapper.xml"/> </mappers></configuration> |
10.2 demomapper.xml
|
1
2
3
4
5
6
7
8
9
10
11
12
13
|
<?xml version="1.0" encoding="utf-8" ?> <!doctype mapper public "-//mybatis.org//dtd mapper 3.0//en" "http://mybatis.org/dtd/mybatis-3-mapper.dtd"> <mapper namespace="com.elon.idemo"> <insert id="insertdemo" parametertype="com.elon.demodao"> insert into tbl_demo(a, b, c) values(#{a}, #{b}, #{c}); </insert> <resultmap id="demoresult" type="com.elon.demoresult"> <id property="sum" column="sumcolum"/> </resultmap> <select id="selectgroup" resultmap="demoresult"> select sum(a) as sumcolum from tbl_demo group by c; </select></mapper> |
十一、创建spring配置文件
11.1 spring.xml
|
1
2
3
4
5
6
7
8
9
10
11
12
13
14
15
16
17
18
19
20
21
22
23
24
25
26
27
28
29
30
31
32
33
34
35
36
37
38
39
40
41
42
43
44
45
46
47
48
49
50
51
52
53
54
55
56
57
58
59
60
61
62
63
64
65
66
67
68
69
70
71
72
73
74
75
76
77
78
79
80
81
82
83
84
85
86
87
88
89
90
91
92
93
94
95
96
97
98
99
100
101
102
103
104
105
106
107
108
109
110
111
112
113
114
115
116
117
118
119
120
121
122
123
124
125
126
127
128
129
130
131
132
133
134
135
136
137
138
139
140
141
142
143
|
<?xml version="1.0" encoding="utf-8"?><beans xmlns="http://www.springframework.org/schema/beans" xmlns:xsi="http://www.w3.org/2001/xmlschema-instance" xsi:schemalocation="http://www.springframework.org/schema/beans http://www.springframework.org/schema/beans/spring-beans-3.0.xsd"> <bean id="datasource_1" class="org.apache.commons.dbcp.basicdatasource"> <property name="driverclassname" value="com.mysql.jdbc.driver"></property> <property name="url" value="jdbc:mysql://10.70.69.69:3306/test1"></property> <property name="username" value="user123"></property> <property name="password" value="user123"></property> <property name="maxactive" value="100"></property> <property name="maxidle" value="30"></property> <property name="maxwait" value="500"></property> <property name="defaultautocommit" value="true"></property> </bean> <bean id="datasource_2" class="org.apache.commons.dbcp.basicdatasource"> <property name="driverclassname" value="com.mysql.jdbc.driver"></property> <property name="url" value="jdbc:mysql://10.70.69.69:3306/test2"></property> <property name="username" value="user123"></property> <property name="password" value="user123"></property> <property name="maxactive" value="100"></property> <property name="maxidle" value="30"></property> <property name="maxwait" value="500"></property> <property name="defaultautocommit" value="true"></property> </bean> <bean id="datasource_3" class="org.apache.commons.dbcp.basicdatasource"> <property name="driverclassname" value="com.mysql.jdbc.driver"></property> <property name="url" value="jdbc:mysql://10.70.69.69:3306/test3"></property> <property name="username" value="user123"></property> <property name="password" value="user123"></property> <property name="maxactive" value="100"></property> <property name="maxidle" value="30"></property> <property name="maxwait" value="500"></property> <property name="defaultautocommit" value="true"></property> </bean> <bean id="datasource_4" class="org.apache.commons.dbcp.basicdatasource"> <property name="driverclassname" value="com.mysql.jdbc.driver"></property> <property name="url" value="jdbc:mysql://10.70.69.69:3306/test4"></property> <property name="username" value="user123"></property> <property name="password" value="user123"></property> <property name="maxactive" value="100"></property> <property name="maxidle" value="30"></property> <property name="maxwait" value="500"></property> <property name="defaultautocommit" value="true"></property> </bean> <bean id="datasource_5" class="org.apache.commons.dbcp.basicdatasource"> <property name="driverclassname" value="com.mysql.jdbc.driver"></property> <property name="url" value="jdbc:mysql://10.70.69.69:3306/test5"></property> <property name="username" value="user123"></property> <property name="password" value="user123"></property> <property name="maxactive" value="100"></property> <property name="maxidle" value="30"></property> <property name="maxwait" value="500"></property> <property name="defaultautocommit" value="true"></property> </bean> <bean id="datasource_6" class="org.apache.commons.dbcp.basicdatasource"> <property name="driverclassname" value="com.mysql.jdbc.driver"></property> <property name="url" value="jdbc:mysql://10.70.69.69:3306/test6"></property> <property name="username" value="user123"></property> <property name="password" value="user123"></property> <property name="maxactive" value="100"></property> <property name="maxidle" value="30"></property> <property name="maxwait" value="500"></property> <property name="defaultautocommit" value="true"></property> </bean> <bean id="datasource_7" class="org.apache.commons.dbcp.basicdatasource"> <property name="driverclassname" value="com.mysql.jdbc.driver"></property> <property name="url" value="jdbc:mysql://10.61.67.246:3306/test7"></property> <property name="username" value="user123"></property> <property name="password" value="user123"></property> <property name="maxactive" value="100"></property> <property name="maxidle" value="30"></property> <property name="maxwait" value="500"></property> <property name="defaultautocommit" value="true"></property> </bean> <bean id="datasource_8" class="org.apache.commons.dbcp.basicdatasource"> <property name="driverclassname" value="com.mysql.jdbc.driver"></property> <property name="url" value="jdbc:mysql://10.61.67.246:3306/test8"></property> <property name="username" value="user123"></property> <property name="password" value="user123"></property> <property name="maxactive" value="100"></property> <property name="maxidle" value="30"></property> <property name="maxwait" value="500"></property> <property name="defaultautocommit" value="true"></property> </bean> <bean id="datasource_9" class="org.apache.commons.dbcp.basicdatasource"> <property name="driverclassname" value="com.mysql.jdbc.driver"></property> <property name="url" value="jdbc:mysql://10.61.67.246:3306/test9"></property> <property name="username" value="user123"></property> <property name="password" value="user123"></property> <property name="maxactive" value="100"></property> <property name="maxidle" value="30"></property> <property name="maxwait" value="500"></property> <property name="defaultautocommit" value="true"></property> </bean> <bean id="datasource_10" class="org.apache.commons.dbcp.basicdatasource"> <property name="driverclassname" value="com.mysql.jdbc.driver"></property> <property name="url" value="jdbc:mysql://10.61.67.246:3306/test10"></property> <property name="username" value="user123"></property> <property name="password" value="user123"></property> <property name="maxactive" value="100"></property> <property name="maxidle" value="30"></property> <property name="maxwait" value="500"></property> <property name="defaultautocommit" value="true"></property> </bean> <bean id="datasource_11" class="org.apache.commons.dbcp.basicdatasource"> <property name="driverclassname" value="com.mysql.jdbc.driver"></property> <property name="url" value="jdbc:mysql://10.61.67.246:3306/test11"></property> <property name="username" value="user123"></property> <property name="password" value="user123"></property> <property name="maxactive" value="100"></property> <property name="maxidle" value="30"></property> <property name="maxwait" value="500"></property> <property name="defaultautocommit" value="true"></property> </bean> <bean id="datasource" class="com.elon.dynamicdatasource"> <property name="targetdatasources"> <map> <entry key="test1" value-ref="datasource_1"/> <entry key="test2" value-ref="datasource_2"/> <entry key="test3" value-ref="datasource_3"/> <entry key="test4" value-ref="datasource_4"/> <entry key="test5" value-ref="datasource_5"/> <entry key="test6" value-ref="datasource_6"/> <entry key="test7" value-ref="datasource_7"/> <entry key="test8" value-ref="datasource_8"/> <entry key="test9" value-ref="datasource_9"/> <entry key="test10" value-ref="datasource_10"/> <entry key="test11" value-ref="datasource_11"/> </map> </property> </bean> <bean id="sqlsessionfactory" class="org.mybatis.spring.sqlsessionfactorybean"> <property name="configlocation" value="classpath:cfg/mybatis.xml"></property> <property name="datasource" ref="datasource" /> </bean> <bean id="idemo" class="org.mybatis.spring.mapper.mapperfactorybean"> <property name="mapperinterface" value="com.elon.idemo"></property> <property name="sqlsessionfactory" ref="sqlsessionfactory"></property> </bean> <bean id="idemoservice" class="com.elon.demoserviceimpl"> <property name="idemo" ref="idemo"></property> </bean></beans> |
十二、测试代码
|
1
2
3
4
5
6
7
8
9
10
11
12
13
14
15
16
17
18
19
20
21
22
23
24
25
26
27
28
29
30
31
32
33
34
35
36
37
38
39
40
41
42
43
44
45
46
47
48
49
50
51
52
53
54
55
56
57
58
59
60
61
62
63
64
65
66
67
68
69
70
71
72
73
74
75
76
77
78
79
80
81
82
83
84
85
86
87
88
89
90
91
92
93
94
95
96
97
98
99
100
101
102
103
104
105
106
107
108
109
110
111
112
113
114
115
116
117
118
119
120
121
122
123
|
public class testmain{ /** * 测试代码 * * * @param args */ public static void main(string[] args) { @suppresswarnings("resource") applicationcontext context = new classpathxmlapplicationcontext("cfg/spring.xml"); idemoservice service1 = (idemoservice)context.getbean("idemoservice"); // 创建任务对象 dbtask task1 = new dbtask("test1", service1, "selectgroup"); dbtask task2 = new dbtask("test2", service1, "selectgroup"); dbtask task3 = new dbtask("test3", service1, "selectgroup"); dbtask task4 = new dbtask("test4", service1, "selectgroup"); dbtask task5 = new dbtask("test5", service1, "selectgroup"); dbtask task6 = new dbtask("test6", service1, "selectgroup"); dbtask task7 = new dbtask("test7", service1, "selectgroup"); dbtask task8 = new dbtask("test8", service1, "selectgroup"); dbtask task9 = new dbtask("test9", service1, "selectgroup"); dbtask task10 = new dbtask("test10", service1, "selectgroup"); dbtask task11 = new dbtask("test11", service1, "selectgroup"); demodao demo = new demodao(); demo.seta(10000000); demo.setb("12121212"); demo.setc(100); dbtask taskinsert = new dbtask("test2", service1, "insertdemo", demo); simpledateformat format = new simpledateformat("yyyy-mm-dd hh:mm:ss"); system.out.println("开始插入数据:" + format.format(new date())); dbtaskmgr.instance().excute(taskinsert); while (true) { if (!taskinsert.isfinish()) { try { thread.sleep(1000); } catch (interruptedexception e) { e.printstacktrace(); } } else { break; } } system.out.println("插入数据结束:" + format.format(new date())); system.out.println("开始查询5千万数据表:" + format.format(new date())); dbtaskmgr.instance().excute(task1); while (true) { if (!task1.isfinish()) { try { thread.sleep(1000); } catch (interruptedexception e) { e.printstacktrace(); } } else { break; } } system.out.println(task1.getretvalue()); system.out.println("查询5千万数据表结束:" + format.format(new date())); list<dbtask> tasklist = new arraylist<dbtask>(); tasklist.add(task2); tasklist.add(task3); tasklist.add(task4); tasklist.add(task5); tasklist.add(task6); tasklist.add(task7); tasklist.add(task8); tasklist.add(task9); tasklist.add(task10); tasklist.add(task11); system.out.println("开始查询10个5百万数据表:" + format.format(new date())); for (dbtask task : tasklist) { dbtaskmgr.instance().excute(task); } while (true) { int success = 0; for (dbtask task : tasklist) { if (!task.isfinish()) { try { thread.sleep(1000); } catch (interruptedexception e) { e.printstacktrace(); } } else { ++success; } } if (success == 10) { break; } } for (dbtask task : tasklist) { system.out.println(task.getretvalue());; } system.out.println("10个5百万数据表查询结束:" +format.format(new date())); }} |
十三、测试结果
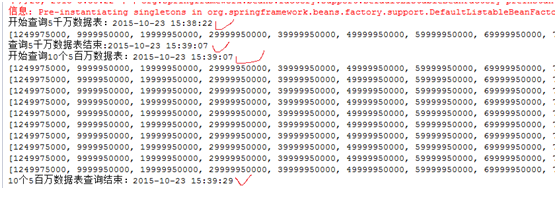
直接查询一个5千万条数据的数据库用时:45s。
多线程同步查询10个5百万数据的数据库用时: 22s。
由于10个数据库放在两台服务器上,一个服务器5个数据库。如果将10个数据分别部署到10个服务器,效率将更高。
总结
以上所述是小编给大家介绍的spring+mybatis+mysql搭建分布式数据库访问框架,希望对大家有所帮助,如果大家有任何疑问请给我留言,小编会及时回复大家的。在此也非常感谢大家对服务器之家网站的支持!
原文链接:http://blog.csdn.net/ylforever/article/details/49430603


