目前android已经在只能手机市场已经具有强大的霸主地位,也吸引了越来越多的追捧者。android的学习也越来越火。但是,报名费用确实大多人望而却步
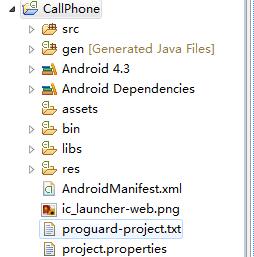
一、新建项目callphone
1.1、建立项目

二、设置界面与项目名称
2.1、更改项目名称
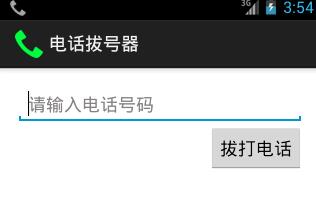
res/values下strings.xml中更改app_name电话拔号器
string.xml
|
1
2
3
4
5
6
7
8
|
<?xml version="1.0" encoding="utf-8"?><resources> <string name="app_name">电话拔号器</string> <string name="action_settings">settings</string> <string name="hello_world">hello world!</string> <string name="dail">拔打电话</string> <string name="defaul_prop">请输入电话号码</string></resources> |
2.2、设置文件框与按键
|
1
2
3
4
5
6
7
8
9
10
11
12
13
14
15
16
17
18
19
20
21
22
23
24
25
|
<relativelayout xmlns:android="http://schemas.android.com/apk/res/android" xmlns:tools="http://schemas.android.com/tools" android:layout_width="match_parent" android:layout_height="match_parent" android:paddingbottom="@dimen/activity_vertical_margin" android:paddingleft="@dimen/activity_horizontal_margin" android:paddingright="@dimen/activity_horizontal_margin" android:paddingtop="@dimen/activity_vertical_margin" tools:context=".mainactivity" > <edittext android:id="@+id/et_number" android:layout_width="match_parent" android:layout_height="wrap_content" android:inputtype="phone" android:hint="@string/defaul_prop"> <requestfocus /> </edittext> <button android:id="@+id/btn_dail" android:layout_width="wrap_content" android:layout_height="wrap_content" android:layout_alignparentright="true" android:layout_below="@+id/et_number" android:text="@string/dail" /></relativelayout> |
三、写java代码
3.1、mainactivity.java
|
1
2
3
4
5
6
7
8
9
10
11
12
13
14
15
16
17
18
19
20
21
22
23
24
25
26
27
28
29
30
31
32
33
34
35
36
37
38
39
40
41
42
|
package com.pb.dial;import android.net.uri;import android.os.bundle;import android.view.view;import android.view.view.onclicklistener;import android.widget.button;import android.widget.edittext;import android.app.activity;import android.content.intent;public class mainactivity extends activity { @override protected void oncreate(bundle savedinstancestate) { super.oncreate(savedinstancestate); setcontentview(r.layout.activity_main); //根据id找到id,拔号按键的id button bt_dail= (button) findviewbyid(r.id.btn_dail); //为按键设置点击事件 bt_dail.setonclicklistener(new myonclicklistener()); } //单击监听事件 private class myonclicklistener implements onclicklistener{ /** * 单击按键被点击时调用的方法 */ @override public void onclick(view v) { //取出输入框中的内容 //先找到id edittext et_number=(edittext) mainactivity.this.findviewbyid(r.id.et_number); //根据id出内容 string phonenumber=et_number.gettext().tostring(); //意图,想做什么事 intent intent=new intent(); //开始拔打电话 intent.setaction(intent.action_call); //设置动作内容 uri:统一资源标识符,url的类型 统一资源定位符 intent.setdata(uri.parse("tel:"+phonenumber)); //开启新的界面 startactivity(intent); } }} |
或者
|
1
2
3
4
5
6
7
8
9
10
11
12
13
14
15
16
17
18
19
20
21
22
23
24
25
26
27
28
29
30
31
32
33
34
35
36
37
38
39
40
41
42
43
44
45
46
47
48
49
50
51
52
53
54
55
56
57
58
59
60
61
62
63
64
65
66
67
68
|
package com.pb.dial;import android.net.uri;import android.os.bundle;import android.text.textutils;import android.view.view;import android.view.view.onclicklistener;import android.widget.button;import android.widget.edittext;import android.widget.toast;import android.app.activity;import android.content.intent;public class mainactivity extends activity implements onclicklistener{ private button bt_dail; private edittext et_number; @override protected void oncreate(bundle savedinstancestate) { super.oncreate(savedinstancestate); setcontentview(r.layout.activity_main); //根据id找到id,拔号按键的id bt_dail= (button) findviewbyid(r.id.btn_dail); //取出输入框中的内容 //先找到id //根据id出内容 et_number=(edittext) mainactivity.this.findviewbyid(r.id.et_number); //为按键设置点击事件 bt_dail.setonclicklistener(this); } @override public void onclick(view v) { string phonenumber=et_number.gettext().tostring().trim(); //判断内容是否为空 textutils是个工具类 if(textutils.isempty(phonenumber)){ toast.maketext(this, "电话号码不能为空", toast.length_long).show(); //如果是内容类请将this改为mainactivity.this return; } //意图,想做什么事 intent intent=new intent(); //开始拔打电话 intent.setaction(intent.action_call); //设置动作内容 uri:统一资源标识符,url的类型 统一资源定位符 intent.setdata(uri.parse("tel:"+phonenumber)); //开启新的界面 startactivity(intent); } //单击监听事件 /* private class myonclicklistener implements onclicklistener{ *//** * 单击按键被点击时调用的方法 *//* @override public void onclick(view v) { //取出输入框中的内容 //先找到id edittext et_number=(edittext) mainactivity.this.findviewbyid(r.id.et_number); //根据id出内容 string phonenumber=et_number.gettext().tostring(); //意图,想做什么事 intent intent=new intent(); //开始拔打电话 intent.setaction(intent.action_call); //设置动作内容 uri:统一资源标识符,url的类型 统一资源定位符 intent.setdata(uri.parse("tel:"+phonenumber)); //开启新的界面 startactivity(intent); } }*/} |
3.2、添加权限
|
1
2
|
<!--添加权限 --><uses-permission android:name="android.permission.call_phone"/> |
3.3、运行

下面给大家分享一段代码 ————android电话拔号器和短信发送器
android电话拔号器
因为应用要使用手机的电话服务,所以要在清单文件androidmanifest.xml中添加电话服务权限:
|
1
2
3
4
5
6
7
8
9
|
<?xml version="1.0" encoding="utf-8"?><manifest xmlns:android="http://schemas.android.com/apk/res/android" package="cn.itcast.action" android:versioncode="1" android:versionname="1.0"> 略.... <uses-sdk android:minsdkversion=“6" /> <uses-permission android:name="android.permission.call_phone"/></manifest> |
界面布局:
|
1
2
3
4
5
6
7
8
9
10
11
12
13
14
|
<?xml version="1.0" encoding="utf-8"?><linearlayout xmlns:android="http://schemas.android.com/apk/res/android" android:orientation="vertical" android:layout_width="fill_parent" android:layout_height="fill_parent" > <textview android:layout_width="fill_parent" android:layout_height="wrap_content" android:text="@string/inputmobile"/> <edittext android:layout_width="fill_parent" android:layout_height="wrap_content" android:id="@+id/mobile"/> <button android:layout_width="wrap_content" android:layout_height="wrap_content" android:text="@string/button" android:id="@+id/button"/></linearlayout> |
linearlayout (线性布局)、absolutelayout(绝对布局)、relativelayout(相对布局)、tablelayout(表格布局)、framelayout(帧布局)
activity:
|
1
2
3
4
5
6
7
8
9
10
11
12
13
14
15
|
public class dialeraction extends activity { @override public void oncreate(bundle savedinstancestate) { super.oncreate(savedinstancestate); setcontentview(r.layout.main); button button = (button)findviewbyid(r.id.button); button.setonclicklistener(new view.onclicklistener(){ public void onclick(view v) { edittext edittext = (edittext)findviewbyid(r.id.mobile); intent intent = new intent(intent.action_call, uri.parse("tel:"+ edittext.gettext())); dialeraction.this.startactivity(intent); } }); }} |
短信发送器
因为应用要使用手机的短信服务,所以要在清单文件androidmanifest.xml中添加短信服务权限:
|
1
|
<uses-permission android:name="android.permission.send_sms"/> |
界面布局:
|
1
2
3
4
5
6
7
8
9
10
11
12
13
14
15
16
|
<?xml version="1.0" encoding="utf-8"?><linearlayout xmlns:android="http://schemas.android.com/apk/res/android" android:orientation="vertical“ android:layout_width="fill_parent“ android:layout_height="fill_parent" > <textview android:layout_width="fill_parent" android:layout_height="wrap_content" android:text="@string/inputmobile"/> <edittext android:layout_width="fill_parent" android:layout_height="wrap_content" android:id="@+id/mobile"/> <textview android:layout_width="fill_parent" android:layout_height="wrap_content" android:text="@string/content"/> <edittext android:layout_width="fill_parent" android:layout_height="wrap_content" android:minlines="3" android:id="@+id/content"/> <button android:layout_width="wrap_content" android:layout_height="wrap_content" android:text="@string/button" android:id="@+id/button"/></linearlayout> |
activity主要代码:
|
1
2
3
4
5
6
7
8
9
10
11
12
13
14
|
string mobile = mobileview.gettext().tostring();string content = contentview.gettext().tostring();smsmanager smsmanager = smsmanager.getdefault();pendingintent sentintent = pendingintent.getbroadcast(smssender.this, 0, new intent(), 0);if(content.length()>70){//如果字数超过70,需拆分成多条短信发送 list<string> msgs = smsmanager.dividemessage(content); for(string msg : msgs){ smsmanager.sendtextmessage(mobile, null, msg, sentintent, null); //最后二个参数为短信已发送的广播意图,最后一个参数为短信对方已收到短信的广播意图 }}else{ smsmanager.sendtextmessage(mobile, null, content, sentintent, null);}toast.maketext(smssender.this, "短信发送完成", toast.length_long).show(); |


