本文实例分析了android重写view并自定义属性的方法。分享给大家供大家参考,具体如下:
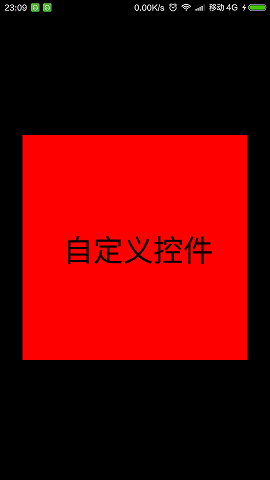
这里通过自定义属性 实现如下图所示效果:

第一步:在res\values的目录下新建一个文件attrs.xml
声明一些自定义属性
|
1
2
3
4
5
6
7
8
|
<?xml version="1.0" encoding="utf-8"?><resources> <declare-styleable name="customviewstyle"> <attr name="customtext" format="string" /> <attr name="customtextcolor" format="color" /> <attr name="customtextsize" format="dimension" /> </declare-styleable></resources> |
第二步:在layout目录下新建布局文件activity_main.xml
特别注意要在外层控件加上这个声明:
格式:xmlns:(你自定义名称)="http://schemas.android.com/apk/(你应用的包名)"
|
1
|
xmlns:xr="http://schemas.android.com/apk/res/com.rong.test" |
或者
|
1
|
xmlns:xr="http://schemas.android.com/apk/res-auto" |
推荐使用第二种
在布局文件中加入这些自定义的属性:
|
1
2
3
4
5
6
7
8
9
10
11
12
13
14
15
16
|
<?xml version="1.0" encoding="utf-8"?><relativelayout xmlns:android="http://schemas.android.com/apk/res/android" xmlns:xr="http://schemas.android.com/apk/res/com.rong.test" android:layout_width="match_parent" android:layout_height="match_parent" android:background="@android:color/black" android:orientation="vertical" > <com.rong.activity.customview android:layout_width="300dp" android:layout_height="300dp" android:layout_centerinparent="true" android:background="#ff0000" xr:customtext="自定义控件" xr:customtextcolor="#000000" xr:customtextsize="40sp" /></relativelayout> |
第三部继承view重写
|
1
2
3
4
5
6
7
8
9
10
11
12
13
14
15
16
17
18
19
20
21
22
23
24
25
26
27
28
29
30
31
32
33
34
35
36
37
38
39
40
41
42
43
44
45
46
47
48
49
50
51
52
53
54
55
56
57
58
59
60
61
62
63
64
65
66
67
68
69
70
71
72
73
|
package com.rong.activity;import com.rong.test.r;import android.content.context;import android.content.res.typedarray;import android.graphics.canvas;import android.graphics.color;import android.graphics.paint;import android.graphics.rect;import android.util.attributeset;import android.view.view;/** * 自定义控件 * * @author 徐荣 * */public class customview extends view { /** * 自定义画笔 */ private paint mpaint; /** * 文字范围 */ private rect mbounds; /** * 自定义文字 */ private string customtext; /** * 自定义大小 */ private int customtextsize; /** * 自定义颜色 */ private int customtextcolor; public customview(context context, attributeset attrs) { super(context, attrs); typedarray typedarray = context.obtainstyledattributes(attrs, r.styleable.customviewstyle); // 获取自定义文字 customtext = typedarray.getstring(r.styleable.customviewstyle_customtext); // 获取自定义文字大小 customtextsize = typedarray.getdimensionpixelsize(r.styleable.customviewstyle_customtextsize, 28); // 或者自定义文字颜色 customtextcolor = typedarray.getcolor(r.styleable.customviewstyle_customtextcolor, color.white); // 要回收这个typedarray对象 typedarray.recycle(); initview(); } public void initview() { // 初始化画笔 mpaint = new paint(); mpaint.setantialias(true); mpaint.setstyle(paint.style.fill); mpaint.setcolor(customtextcolor); mpaint.settextsize(customtextsize); // 生成文字区域 mbounds = new rect(); } @override protected void ondraw(canvas canvas) { super.ondraw(canvas); // 获取文字显示区域mbounds mpaint.gettextbounds(customtext, 0, customtext.length(), mbounds); //使文字宽居中显示=控件的宽度/2 -文字的宽度/2 float helfwidth = getwidth() / 2 - mbounds.width() / 2; //使文字高居中显示=控件的宽度/2 +文字的宽度/2 float helfheight = getheight() / 2+mbounds.height()/2; //绘制文字 canvas.drawtext(customtext, helfwidth, helfheight, mpaint); }} |
运行!
希望本文所述对大家android程序设计有所帮助。


