我们不是走在坑里就是走在前往坑的路上_(:зゝ∠)_
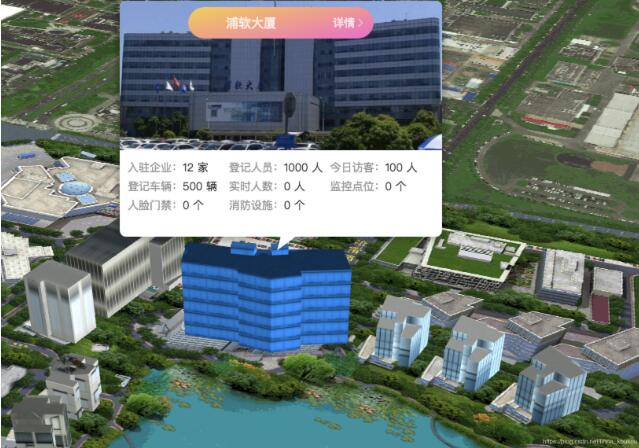
最终效果如图:(地图上添加一个“三维地图”的toolbar按钮,点击后在二维地图上贴上建好的三维模型点击显示弹框)

以下都在已经引入并且初始化maptalks地图的基础上,如何引入使用maptalks可以查看以下文章
http://www.zzvips.com/article/184419.html
1、安装maptalks.three包
npm install maptalks.three
2、安装three包
npm install three
3、安装obj-loader和mtl-loader包
npm i --save three-obj-mtl-loader
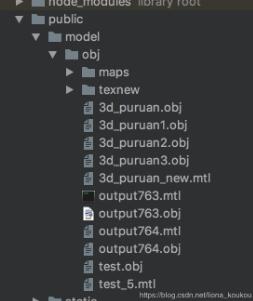
4、引入model模型文件到public下(放在这里是因为打包后读取路径问题,目前发现放在这里才能在打包后正确读取)

5、vue页面代码
引入包
|
1
2
3
4
|
import * as three from 'three'import * as maptalks from 'maptalks'import { threelayer } from 'maptalks.three'import { mtlloader, objloader } from 'three-obj-mtl-loader' |
初始化的地图对象是
this.map
下面是渲染三维模型的方法
|
1
2
3
4
5
6
7
8
9
10
11
12
13
14
15
16
17
18
19
20
21
22
23
24
25
26
27
28
29
30
31
32
33
34
35
36
37
38
39
40
41
42
43
44
45
46
47
48
49
50
51
52
53
54
55
56
57
58
59
60
61
62
63
64
65
66
67
68
69
70
71
72
73
74
75
76
77
78
79
80
81
82
83
84
85
86
87
88
89
90
91
92
93
94
95
96
97
98
99
100
101
102
103
104
105
106
107
108
109
110
111
112
113
114
115
116
117
118
119
120
121
122
123
124
125
126
127
128
129
130
131
132
133
134
135
136
137
138
139
140
141
142
143
144
145
146
147
148
149
150
151
152
153
154
155
156
157
158
159
160
161
162
163
164
165
166
167
168
169
170
171
172
173
174
175
176
177
178
179
180
181
182
183
184
185
186
187
188
189
190
191
192
193
194
195
196
197
198
199
200
201
202
203
204
205
206
207
208
209
210
211
212
213
214
215
216
217
218
219
220
221
|
// 渲染三维draw3d() { const that = this // 三维地图 var three_flag = false // ///单体化交互开始 var intersected this.map.on('click', function(e) { // console.log(e) var raycaster = new three.raycaster() var mouse = new three.vector2() const camera = threelayer.getcamera() const scene = threelayer.getscene() if (!scene) return const size = that.map.getsize() const width = size.width; const height = size.height mouse.x = (e.containerpoint.x / width) * 2 - 1 mouse.y = -((e.containerpoint.y) / height) * 2 + 1 raycaster.setfromcamera(mouse, camera) raycaster.lineprecision = 3 var intersects = raycaster.intersectobjects(scene.children, true) // var intersects = raycaster.intersectobject(points); if (!intersects) return if (array.isarray(intersects) && intersects.length === 0) return console.log(intersects) // 这里我们操作第一个相交的物体 if (intersects.length > 0) { if (intersected != intersects[0].object) { if (intersected) { // intersected.material.color.sethex(intersected.currenthex); // intersected.scale.set(1,1,1); if (intersected.material.length === undefined) { intersected.material.color.sethex(intersected.currenthex) } else { for (var i = 0; i < intersected.material.length; i++) { intersected.material[i].color.sethex(intersected.currenthex) } } } intersected = intersects[0].object // 设置相交的第一个物体的颜色 // intersected.currenthex = intersected.material[0].color.gethex(); intersected.currenthex = 16777215 // 将该物体设为随机的其他颜色 // intersected.material.opacity = 0.2; // intersected.material.transparent = true; // intersected.material.opacity = 0.2; // intersected.material.needsupdate = true; // intersected.material.transparent = false; // intersected.material.color.sethex(0xff0000); if (intersected.material.length === undefined) { intersected.material.color.sethex(0x1e90ff) } else { for (var i = 0; i < intersected.material.length; i++) { intersected.material[i].color.sethex(0x1e90ff) } } } // ////////////// var lonlat = e.coordinate if (true) { var options = { 'autoopenon': 'null', // set to null if not to open window when clicking on map 'single': true, 'width': 410, 'height': 190, 'custom': true, 'autocloseon': 'click', 'dy': -316, 'content': '<div class="content build-content">' + '<div class="pop-img"><img src="http://pde56fqkk.bkt.clouddn.com/1544760152593.jpg"/><p class="pop-name build-pop-name" id="viewdetial"><span class="text-ellipsis" javascript" id="highlighter_300040">
关于process.env.base_url的值可以在vue.config.js里自定义设置(cli3.0)
关于draw3d的代码我没有进行详细的解释,如果需要会出一个详细版的方法使用介绍 补充知识:vue npm安装vue常用依赖,axios、element ui、mockjs 添加axios依赖:
添加element-ui:
添加 mockjs:
以上这篇maptalks+three.js+vue webpack实现二维地图上贴三维模型操作就是小编分享给大家的全部内容了,希望能给大家一个参考,也希望大家多多支持服务器之家。 原文链接:https://blog.csdn.net/liona_koukou/article/details/85231410 延伸 · 阅读
精彩推荐
|


