|
1
2
3
4
5
6
7
8
9
10
11
12
13
14
15
16
17
18
19
20
21
22
23
24
25
26
27
28
29
30
31
32
33
34
35
36
37
38
39
40
41
42
43
44
45
46
47
48
49
50
51
52
53
54
55
56
57
58
59
60
61
62
63
64
65
66
67
68
69
70
71
72
73
74
75
76
77
78
79
80
81
82
83
84
85
86
87
88
89
90
91
92
93
94
95
96
97
98
99
100
101
102
103
104
105
106
107
108
109
110
111
112
113
114
115
116
117
118
119
120
121
122
|
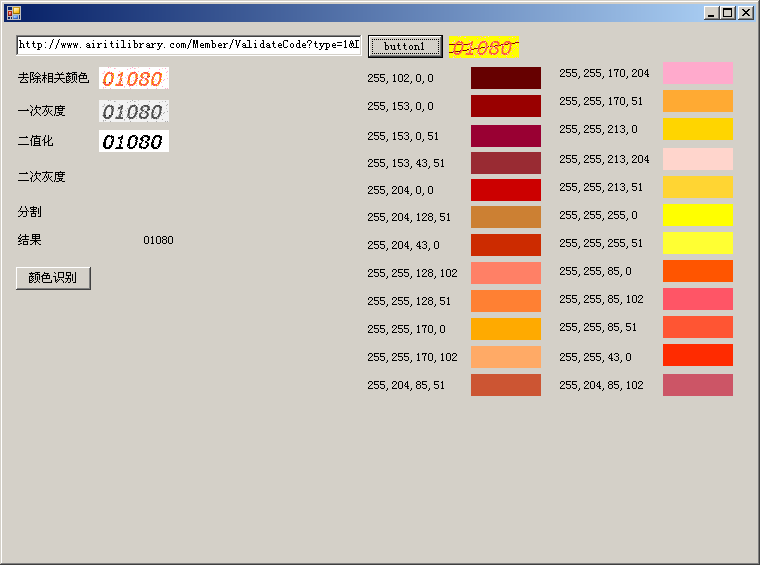
public void imgdo(bitmap img) { //去色 bitmap btp = img; color c = new color(); int rr, gg, bb; for (int i = 0; i < btp.width; i++) { for (int j = 0; j < btp.height; j++) { //取图片当前的像素点 c = btp.getpixel(i, j); rr = c.r; gg = c.g; bb = c.b; //改变颜色 if (rr == 102 && gg == 0 && bb == 0) { //重新设置当前的像素点 btp.setpixel(i, j, color.fromargb(255, 255, 255, 255)); } if (rr == 153 && gg == 0 && bb == 0) { //重新设置当前的像素点 btp.setpixel(i, j, color.fromargb(255, 255, 255, 255)); } if (rr == 153 && gg == 0 && bb == 51) { //重新设置当前的像素点 btp.setpixel(i, j, color.fromargb(255, 255, 255, 255)); } if (rr == 153 && gg == 43 && bb == 51) { //重新设置当前的像素点 btp.setpixel(i, j, color.fromargb(255, 255, 255, 255)); } if (rr == 255 && gg == 255 && bb == 0) { //重新设置当前的像素点 btp.setpixel(i, j, color.fromargb(255, 255, 255, 255)); } if (rr == 255 && gg == 255 && bb == 51) { //重新设置当前的像素点 btp.setpixel(i, j, color.fromargb(255, 255, 255, 255)); } } } btp.save("d:\\去除相关颜色.png"); picturebox2.image = image.fromfile("d:\\去除相关颜色.png"); //灰度 bitmap bmphd = btp; for (int i = 0; i < bmphd.width; i++) { for (int j = 0; j < bmphd.height; j++) { //取图片当前的像素点 var color = bmphd.getpixel(i, j); var gray = (int)(color.r * 0.001 + color.g * 0.700 + color.b * 0.250); //重新设置当前的像素点 bmphd.setpixel(i, j, color.fromargb(gray, gray, gray)); } } bmphd.save("d:\\灰度.png"); picturebox27.image = image.fromfile("d:\\灰度.png"); //二值化 bitmap erzhi = bmphd; bitmap orcbmp; int nn = 3; int w = erzhi.width; int h = erzhi.height; bitmapdata data = erzhi.lockbits(new rectangle(0, 0, w, h), imagelockmode.readonly, pixelformat.format24bpprgb); unsafe { byte* p = (byte*)data.scan0; byte[,] vsource = new byte[w, h]; int offset = data.stride - w * nn; for (int y = 0; y < h; y++) { for (int x = 0; x < w; x++) { vsource[x, y] = (byte)(((int)p[0] + (int)p[1] + (int)p[2]) / 3); p += nn; } p += offset; } erzhi.unlockbits(data); bitmap bmpdest = new bitmap(w, h, pixelformat.format24bpprgb); bitmapdata datadest = bmpdest.lockbits(new rectangle(0, 0, w, h), imagelockmode.writeonly, pixelformat.format24bpprgb); p = (byte*)datadest.scan0; offset = datadest.stride - w * nn; for (int y = 0; y < h; y++) { for (int x = 0; x < w; x++) { p[0] = p[1] = p[2] = (int)vsource[x, y] > 161 ? (byte)255 : (byte)0; //p[0] = p[1] = p[2] = (int)getaveragecolor(vsource, x, y, w, h) > 50 ? (byte)255 : (byte)0; p += nn; } p += offset; } bmpdest.unlockbits(datadest); orcbmp = bmpdest; orcbmp.save("d:\\二值化.png"); picturebox29.image = image.fromfile("d:\\二值化.png"); } //ocr的值 if (orcbmp != null) { string result = ocr(orcbmp); label32.text = result.replace("\n", "\r\n").replace(" ", ""); } } |
c#识别验证码图片通用类
|
1
2
3
4
5
6
7
8
9
10
11
12
13
14
15
16
17
18
19
20
21
22
23
24
25
26
27
28
29
30
31
32
33
34
35
36
37
38
39
40
41
42
43
44
45
46
47
48
49
50
51
52
53
54
55
56
57
58
59
60
61
62
63
64
65
66
67
68
69
70
71
72
73
74
75
76
77
78
79
80
81
82
83
84
85
86
87
88
89
90
91
92
93
94
95
96
97
98
99
100
101
102
103
104
105
106
107
108
109
110
111
112
113
114
115
116
117
118
119
120
121
122
123
124
125
126
127
128
129
130
131
132
133
134
135
136
137
138
139
140
141
142
143
144
145
146
147
148
149
150
151
152
153
154
155
156
157
158
159
160
161
162
163
164
165
166
167
168
169
170
171
172
173
174
175
176
177
178
179
180
181
182
183
184
185
186
187
188
189
190
191
192
193
194
195
196
197
198
199
200
201
202
203
204
205
206
207
208
209
210
211
212
213
214
215
216
217
218
219
220
221
222
223
224
225
226
227
228
229
230
231
232
|
using system;using system.collections.generic;using system.text;using system.collections;using system.drawing;using system.drawing.imaging;using system.runtime.interopservices; namespace ballotaiying2{ class uncodebase { public bitmap bmpobj; public uncodebase(bitmap pic) { bmpobj = new bitmap(pic); //转换为format32bpprgb } /// <summary> /// 根据rgb,计算灰度值 /// </summary> /// <param name="posclr">color值</param> /// <returns>灰度值,整型</returns> private int getgraynumcolor(system.drawing.color posclr) { return (posclr.r * 19595 + posclr.g * 38469 + posclr.b * 7472) >> 16; } /// <summary> /// 灰度转换,逐点方式 /// </summary> public void graybypixels() { for (int i = 0; i < bmpobj.height; i++) { for (int j = 0; j < bmpobj.width; j++) { int tmpvalue = getgraynumcolor(bmpobj.getpixel(j, i)); bmpobj.setpixel(j, i, color.fromargb(tmpvalue, tmpvalue, tmpvalue)); } } } /// <summary> /// 去图形边框 /// </summary> /// <param name="borderwidth"></param> public void clearpicborder(int borderwidth) { for (int i = 0; i < bmpobj.height; i++) { for (int j = 0; j < bmpobj.width; j++) { if (i < borderwidth || j < borderwidth || j > bmpobj.width - 1 - borderwidth || i > bmpobj.height - 1 - borderwidth) bmpobj.setpixel(j, i, color.fromargb(255, 255, 255)); } } } /// <summary> /// 灰度转换,逐行方式 /// </summary> public void graybyline() { rectangle rec = new rectangle(0, 0, bmpobj.width, bmpobj.height); bitmapdata bmpdata = bmpobj.lockbits(rec, imagelockmode.readwrite, bmpobj.pixelformat);// pixelformat.format32bpppargb); // bmpdata.pixelformat = pixelformat.format24bpprgb; intptr scan0 = bmpdata.scan0; int len = bmpobj.width * bmpobj.height; int[] pixels = new int[len]; marshal.copy(scan0, pixels, 0, len); //对图片进行处理 int grayvalue = 0; for (int i = 0; i < len; i++) { grayvalue = getgraynumcolor(color.fromargb(pixels)); pixels = (byte)(color.fromargb(grayvalue, grayvalue, grayvalue)).toargb(); //color转byte } bmpobj.unlockbits(bmpdata); } /// <summary> /// 得到有效图形并调整为可平均分割的大小 /// </summary> /// <param name="dggrayvalue">灰度背景分界值</param> /// <param name="charscount">有效字符数</param> /// <returns></returns> public void getpicvalidbyvalue(int dggrayvalue, int charscount) { int posx1 = bmpobj.width; int posy1 = bmpobj.height; int posx2 = 0; int posy2 = 0; for (int i = 0; i < bmpobj.height; i++) //找有效区 { for (int j = 0; j < bmpobj.width; j++) { int pixelvalue = bmpobj.getpixel(j, i).r; if (pixelvalue < dggrayvalue) //根据灰度值 { if (posx1 > j) posx1 = j; if (posy1 > i) posy1 = i; if (posx2 < j) posx2 = j; if (posy2 < i) posy2 = i; }; }; }; // 确保能整除 int span = charscount - (posx2 - posx1 + 1) % charscount; //可整除的差额数 if (span < charscount) { int leftspan = span / 2; //分配到左边的空列 ,如span为单数,则右边比左边大1 if (posx1 > leftspan) posx1 = posx1 - leftspan; if (posx2 + span - leftspan < bmpobj.width) posx2 = posx2 + span - leftspan; } //复制新图 rectangle clonerect = new rectangle(posx1, posy1, posx2 - posx1 + 1, posy2 - posy1 + 1); bmpobj = bmpobj.clone(clonerect, bmpobj.pixelformat); } /// <summary> /// 得到有效图形,图形为类变量 /// </summary> /// <param name="dggrayvalue">灰度背景分界值</param> /// <param name="charscount">有效字符数</param> /// <returns></returns> public void getpicvalidbyvalue(int dggrayvalue) { int posx1 = bmpobj.width; int posy1 = bmpobj.height; int posx2 = 0; int posy2 = 0; for (int i = 0; i < bmpobj.height; i++) //找有效区 { for (int j = 0; j < bmpobj.width; j++) { int pixelvalue = bmpobj.getpixel(j, i).r; if (pixelvalue < dggrayvalue) //根据灰度值 { if (posx1 > j) posx1 = j; if (posy1 > i) posy1 = i; if (posx2 < j) posx2 = j; if (posy2 < i) posy2 = i; }; }; }; //复制新图 rectangle clonerect = new rectangle(posx1, posy1, posx2 - posx1 + 1, posy2 - posy1 + 1); bmpobj = bmpobj.clone(clonerect, bmpobj.pixelformat); } /// <summary> /// 得到有效图形,图形由外面传入 /// </summary> /// <param name="dggrayvalue">灰度背景分界值</param> /// <param name="charscount">有效字符数</param> /// <returns></returns> public bitmap getpicvalidbyvalue(bitmap singlepic, int dggrayvalue) { int posx1 = singlepic.width; int posy1 = singlepic.height; int posx2 = 0; int posy2 = 0; for (int i = 0; i < singlepic.height; i++) //找有效区 { for (int j = 0; j < singlepic.width; j++) { int pixelvalue = singlepic.getpixel(j, i).r; if (pixelvalue < dggrayvalue) //根据灰度值 { if (posx1 > j) posx1 = j; if (posy1 > i) posy1 = i; if (posx2 < j) posx2 = j; if (posy2 < i) posy2 = i; }; }; }; //复制新图 rectangle clonerect = new rectangle(posx1, posy1, posx2 - posx1 + 1, posy2 - posy1 + 1); return singlepic.clone(clonerect, singlepic.pixelformat); } /// <summary> /// 平均分割图片 /// </summary> /// <param name="rownum">水平上分割数</param> /// <param name="colnum">垂直上分割数</param> /// <returns>分割好的图片数组</returns> public bitmap [] getsplitpics(int rownum,int colnum) { if (rownum == 0 || colnum == 0) return null; int singw = bmpobj.width / rownum; int singh = bmpobj.height / colnum; bitmap [] picarray=new bitmap[rownum*colnum]; rectangle clonerect; for (int i = 0; i < colnum; i++) //找有效区 { for (int j = 0; j < rownum; j++) { clonerect = new rectangle(j*singw, i*singh, singw , singh); picarray[i*rownum+j]=bmpobj.clone(clonerect, bmpobj.pixelformat);//复制小块图 } } return picarray; } /// <summary> /// 返回灰度图片的点阵描述字串,1表示灰点,0表示背景 /// </summary> /// <param name="singlepic">灰度图</param> /// <param name="dggrayvalue">背前景灰色界限</param> /// <returns></returns> public string getsinglebmpcode(bitmap singlepic, int dggrayvalue) { color piexl; string code = ""; for (int posy = 0; posy < singlepic.height; posy++) for (int posx = 0; posx < singlepic.width; posx++) { piexl = singlepic.getpixel(posx, posy); if (piexl.r < dggrayvalue) // color.black ) code = code + "1"; else code = code + "0"; } return code; } }} |
以上2则都是使用c#实现的orc识别的代码,希望对大家学习c#有所帮助。


