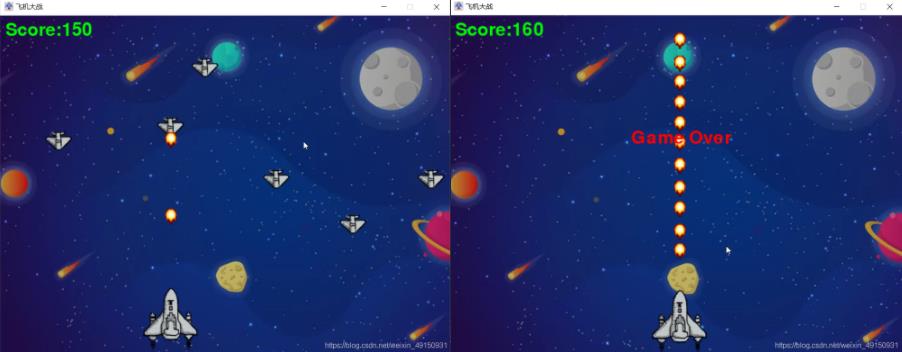
本文实例为大家分享了python开发飞机大战游戏的具体代码,供大家参考,具体内容如下
|
1
2
3
4
5
6
7
8
9
10
11
12
13
14
15
16
17
18
19
20
21
22
23
24
25
26
27
28
29
30
31
32
33
34
35
36
37
38
39
40
41
42
43
44
45
46
47
48
49
50
51
52
53
54
55
56
57
58
59
60
61
62
63
64
65
66
67
68
69
70
71
72
73
74
75
76
77
78
79
80
81
82
83
84
85
86
87
88
89
90
91
92
93
94
95
96
97
98
99
100
101
102
103
104
105
106
107
108
109
110
111
112
113
114
115
116
117
118
119
120
121
122
123
124
125
126
127
128
129
130
131
132
133
134
135
136
137
138
139
140
141
142
143
144
145
146
147
148
149
150
151
152
153
154
155
156
157
158
159
160
161
162
163
164
165
166
167
168
169
170
171
172
173
174
175
176
177
178
179
180
181
182
183
184
185
186
187
188
189
190
191
192
193
194
195
196
197
198
199
200
201
202
203
204
205
206
207
208
209
210
211
212
213
214
215
216
217
218
219
220
221
|
import pygameimport randomimport math # 数学模块 # 初始化界面pygame.init()# 设置窗口大小windows = pygame.display.set_mode((800, 600))# 设置窗口标题pygame.display.set_caption("小赵同学")# 引入图片 logoicon = pygame.image.load('logo.jpg')pygame.display.set_icon(icon) # 4.游戏获取背景bgcolor = pygame.image.load('bj.png')# 5.设置玩家飞机playerimg = pygame.image.load('fj.png')X = 350 # 设置玩家X轴Y = 480 # 设置玩家Y轴# 停止移动就可以将palyerStep改为0。控制一个变量来指定飞机指定移动playerStep = 0 # 添加背景音乐pygame.mixer.music.load('bj.mp3')pygame.mixer.music.play(-1)# 添加射中的音效# bao_music = pygame.mixer.Sound('bj.mp3') # 分数score = 0# 添加字体和大小font = pygame.font.Font('freesansbold.ttf', 32) # 字体类def show_score(): # 显示的文字 text = f"Score:{score}" # 渲染然后显示 显示text True表示24位的字 score_render = font.render(text, True, (0, 255, 0)) # 指定字体放到那个位置 windows.blit(score_render, (10, 10)) # 游戏结束的变量over = Falseover_font = pygame.font.Font('freesansbold.ttf', 64) # 结束的提示语def check_over(): if over: text = "Game Over" render = font.render(text, True, (255, 0, 0)) windows.blit(render, (320, 200)) # 8.添加敌人. # 11.添加多个敌人number_enemy = 6 # 敌人类class Enemy: def __init__(self): # self.img = pygame.image.load('enemy.png') self.x = random.randint(200, 600) # 随机产生X self.y = random.randint(50, 250) # 随机产生Y self.step = random.randint(2, 4) # 随机产生速度 # 当被射中时恢复位置 def reset(self): self.x = random.randint(200, 600) self.y = random.randint(50, 180) def distance(bx, by, ex, ey): a = bx - ex b = by - ey return math.sqrt(a * a + b * b) # 开根号 # 保存所有的敌人enemis = []for i in range(number_enemy): # 每次循环都都在class Enemy中过一边,所以随机产生一个敌人的参数并且保存到列表中 enemis.append(Enemy()) # 显示敌人并且实现敌人的移动下沉def enemy(): # 循环保存敌人的列表,每个敌人都过在这个for循环里被限制了移动的轨迹 global over for e in enemis: windows.blit(e.img, (e.x, e.y)) e.x += e.step if e.x > 750 or e.x < 0: # 判断敌人是否到了边界 e.step *= -1 # 敌人碰到界面往返 e.y += 40 # 设置敌人往下沉 # 判断敌人的位置如果到达指定的地方则游戏结束 if e.y > 436: over = True print("游戏结束啦") enemis.clear() # 设置飞机及飞机移动范围的函数 == 飞机类型def fiji_type(): # 设置飞机的坐标和飞机X Y轴最大的移动位置 global X, Y # 5. 设置飞机 windows.blit(playerimg, (X, Y)) # 6.飞机移动 X += plagerStep # 预防飞机出界 if X > 680: X = 680 if X < 0: X = 0 # 子弹的类class Bullet: def __init__(self): self.img = pygame.image.load('bullet.png') self.x = X + 55 # 设置子弹的X轴 self.y = Y + 5 # 子弹出现在玩家的上方 self.step = 2 # 子弹移动的速度 # 击中敌人 def hit(self): global score for e in enemis: if distance(self.x, self.y, e.x, e.y) < 30: # 射中了 bullets.remove(self) e.reset() # 重置敌人 # 没击中加10分 score += 10 bullets = [] # 保存现有的子弹 # 显示子弹移动def show_bullets(): for b in bullets: windows.blit(b.img, (b.x, b.y)) b.hit() # 查看是否击中了敌人 b.y -= b.step # 往上移动 # 判断子弹是否出了界面 if b.y < 0: bullets.remove(b) # 3.游戏主循环running = Truewhile running: # 4.背景 # 每个循环是画一张画组成的 # 画出来bgcolor windows.blit(bgcolor, (0, 0)) # 调用这个字体 show_score() # event.get操作事件 for event in pygame.event.get(): # 判断操作类型是不是QUIT if event.type == pygame.QUIT: # 如果程序为False就会停止则关闭 running = False # 7.控制飞机的移动 # 通过控制键盘的事件来控制(playerStep值)飞机的移动 if event.type == pygame.KEYDOWN: # 判断按下键盘右键,按下则移动 if event.key == pygame.K_RIGHT: plagerStep = 3 # 判断按下左键 elif event.key == pygame.K_LEFT: plagerStep = -3 # 判断按下空格健的反应 elif event.key == pygame.K_SPACE: # 创建一个子弹 b = Bullet() bullets.append(b) # 判断松来按键停止, if event.type == pygame.KEYUP: plagerStep = 0 # 调用飞机的类型的函数 fiji_type() # 调用敌人这个函数 enemy() show_bullets() # 显示子弹 # 游戏结束语 check_over() # 刷新更新数据 pygame.display.update()# global 设置全局变量 ''' 游戏结构1.设置窗口大小2.背景图3.显示飞机4.移动飞机5.控制出界6.获取键盘事件7.显示敌人8.敌人移动9.下沉和随机位置10.显示多个敌人11.响应空格键12.添加子弹13.发射子弹14.射中检测之距离15.射中检测16.添加音效 17.添加并显示分数18.游戏结束19.结束提示''' |

以上就是本文的全部内容,希望对大家的学习有所帮助,也希望大家多多支持服务器之家。
原文链接:https://blog.csdn.net/weixin_49150931/article/details/112579924


