本文实例为大家分享了c#添加windows服务的具体方法,供大家参考,具体内容如下
源码下载地址:windowsservice1.rar
步骤一、创建服务项目。

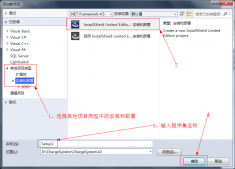
步骤二、添加安装程序。

步骤三、服务属性设置 【serviceinstaller1】。

4.1 添加定时任务
|
1
2
3
4
5
6
7
8
9
10
11
12
13
14
15
16
17
18
19
20
21
22
23
24
25
26
27
28
29
30
31
32
33
34
35
36
37
38
39
40
41
42
43
44
45
46
47
48
49
50
51
52
53
54
55
56
57
58
59
60
61
62
63
64
65
66
67
68
69
70
71
72
73
74
75
76
77
78
79
80
81
82
83
84
85
86
87
88
89
90
91
92
93
94
95
96
97
98
99
100
101
102
103
|
public partial class sapsyn : servicebase { system.timers.timer timer1; //计时器 system.timers.timer timer2; //计时器 system.timers.timer timer3; //计时器 system.timers.timer timer4; //计时器 public sapsyn() { initializecomponent(); } protected override void onstart(string[] args) { timer1 = new system.timers.timer(); timer1.interval = 8000; //设置计时器事件间隔执行时间 timer1.elapsed += new system.timers.elapsedeventhandler(tmstart1_elapsed); timer1.enabled = true; timer2 = new system.timers.timer(); timer2.interval = 8000; //设置计时器事件间隔执行时间 timer2.elapsed += new system.timers.elapsedeventhandler(tmstart2_elapsed); timer2.enabled = true; timer3 = new system.timers.timer(); timer3.interval = 8000; //设置计时器事件间隔执行时间 timer3.elapsed += new system.timers.elapsedeventhandler(tmstart3_elapsed); timer3.enabled = true; timer4 = new system.timers.timer(); timer4.interval = 8000; //设置计时器事件间隔执行时间 timer4.elapsed += new system.timers.elapsedeventhandler(tmstart4_elapsed); timer4.enabled = true; } protected override void onstop() //服务停止执行 { using (system.io.streamwriter sw = new system.io.streamwriter("c:\\log.txt", true)) { sw.writeline(datetime.now.tostring("yyyy-mm-dd hh:mm:ss ") + "stop."); } this.timer1.enabled = false; this.timer2.enabled = false; this.timer3.enabled = false; this.timer4.enabled = false; } protected override void onpause() { //服务暂停执行代码 base.onpause(); } protected override void oncontinue() { //服务恢复执行代码 base.oncontinue(); } protected override void onshutdown() { //系统即将关闭执行代码 base.onshutdown(); } private void tmstart1_elapsed(object sender, system.timers.elapsedeventargs e) { //执行sql语句或其他操作 using (system.io.streamwriter sw = new system.io.streamwriter("c:\\" + 1 + "log.txt", true)) { sw.writeline(datetime.now.tostring("yyyy-mm-dd hh:mm:ss ") + "start."); } } private void tmstart2_elapsed(object sender, system.timers.elapsedeventargs e) { //执行sql语句或其他操作 using (system.io.streamwriter sw = new system.io.streamwriter("c:\\" + 2 + "log.txt", true)) { sw.writeline(datetime.now.tostring("yyyy-mm-dd hh:mm:ss ") + "start."); } } private void tmstart3_elapsed(object sender, system.timers.elapsedeventargs e) { //执行sql语句或其他操作 using (system.io.streamwriter sw = new system.io.streamwriter("c:\\" + 3 + "log.txt", true)) { sw.writeline(datetime.now.tostring("yyyy-mm-dd hh:mm:ss ") + "start."); } } private void tmstart4_elapsed(object sender, system.timers.elapsedeventargs e) { //执行sql语句或其他操作 using (system.io.streamwriter sw = new system.io.streamwriter("c:\\" + 4 + "log.txt", true)) { sw.writeline(datetime.now.tostring("yyyy-mm-dd hh:mm:ss ") + "start."); } } } |
4.2 设置服务启动方式为自动启动
|
1
2
3
4
5
6
7
8
9
10
11
12
13
14
15
16
17
18
19
|
[runinstaller(true)] public partial class projectinstaller : system.configuration.install.installer { public projectinstaller() { initializecomponent(); this.committed += new installeventhandler(projectinstaller_committed); } private void projectinstaller_committed(object sender, installeventargs e) { //参数为服务的名字 system.serviceprocess.servicecontroller controller = new system.serviceprocess.servicecontroller("servicesapsyn"); controller.start(); } private void serviceinstaller1_afterinstall(object sender, installeventargs e) { } } |
步骤五、脚本配置。
安装服务脚本
卸载服务脚本

5.1 停止或启动服务的代码
|
1
2
3
4
5
6
7
8
9
10
11
12
13
14
15
16
17
18
19
20
21
22
23
24
25
26
27
28
29
30
31
32
33
34
35
36
37
38
39
40
41
42
43
44
45
46
47
48
49
50
51
52
53
54
55
56
57
58
59
60
61
62
63
64
65
66
67
68
69
70
71
72
73
74
75
76
77
78
79
80
81
82
83
84
85
86
87
88
89
90
91
92
93
94
95
96
97
98
99
100
101
102
103
104
105
106
107
108
109
110
111
112
113
114
115
116
117
118
119
120
121
122
123
124
125
126
127
128
129
130
131
132
133
134
135
136
137
138
139
140
141
142
143
144
145
146
147
148
149
150
151
152
153
154
155
156
157
158
159
160
161
162
163
164
165
166
167
168
169
170
|
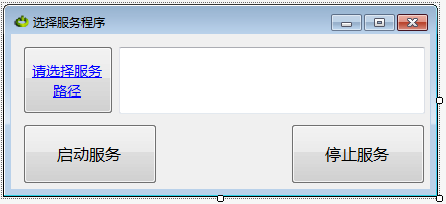
public partial class form1 : form { public form1() { initializecomponent(); } public string thispath = application.startuppath; public string propath = ""; private void form1_load(object sender, eventargs e) { this.text = "启动服务"; } /// <summary> /// 启动服务 /// </summary> /// <param name="sender"></param> /// <param name="e"></param> private void button1_click(object sender, eventargs e) { cursor = cursors.waitcursor; string starpath = @"%systemroot%\microsoft.net\framework\v4.0.30319\installutil.exe " + propath; filestream fs = new filestream(thispath + "\\install.bat", filemode.create); streamwriter sw = new streamwriter(fs); try { sw.writeline(starpath); sw.writeline("net start servicetest"); sw.writeline("sc config servicetest start= auto"); } catch (exception ex) { messagebox.show(ex.message.tostring()); } finally { sw.close(); fs.close(); } system.diagnostics.process.start(thispath + "\\install.bat"); this.text = "启动服务:你选择的服务已经启动。"; cursor = cursors.default; } /// <summary> /// 停止服务 /// </summary> /// <param name="sender"></param> /// <param name="e"></param> private void button2_click(object sender, eventargs e) { cursor = cursors.waitcursor; string starpath = @"%systemroot%\microsoft.net\framework\v4.0.30319\installutil.exe /u " + propath; filestream fs = new filestream(thispath + "\\uninstall.bat", filemode.create); streamwriter sw = new streamwriter(fs); try { sw.writeline(starpath); } catch (exception ex) { messagebox.show(ex.message.tostring()); } finally { sw.close(); fs.close(); } system.diagnostics.process.start(thispath + "\\uninstall.bat"); this.text = "启动服务:你选择的服务已经卸载。"; cursor = cursors.default; } private void button3_click(object sender, eventargs e) { ///选择文件框 对象 openfiledialog ofd = new openfiledialog(); //打开时指定默认路径 ofd.initialdirectory = @"c:\documents and settings\administrator.icbcoa-6e96e6be\桌面"; //如果用户点击确定 if (ofd.showdialog() == dialogresult.ok) { //将用户选择的文件路径 显示 在文本框中 textbox1.text = ofd.filename; propath = textbox1.text; } if (file.exists(thispath + "\\uninstall.bat")) { file.delete(thispath + "\\uninstall.bat"); } file.create(thispath + "\\uninstall.bat").close(); if (file.exists(thispath + "\\install.bat")) { file.delete(thispath + "\\install.bat"); } file.create(thispath + "\\install.bat").close(); } //读写文本 - 写入数据按钮 private void buttonwrite_click(string filepath) { } /// <summary> /// 运行cmd命令 /// </summary> /// <param name="cmd">命令</param> /// <returns></returns> public static string cmd(string[] cmd) { process p = new process(); p.startinfo.filename = "cmd.exe"; p.startinfo.useshellexecute = false; p.startinfo.redirectstandardinput = true; p.startinfo.redirectstandardoutput = true; p.startinfo.redirectstandarderror = true; p.startinfo.createnowindow = true; p.start(); p.standardinput.autoflush = true; for (int i = 0; i < cmd.length; i++) { p.standardinput.writeline(cmd[i].tostring()); } p.standardinput.writeline("exit"); string strrst = p.standardoutput.readtoend(); p.waitforexit(); p.close(); return strrst; } /// <summary> /// 关闭进程 /// </summary> /// <param name="procname">进程名称</param> /// <returns></returns> public static bool closeprocess(string procname) { bool result = false; system.collections.arraylist proclist = new system.collections.arraylist(); string tempname = ""; int begpos; int endpos; foreach (system.diagnostics.process thisproc in system.diagnostics.process.getprocesses()) { tempname = thisproc.tostring(); begpos = tempname.indexof("(") + 1; endpos = tempname.indexof(")"); tempname = tempname.substring(begpos, endpos - begpos); proclist.add(tempname); if (tempname == procname) { if (!thisproc.closemainwindow()) thisproc.kill(); // 当发送关闭窗口命令无效时强行结束进程 result = true; } } return result; } } |
5.2 form1.designer.cs 代码
|
1
2
3
4
5
6
7
8
9
10
11
12
13
14
15
16
17
18
19
20
21
22
23
24
25
26
27
28
29
30
31
32
33
34
35
36
37
38
39
40
41
42
43
44
45
46
47
48
49
50
51
52
53
54
55
56
57
58
59
60
61
62
63
64
65
66
67
68
69
70
71
72
73
74
75
76
77
78
79
80
81
82
83
84
85
86
87
88
89
90
91
92
93
94
95
96
97
98
99
100
101
102
103
104
|
partial class form1 { /// <summary> /// 必需的设计器变量。 form1.designer.cs /// </summary> private system.componentmodel.icontainer components = null; /// <summary> /// 清理所有正在使用的资源。 /// </summary> /// <param name="disposing">如果应释放托管资源,为 true;否则为 false。</param> protected override void dispose(bool disposing) { if (disposing && (components != null)) { components.dispose(); } base.dispose(disposing); } #region windows 窗体设计器生成的代码 /// <summary> /// 设计器支持所需的方法 - 不要 /// 使用代码编辑器修改此方法的内容。 /// </summary> private void initializecomponent() { system.componentmodel.componentresourcemanager resources = new system.componentmodel.componentresourcemanager(typeof(form1)); this.button1 = new system.windows.forms.button(); this.button2 = new system.windows.forms.button(); this.textbox1 = new system.windows.forms.textbox(); this.button3 = new system.windows.forms.button(); this.suspendlayout(); // // button1 // this.button1.font = new system.drawing.font("微软雅黑", 12f, system.drawing.fontstyle.regular, system.drawing.graphicsunit.point, ((byte)(134))); this.button1.location = new system.drawing.point(12, 90); this.button1.name = "button1"; this.button1.size = new system.drawing.size(134, 60); this.button1.tabindex = 0; this.button1.text = "启动服务"; this.button1.usevisualstylebackcolor = true; this.button1.click += new system.eventhandler(this.button1_click); // // button2 // this.button2.font = new system.drawing.font("微软雅黑", 12f, system.drawing.fontstyle.regular, system.drawing.graphicsunit.point, ((byte)(134))); this.button2.location = new system.drawing.point(280, 90); this.button2.name = "button2"; this.button2.size = new system.drawing.size(134, 60); this.button2.tabindex = 0; this.button2.text = "停止服务"; this.button2.usevisualstylebackcolor = true; this.button2.click += new system.eventhandler(this.button2_click); // // textbox1 // this.textbox1.font = new system.drawing.font("微软雅黑", 10.5f, system.drawing.fontstyle.regular, system.drawing.graphicsunit.point, ((byte)(134))); this.textbox1.forecolor = system.drawing.color.maroon; this.textbox1.location = new system.drawing.point(108, 13); this.textbox1.multiline = true; this.textbox1.name = "textbox1"; this.textbox1.size = new system.drawing.size(306, 67); this.textbox1.tabindex = 2; // // button3 // this.button3.font = new system.drawing.font("微软雅黑", 10.5f, system.drawing.fontstyle.underline, system.drawing.graphicsunit.point, ((byte)(134))); this.button3.forecolor = system.drawing.color.blue; this.button3.location = new system.drawing.point(12, 12); this.button3.name = "button3"; this.button3.size = new system.drawing.size(90, 68); this.button3.tabindex = 3; this.button3.text = "请选择服务路径"; this.button3.usevisualstylebackcolor = true; this.button3.click += new system.eventhandler(this.button3_click); // // form1 // this.autoscaledimensions = new system.drawing.sizef(6f, 12f); this.autoscalemode = system.windows.forms.autoscalemode.font; this.clientsize = new system.drawing.size(419, 155); this.controls.add(this.button3); this.controls.add(this.textbox1); this.controls.add(this.button2); this.controls.add(this.button1); this.icon = ((system.drawing.icon)(resources.getobject("$this.icon"))); this.name = "form1"; this.text = "选择服务程序"; this.load += new system.eventhandler(this.form1_load); this.resumelayout(false); this.performlayout(); } #endregion private system.windows.forms.button button1; private system.windows.forms.button button2; private system.windows.forms.textbox textbox1; private system.windows.forms.button button3; } |
源码下载地址:windowsservice1.rar
以上就是本文的全部内容,希望对大家的学习有所帮助,也希望大家多多支持服务器之家。


