spring-boot-starter-actuator提供服务健康检查和暴露内置的url接口。
spring-cloud-starter-config提供动态刷新的一些支持和注解。
pom.xml
<?xml version="1.0" encoding="UTF-8"?>
<project xmlns:xsi="http://www.w3.org/2001/XMLSchema-instance" xmlns="http://maven.apache.org/POM/4.0.0"
       xsi:schemaLocation="http://maven.apache.org/POM/4.0.0 https://maven.apache.org/xsd/maven-4.0.0.xsd">
  <modelVersion>4.0.0</modelVersion>
  <parent>
      <groupId>org.springframework.boot</groupId>
      <artifactId>spring-boot-starter-parent</artifactId>
      <version>2.4.6</version>
      <relativePath/> <!-- lookup parent from repository -->
  </parent>
  <groupId>com.xiaobu</groupId>
  <artifactId>demo-for-mybatis-plus</artifactId>
  <version>0.0.1-SNAPSHOT</version>
  <name>demo-for-mybatis-plus</name>
  <description>demo-for-mybatis-plus</description>
  <properties>
      <java.version>1.8</java.version>
      <spring-cloud.version>2020.0.3</spring-cloud.version>
  </properties>
  <dependencies>
      <!--spring boot-->
      <dependency>
          <groupId>org.springframework.boot</groupId>
          <artifactId>spring-boot-starter-web</artifactId>
      </dependency>
      <dependency>
          <groupId>org.springframework.boot</groupId>
          <artifactId>spring-boot-starter-test</artifactId>
          <scope>test</scope>
          <exclusions>
              <exclusion>
                  <artifactId>asm</artifactId>
                  <groupId>org.ow2.asm</groupId>
              </exclusion>
          </exclusions>
      </dependency>
      <dependency>
          <groupId>com.baomidou</groupId>
          <artifactId>mybatis-plus-boot-starter</artifactId>
          <version>3.4.2</version>
      </dependency>
      <!-- lomback -->
      <dependency>
          <groupId>org.projectlombok</groupId>
          <artifactId>lombok</artifactId>
          <version>1.16.10</version>
      </dependency>
      <dependency>
          <groupId>cn.hutool</groupId>
          <artifactId>hutool-all</artifactId>
          <version>5.3.2</version>
      </dependency>
      <!-- 引入Swagger2依赖 -->
      <dependency>
          <groupId>io.springfox</groupId>
          <artifactId>springfox-swagger2</artifactId>
          <version>2.9.2</version>
          <exclusions>
              <exclusion>
                  <artifactId>guava</artifactId>
                  <groupId>com.google.guava</groupId>
              </exclusion>
          </exclusions>
      </dependency>
      <dependency>
          <groupId>io.springfox</groupId>
          <artifactId>springfox-swagger-ui</artifactId>
          <version>2.9.2</version>
      </dependency>
      <!-- https://mvnrepository.com/artifact/com.google.guava/guava -->
      <dependency>
          <groupId>com.google.guava</groupId>
          <artifactId>guava</artifactId>
          <version>29.0-jre</version>
      </dependency>
      <dependency>
          <groupId>com.alibaba</groupId>
          <artifactId>easyexcel</artifactId>
          <version>2.0.2</version>
      </dependency>
      <dependency>
          <groupId>junit</groupId>
          <artifactId>junit</artifactId>
      </dependency>

      <dependency>
          <groupId>com.xuxueli</groupId>
          <artifactId>xxl-job-core</artifactId>
          <version>2.3.0</version>
      </dependency>
      <dependency>
          <groupId>mysql</groupId>
          <artifactId>mysql-connector-java</artifactId>
      </dependency>
      <!--   spring-cloud config-->
      <dependency>
          <groupId>org.springframework.cloud</groupId>
          <artifactId>spring-cloud-starter-config</artifactId>
      </dependency>
      <dependency>
          <groupId>org.springframework.boot</groupId>
          <artifactId>spring-boot-starter-actuator</artifactId>
      </dependency>
      <!--        springcloud 高版本需要引入 spring-cloud-starter-bootstrap 否则刷新不起效-->
      <dependency>
          <groupId>org.springframework.cloud</groupId>
          <artifactId>spring-cloud-starter-bootstrap</artifactId>
      </dependency>
  </dependencies>

  <dependencyManagement>
      <dependencies>
          <dependency>
              <groupId>org.springframework.cloud</groupId>
              <artifactId>spring-cloud-dependencies</artifactId>
              <version>${spring-cloud.version}</version>
              <type>pom</type>
              <scope>import</scope>
          </dependency>
      </dependencies>
  </dependencyManagement>


  <build>
      <resources>
          <resource>
              <directory>src/main/resources</directory>
          </resource>
          <resource>
              <directory>src/main/java</directory>
              <includes>
                  <include>**/*.xml</include>
              </includes>
              <filtering>true</filtering>
          </resource>
      </resources>
      <finalName>App</finalName>
      <plugins>
          <plugin>
              <groupId>org.springframework.boot</groupId>
              <artifactId>spring-boot-maven-plugin</artifactId>
              <version>2.4.5</version>
          </plugin>
      </plugins>
  </build>

</project>
properties
########## Mybatis 自身配置 ##########
logging.level.com.xiaobu=debug
mybatis-plus.type-aliases-package=com.xiaobu.entity
mybatis-plus.mapper-locations=classpath:com/xiaobu/mapper/xml/*.xml
# 控制台打印sql 带参数 无法写入文件
#mybatis-plus.configuration.log-impl=org.apache.ibatis.logging.stdout.StdOutImpl
# 将sql 写入文件 带参数
mybatis-plus.configuration.log-impl=org.apache.ibatis.logging.slf4j.Slf4jImpl
#集成mysql数据库的配置
spring.datasource.driverClassName=com.mysql.cj.jdbc.Driver
spring.datasource.url=jdbc:mysql://localhost:3306/master0?useSSL=false&useUnicode=true&characterEncoding=utf-8&autoReconnect=true&serverTimezone=Asia/Shanghai
spring.datasource.username=root
spring.datasource.password=root
#测试动态刷新配置
order.pay-timeout-seconds=9999
order.create-frequency-seconds=600
#暴露内置的刷新配置文件url,这个必须写,否则无法刷新配置文件
management.endpoints.web.exposure.include=refresh
#management.endpoints.web.exposure.include=env,refresh#management.endpoints.web.exposure.include=env,refresh
启动类
package com.xiaobu;

import org.springframework.boot.SpringApplication;
import org.springframework.boot.autoconfigure.SpringBootApplication;
import org.springframework.boot.context.properties.ConfigurationPropertiesScan;

/**
* @author 小布
*/
@SpringBootApplication
@ConfigurationPropertiesScan
public class DemoForMybatisPlusApplication {

  public static void main(String[] args) {
      SpringApplication.run(DemoForMybatisPlusApplication.class, args);
  }

}
配置类
package com.xiaobu.config;

import lombok.Data;
import org.springframework.boot.context.properties.ConfigurationProperties;
import org.springframework.cloud.context.config.annotation.RefreshScope;
import org.springframework.stereotype.Component;

/**
* @author 小布
*/
@Component
@ConfigurationProperties(prefix = "order")
@RefreshScope
@Data
public class OrderProperties {
  /**
   * 订单支付超时时长,单位:秒。
   */
  private Integer payTimeoutSeconds;

  /**
   * 订单创建频率,单位:秒
   */
  private Integer createFrequencySeconds;

}
controller
package com.xiaobu.controller;

import com.xiaobu.config.OrderProperties;
import org.springframework.beans.factory.annotation.Autowired;
import org.springframework.beans.factory.annotation.Value;
import org.springframework.cloud.context.config.annotation.RefreshScope;
import org.springframework.web.bind.annotation.GetMapping;
import org.springframework.web.bind.annotation.RequestMapping;
import org.springframework.web.bind.annotation.RestController;

/**
* The type Refresh controller.
*
* @author 小布
* @version 1.0.0
* @className RefreshController.java
* @createTime 2021年09月06日 15:38:00
*/
@RestController
@RequestMapping("refresh")
@RefreshScope
public class RefreshController {

  @Autowired
  private OrderProperties orderProperties;

  @Value(value = "${order.pay-timeout-seconds}")
  private Integer payTimeoutSeconds;

  /**
   * Test string.
   *
   * @return the string
   */
  @GetMapping("test")
  public String test() {
      return "payTimeoutSeconds:" + payTimeoutSeconds;
  }

  @GetMapping("test01")
  public String test01() {
      return orderProperties.toString();
  }
}
打包
执行
mvn clean package -Dmaven.test.skip=true
cmd启动jar 并指定外部配置文件
java -jar App.jar --spring.config.location=D:/application.properties
访问:http://localhost:8080/refresh/test
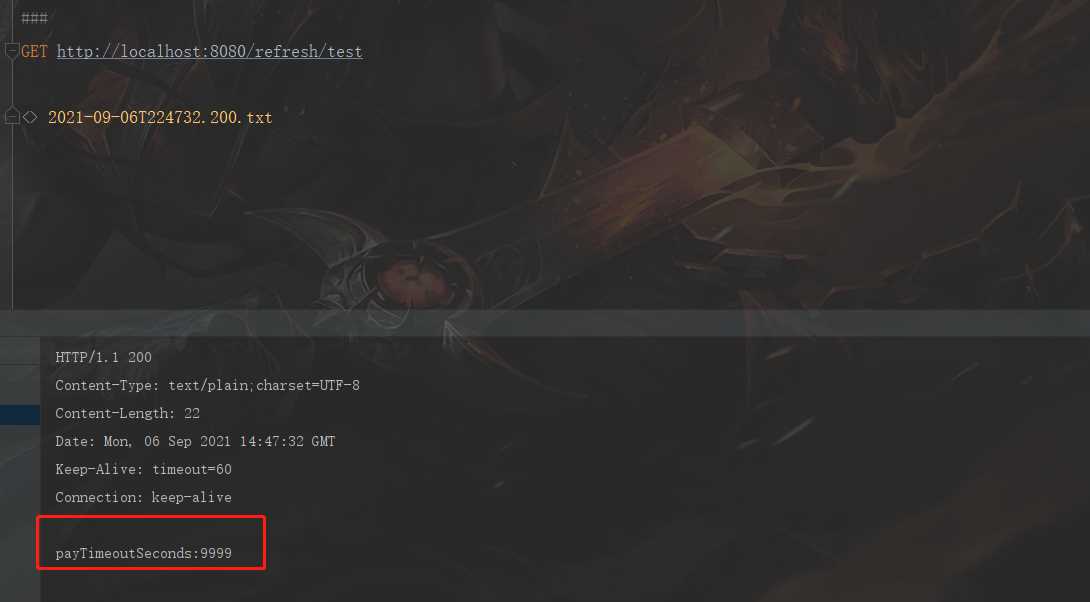
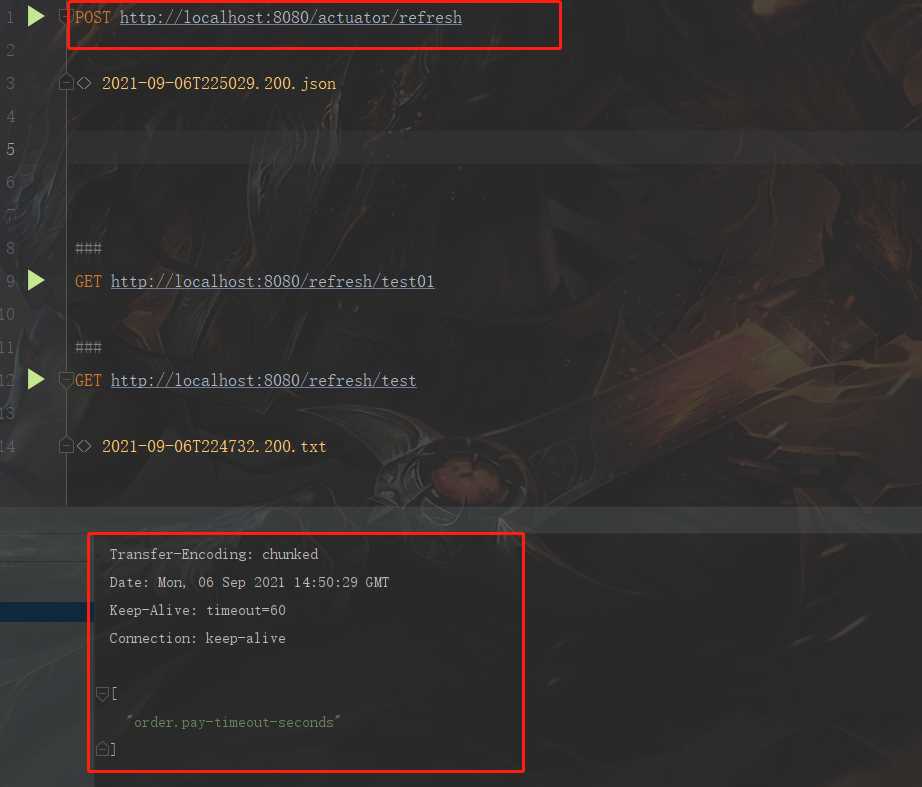
修改配置文件内容:

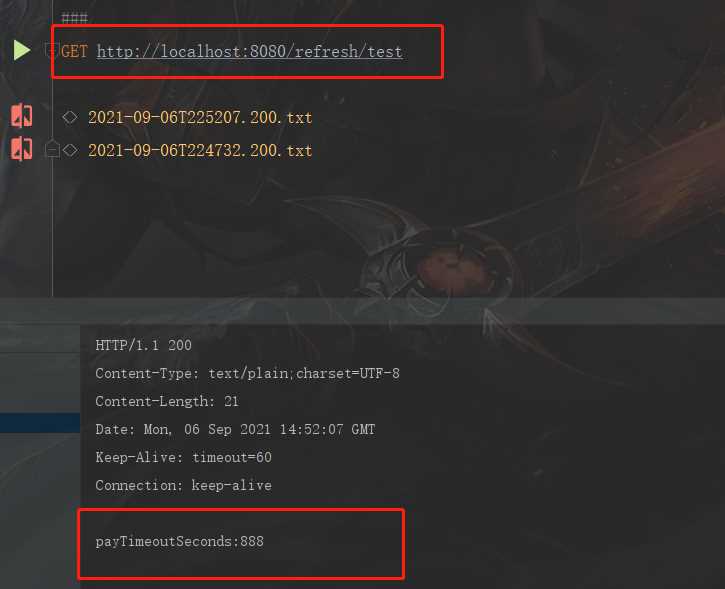
执行 POST http://localhost:8080/actuator/refresh
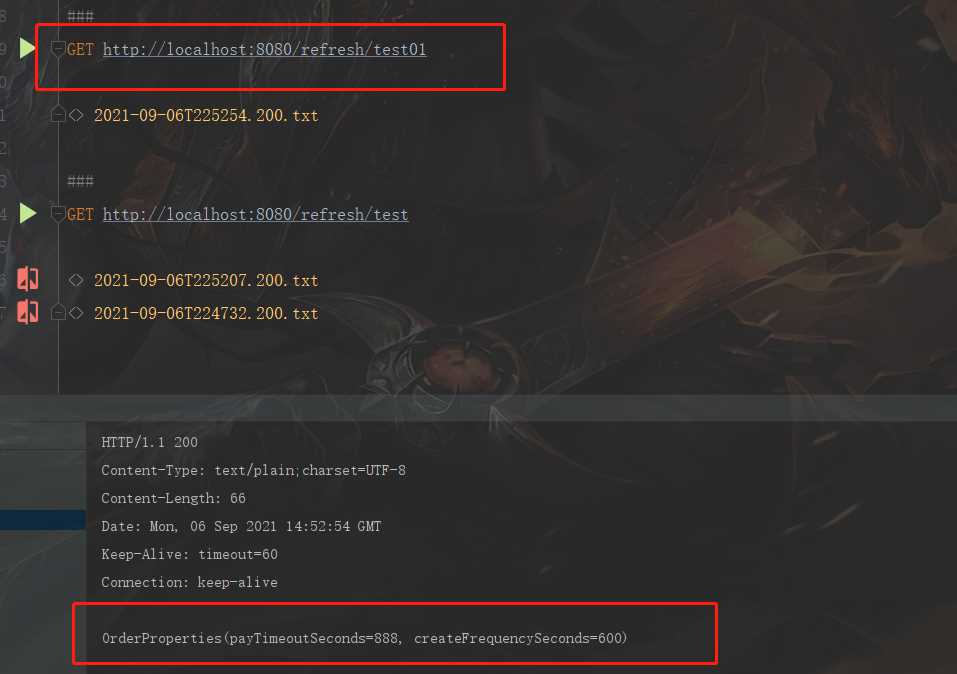
再次访问:http://localhost:8080/refresh/test
访问:http://localhost:8080/refresh/test01
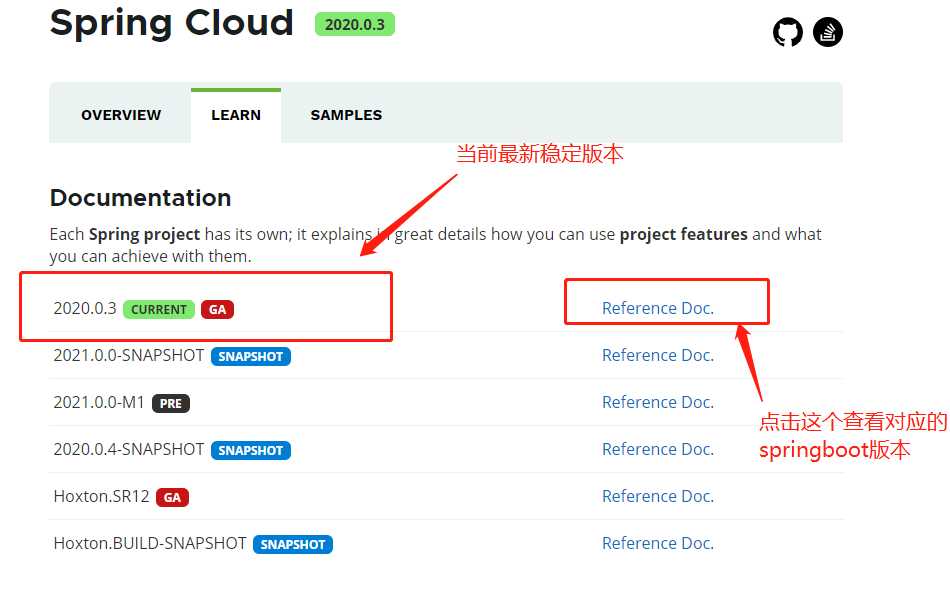
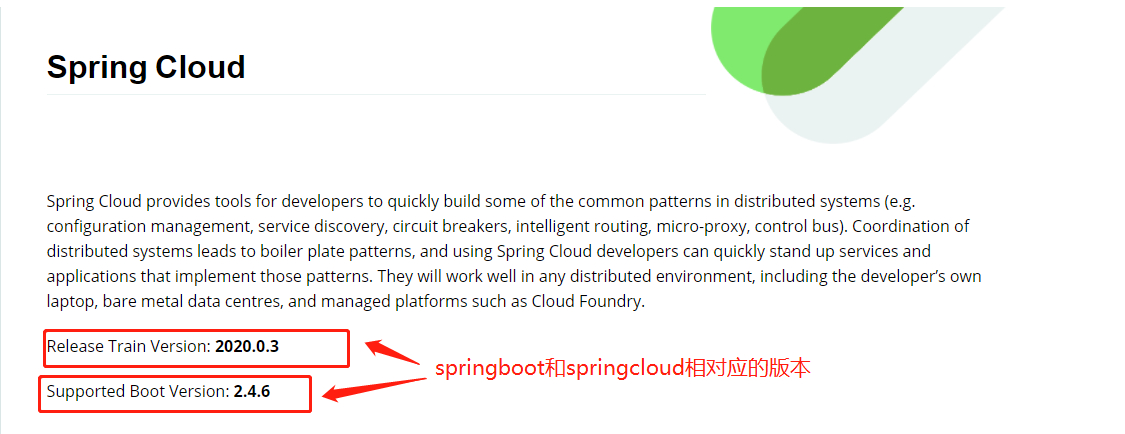
springcloud对应的springboot版本
参考:
Springboot 使用@RefreshScope 注解,实现配置文件的动态加载
到此这篇关于Springboot使用@RefreshScope注解实现配置文件的动态加载的文章就介绍到这了,更多相关Springboot @RefreshScope配置文件动态加载内容请搜索服务器之家以前的文章或继续浏览下面的相关文章希望大家以后多多支持服务器之家!
原文链接:https://blog.csdn.net/tanhongwei1994/article/details/120147010


