Tensor Flow官方网站上提供三种读取数据的方法
1. 预加载数据:在Tensor Flow图中定义常量或变量来保存所有数据,将数据直接嵌到数据图中,当训练数据较大时,很消耗内存。
如
|
1
2
3
|
x1=tf.constant([0,1])x2=tf.constant([1,0])y=tf.add(x1,x2) |
2.填充数据:使用sess.run()的feed_dict参数,将Python产生的数据填充到后端,之前的MNIST数据集就是通过这种方法。也有消耗内存,数据类型转换耗时的缺点。
3. 从文件读取数据:从文件中直接读取,让队列管理器从文件中读取数据。分为两步
先把样本数据写入TFRecords二进制文件
再从队列中读取
TFRecord是TensorFlow提供的一种统一存储数据的二进制文件,能更好的利用内存,更方便的复制和移动,并且不需要单独的标记文件。下面通过代码来将MNIST转换成TFRecord的数据格式,其他数据集也类似。
|
1
2
3
4
5
6
7
8
9
10
11
12
13
14
15
16
17
18
19
20
21
22
23
24
25
26
27
28
29
30
31
32
33
34
35
36
37
38
|
#生成整数型的属性def _int64_feature(value): return tf.train.Feature(int64_list=tf.train.Int64List(value=[value]))#生成字符串型的属性def _bytes_feature(value): return tf.train.Feature(bytes_list=tf.train.BytesList(value=[value]))def convert_to(data_set,name): ''' 将数据填入到tf.train.Example的协议缓冲区(protocol buffer)中,将协议缓冲区序列 化为一个字符串,通过tf.python_io.TFRecordWriter写入TFRecords文件 ''' images=data_set.images labels=data_set.labels num_examples=data_set.num_examples if images.shape[0]!=num_examples: raise ValueError ('Imagessize %d does not match label size %d.'\ %(images.shape[0],num_examples)) rows=images.shape[1] #28 cols=images.shape[2] #28 depth=images.shape[3] #1 是黑白图像 filename = os.path.join(FLAGS.directory, name + '.tfrecords') #使用下面语句就会将三个文件存储为一个TFRecord文件,当数据量较大时,最好将数据写入多个文件 #filename="C:/Users/dbsdz/Desktop/TF练习/TFRecord" print('Writing',filename) writer=tf.python_io.TFRecordWriter(filename) for index in range(num_examples): image_raw=images[index].tostring() #将图像矩阵化为一个字符串 #写入协议缓冲区,height、width、depth、label编码成int 64类型,image——raw编码成二进制 example=tf.train.Example(features=tf.train.Features(feature={ 'height':_int64_feature(rows), 'width':_int64_feature(cols), 'depth':_int64_feature(depth), 'label':_int64_feature(int(labels[index])), 'image_raw':_bytes_feature(image_raw)})) writer.write(example.SerializeToString()) #序列化字符串 writer.close() |
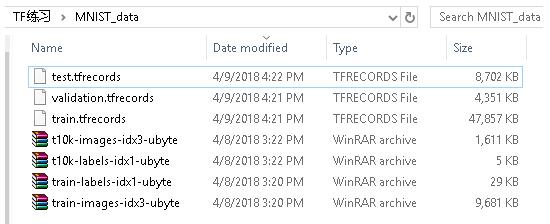
上面程序可以将MNIST数据集中所有的训练数据存储到三个TFRecord文件中。结果如下图

从队列中TFRecord文件,过程分三步
1. 创建张量,从二进制文件中读取一个样本
2. 创建张量,从二进制文件中随机读取一个mini-batch
3. 把每一批张量传入网络作为输入节点
具体代码如下
|
1
2
3
4
5
6
7
8
9
10
11
12
13
14
15
16
17
18
19
20
21
22
23
24
25
26
27
28
29
30
31
32
33
34
35
36
37
38
39
40
41
42
43
44
45
46
47
48
49
50
51
52
53
54
|
def read_and_decode(filename_queue): #输入文件名队列 reader=tf.TFRecordReader() _,serialized_example=reader.read(filename_queue) #解析一个example,如果需要解析多个样例,使用parse_example函数 features=tf.parse_single_example( serialized_example, #必须写明feature里面的key的名称 features={ #TensorFlow提供两种不同的属性解析方法,一种方法是tf.FixedLenFeature, #这种方法解析的结果为一个Tensor。另一个方法是tf.VarLenFeature, #这种方法得到的解析结果为SparseTensor,用于处理稀疏数据。 #这里解析数据的格式需要和上面程序写入数据的格式一致 'image_raw':tf.FixedLenFeature([],tf.string),#图片是string类型 'label':tf.FixedLenFeature([],tf.int64), #标记是int64类型 }) #对于BytesList,要重新进行编码,把string类型的0维Tensor变成uint8类型的一维Tensor image = tf.decode_raw(features['image_raw'], tf.uint8) image.set_shape([IMAGE_PIXELS]) #tensor("input/DecodeRaw:0",shape=(784,),dtype=uint8) #image张量的形状为:tensor("input/sub:0",shape=(784,),dtype=float32) image = tf.cast(image, tf.float32) * (1. / 255) - 0.5 #把标记从uint8类型转换为int32类性 #label张量的形状为tensor(“input/cast_1:0",shape=(),dtype=int32) label = tf.cast(features['label'], tf.int32) return image,labeldef inputs(train,batch_size,num_epochs): #输入参数: #train:选择输入训练数据/验证数据 #batch_size:训练的每一批有多少个样本 #num_epochs:过几遍数据,设置为0/None表示永远训练下去 ''' 返回结果: A tuple (images,labels) *images:类型为float,形状为【batch_size,mnist.IMAGE_PIXELS],范围【-0.5,0.5】。 *label:类型为int32,形状为【batch_size],范围【0,mnist.NUM_CLASSES] 注意tf.train.QueueRunner必须用tf.train.start_queue_runners()来启动线程 ''' if not num_epochs:num_epochs=None #获取文件路径,即./MNIST_data/train.tfrecords,./MNIST_data/validation.records filename=os.path.join(FLAGS.train_dir,TRAIN_FILE if train else VALIDATION_FILE) with tf.name_scope('input'): #tf.train.string_input_producer返回一个QueueRunner,里面有一个FIFOQueue filename_queue=tf.train.string_input_producer(#如果样本量很大,可以分成若干文件,把文件名列表传入 [filename],num_epochs=num_epochs) image,label=read_and_decode(filename_queue) #随机化example,并把它们整合成batch_size大小 #tf.train.shuffle_batch生成了RandomShuffleQueue,并开启两个线程 images,sparse_labels=tf.train.shuffle_batch( [image,label],batch_size=batch_size,num_threads=2, capacity=1000+3*batch_size, min_after_dequeue=1000) #留下一部分队列,来保证每次有足够的数据做随机打乱 return images,sparse_labels |
最后,构建一个三层的神经网络,包含两层卷积层以及一层使用SoftMax层,附上完整代码如下
|
1
2
3
4
5
6
7
8
9
10
11
12
13
14
15
16
17
18
19
20
21
22
23
24
25
26
27
28
29
30
31
32
33
34
35
36
37
38
39
40
41
42
43
44
45
46
47
48
49
50
51
52
53
54
55
56
57
58
59
60
61
62
63
64
65
66
67
68
69
70
71
72
73
74
75
76
77
78
79
80
81
82
83
84
85
86
87
88
89
90
91
92
93
94
95
96
97
98
99
100
101
102
103
104
105
106
107
108
109
110
111
112
113
114
115
116
117
118
119
120
121
122
123
124
125
126
127
128
129
130
131
132
133
134
135
136
137
138
139
140
141
142
143
144
145
146
147
148
149
150
151
152
153
154
155
156
157
158
159
160
161
162
163
164
165
166
167
168
169
170
171
172
173
174
175
176
177
178
179
180
181
182
183
184
185
186
187
188
189
190
191
192
193
194
195
196
197
198
199
200
201
202
203
204
205
206
207
208
209
210
211
212
213
214
215
216
217
218
219
220
|
# -*- coding: utf-8 -*-"""Created on Sun Apr 8 11:06:16 2018@author: dbsdzhttps://blog.csdn.net/xy2953396112/article/details/54929073"""import tensorflow as tfimport osimport timeimport mathfrom tensorflow.examples.tutorials.mnist import input_datamnist = input_data.read_data_sets("MNIST_data/", one_hot=True)# Basic model parameters as external flags. flags = tf.app.flags flags.DEFINE_float('learning_rate', 0.01, 'Initial learning rate.') flags.DEFINE_integer('hidden1', 128, 'Number of units in hidden layer 1.') flags.DEFINE_integer('hidden2', 32, 'Number of units in hidden layer 2.') flags.DEFINE_integer('batch_size', 100, 'Batch size. ' 'Must divide evenly into the dataset sizes.') flags.DEFINE_string('train_dir', 'Mnist_data/', 'Directory to put the training data.') flags.DEFINE_string('directory', './MNIST_data', 'Directory to download data files and write the ' 'converted result')flags.DEFINE_integer('validation_size', 5000, 'Number of examples to separate from the training ' 'data for the validation set.')flags.DEFINE_integer('num_epochs',10,'num_epochs set')FLAGS = tf.app.flags.FLAGSIMAGE_SIZE = 28IMAGE_PIXELS = IMAGE_SIZE * IMAGE_SIZE #图片像素728TRAIN_FILE = "train.tfrecords"VALIDATION_FILE="validation.tfrecords"#生成整数型的属性def _int64_feature(value): return tf.train.Feature(int64_list=tf.train.Int64List(value=[value]))#生成字符串型的属性def _bytes_feature(value): return tf.train.Feature(bytes_list=tf.train.BytesList(value=[value]))def convert_to(data_set,name): ''' 将数据填入到tf.train.Example的协议缓冲区(protocol buffer)中,将协议缓冲区序列 化为一个字符串,通过tf.python_io.TFRecordWriter写入TFRecords文件 ''' images=data_set.images labels=data_set.labels num_examples=data_set.num_examples if images.shape[0]!=num_examples: raise ValueError ('Imagessize %d does not match label size %d.'\ %(images.shape[0],num_examples)) rows=images.shape[1] #28 cols=images.shape[2] #28 depth=images.shape[3] #1 是黑白图像 filename = os.path.join(FLAGS.directory, name + '.tfrecords') #使用下面语句就会将三个文件存储为一个TFRecord文件,当数据量较大时,最好将数据写入多个文件 #filename="C:/Users/dbsdz/Desktop/TF练习/TFRecord" print('Writing',filename) writer=tf.python_io.TFRecordWriter(filename) for index in range(num_examples): image_raw=images[index].tostring() #将图像矩阵化为一个字符串 #写入协议缓冲区,height、width、depth、label编码成int 64类型,image——raw编码成二进制 example=tf.train.Example(features=tf.train.Features(feature={ 'height':_int64_feature(rows), 'width':_int64_feature(cols), 'depth':_int64_feature(depth), 'label':_int64_feature(int(labels[index])), 'image_raw':_bytes_feature(image_raw)})) writer.write(example.SerializeToString()) #序列化字符串 writer.close()def inference(images, hidden1_units, hidden2_units): with tf.name_scope('hidden1'): weights = tf.Variable( tf.truncated_normal([IMAGE_PIXELS, hidden1_units], stddev=1.0 / math.sqrt(float(IMAGE_PIXELS))),name='weights') biases = tf.Variable(tf.zeros([hidden1_units]),name='biases') hidden1 = tf.nn.relu(tf.matmul(images, weights) + biases) with tf.name_scope('hidden2'): weights = tf.Variable( tf.truncated_normal([hidden1_units, hidden2_units], stddev=1.0 / math.sqrt(float(hidden1_units))), name='weights') biases = tf.Variable(tf.zeros([hidden2_units]), name='biases') hidden2 = tf.nn.relu(tf.matmul(hidden1, weights) + biases) with tf.name_scope('softmax_linear'): weights = tf.Variable( tf.truncated_normal([hidden2_units,FLAGS.num_epochs], stddev=1.0 / math.sqrt(float(hidden2_units))),name='weights') biases = tf.Variable(tf.zeros([FLAGS.num_epochs]),name='biases') logits = tf.matmul(hidden2, weights) + biases return logitsdef lossFunction(logits, labels): labels = tf.to_int64(labels) cross_entropy = tf.nn.sparse_softmax_cross_entropy_with_logits( logits=logits, labels=labels, name='xentropy') loss = tf.reduce_mean(cross_entropy, name='xentropy_mean') return lossdef training(loss, learning_rate): tf.summary.scalar(loss.op.name, loss) optimizer = tf.train.GradientDescentOptimizer(learning_rate) global_step = tf.Variable(0, name='global_step', trainable=False) train_op = optimizer.minimize(loss, global_step=global_step) return train_opdef read_and_decode(filename_queue): #输入文件名队列 reader=tf.TFRecordReader() _,serialized_example=reader.read(filename_queue) #解析一个example,如果需要解析多个样例,使用parse_example函数 features=tf.parse_single_example( serialized_example, #必须写明feature里面的key的名称 features={ #TensorFlow提供两种不同的属性解析方法,一种方法是tf.FixedLenFeature, #这种方法解析的结果为一个Tensor。另一个方法是tf.VarLenFeature, #这种方法得到的解析结果为SparseTensor,用于处理稀疏数据。 #这里解析数据的格式需要和上面程序写入数据的格式一致 'image_raw':tf.FixedLenFeature([],tf.string),#图片是string类型 'label':tf.FixedLenFeature([],tf.int64), #标记是int64类型 }) #对于BytesList,要重新进行编码,把string类型的0维Tensor变成uint8类型的一维Tensor image = tf.decode_raw(features['image_raw'], tf.uint8) image.set_shape([IMAGE_PIXELS]) #tensor("input/DecodeRaw:0",shape=(784,),dtype=uint8) #image张量的形状为:tensor("input/sub:0",shape=(784,),dtype=float32) image = tf.cast(image, tf.float32) * (1. / 255) - 0.5 #把标记从uint8类型转换为int32类性 #label张量的形状为tensor(“input/cast_1:0",shape=(),dtype=int32) label = tf.cast(features['label'], tf.int32) return image,labeldef inputs(train,batch_size,num_epochs): #输入参数: #train:选择输入训练数据/验证数据 #batch_size:训练的每一批有多少个样本 #num_epochs:过几遍数据,设置为0/None表示永远训练下去 ''' 返回结果: A tuple (images,labels) *images:类型为float,形状为【batch_size,mnist.IMAGE_PIXELS],范围【-0.5,0.5】。 *label:类型为int32,形状为【batch_size],范围【0,mnist.NUM_CLASSES] 注意tf.train.QueueRunner必须用tf.train.start_queue_runners()来启动线程 ''' if not num_epochs:num_epochs=None #获取文件路径,即./MNIST_data/train.tfrecords,./MNIST_data/validation.records filename=os.path.join(FLAGS.train_dir,TRAIN_FILE if train else VALIDATION_FILE) with tf.name_scope('input'): #tf.train.string_input_producer返回一个QueueRunner,里面有一个FIFOQueue filename_queue=tf.train.string_input_producer(#如果样本量很大,可以分成若干文件,把文件名列表传入 [filename],num_epochs=num_epochs) image,label=read_and_decode(filename_queue) #随机化example,并把它们整合成batch_size大小 #tf.train.shuffle_batch生成了RandomShuffleQueue,并开启两个线程 images,sparse_labels=tf.train.shuffle_batch( [image,label],batch_size=batch_size,num_threads=2, capacity=1000+3*batch_size, min_after_dequeue=1000) #留下一部分队列,来保证每次有足够的数据做随机打乱 return images,sparse_labelsdef run_training(): with tf.Graph().as_default(): #输入images和labels images,labels=inputs(train=True,batch_size=FLAGS.batch_size, num_epochs=3) #num_epochs就是训练的轮数 #构建一个从推理模型来预测数据的图 logits=inference(images,FLAGS.hidden1,FLAGS.hidden2) loss=lossFunction(logits,labels) #定义损失函数 #Add to the Graph operations that train the model train_op=training(loss,FLAGS.learning_rate) #初始化参数,特别注意:string——input_producer内部创建了一个epoch计数变量 #归入tf.graphkey.local_variables集合中,必须单独用initialize_local_variables()初始化 init_op=tf.group(tf.global_variables_initializer(), tf.local_variables_initializer()) sess=tf.Session() sess.run(init_op) #Start input enqueue threads coord =tf.train.Coordinator() threads=tf.train.start_queue_runners(sess=sess,coord=coord) try: step=0 while not coord.should_stop(): #进入永久循环 start_time=time.time() _,loss_value=sess.run([train_op,loss]) #每100次训练输出一次结果 if step % 100 ==0: duration=time.time()-start_time print('Step %d: loss=%.2f (%.3f sec)'%(step,loss_value,duration)) step+=1 except tf.errors.OutOfRangeError: print('Done training for %d epochs,%d steps.'%(FLAGS.num_epochs,step)) finally: coord.request_stop()#通知其他线程关闭 coord.join(threads) sess.close()def main(unused_argv): #获取数据 data_sets=input_data.read_data_sets(FLAGS.directory,dtype=tf.uint8,reshape=False, validation_size=FLAGS.validation_size) #将数据转换成tf.train.Example类型,并写入TFRecords文件 convert_to(data_sets.train,'train') convert_to(data_sets.validation,'validation') convert_to(data_sets.test,'test') print('convert finished') run_training()if __name__ == '__main__': tf.app.run() |
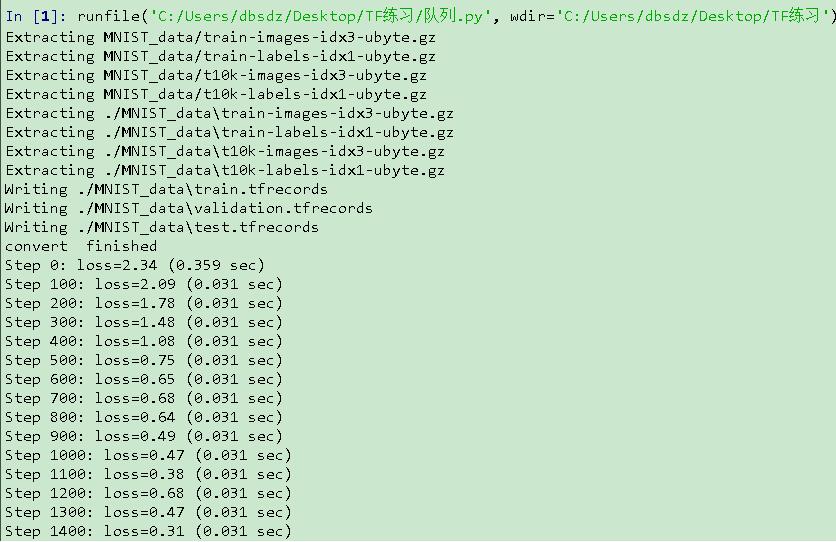
运行结果如图

以上这篇TFRecord格式存储数据与队列读取实例就是小编分享给大家的全部内容了,希望能给大家一个参考,也希望大家多多支持服务器之家。
原文链接:https://blog.csdn.net/dbsdzxq/article/details/79872465


