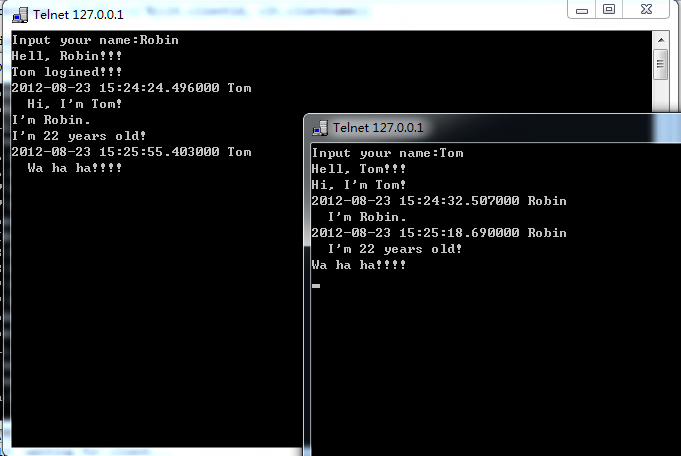
本文实例讲述了Python实现的使用telnet登陆聊天室。分享给大家供大家参考。具体如下:
前久在家学习Python的时候写的一个简单的聊天室,可以使用telnet来登陆。
遗憾的是现在对中文的支持很差,英文聊天倒是没什么问题了。
功能很简单的,应该没有你想象的那么强大,但是你如果有兴趣的话可以试试的。
另外,让我惊奇的是它可以在Android的平板上运行SL4A的Python解释器上运行(需要稍微改几句代码,貌似是编码的那个地方,我记不清了)。
现在这个是可以在PC上跑起来的。
废话不多,直接放代码了,就一个py文件而已,而且注释是乱七八糟的,编码风格也不好(好神似我在用类C语言的习惯)。
|
1
2
3
4
5
6
7
8
9
10
11
12
13
14
15
16
17
18
19
20
21
22
23
24
25
26
27
28
29
30
31
32
33
34
35
36
37
38
39
40
41
42
43
44
45
46
47
48
49
50
51
52
53
54
55
56
57
58
59
60
61
62
63
64
65
66
67
68
69
70
71
72
73
74
75
76
77
78
79
80
81
82
83
84
85
86
87
88
89
90
91
92
93
94
95
96
97
98
99
100
101
102
103
104
105
106
107
108
109
110
111
112
113
114
115
116
117
118
119
120
121
122
123
124
125
126
127
128
|
# Filename: ChatRoomServer.py import threading import datetime import socket # a simple log function def log(lg): print(lg) # Chat room server listen thread class, this class is use for listening client login # when a client request to connect server, this class will start a connect thread class ServerListenThread(threading.Thread): def __init__(self, hostname, port, accept): threading.Thread.__init__(self) self.hostname = hostname self.port = port self.accept = accept self.sock = socket.socket(socket.AF_INET, socket.SOCK_STREAM) self.sock.setsockopt(socket.SOL_SOCKET, socket.SO_REUSEADDR, 1) self.sock.bind((hostname, port)) self.sock.listen(0) log('ServerIp:%s ServerPort:%s waiting for client...'%self.sock.getsockname()) def run(self): clientid = 1 while True: client, cltadd = self.sock.accept() log('a request from Id=%s%s'%('%d Address:'%clientid , cltadd)) if self.accept(clientid, client): clientid = clientid + 1# Connect thread class, this class is use for connecting with client and receiving client's message class ServerConnectThread(threading.Thread): def __init__(self, clientid, client, encoding, receive, disconnect): threading.Thread.__init__(self) self.client = client self.clientid = clientid self.encoding = encoding self.receive = receive self.disconnect = disconnect self.clientname = None self.inputs = self.client.makefile('rb', 0) self.outputs = self.client.makefile('wb', 0) def run(self): self.sendstring('Input your name:') while True: string = self.readline() if string: string = string.lstrip() if len(string)>0: self.receive(self, string) else: self.inputs.close() self.outputs.close() break if self.clientname: self.disconnect(self) def sendstring(self, string): self.sendbytes(bytes(string, self.encoding)) def sendbytes(self, bts): self.outputs.write(bts) def readline(self): rec = self.inputs.readline() if rec: string = bytes.decode(rec, self.encoding) if len(string)>2: string = string[0:-2] else: string = ' ' else: string = False return string # Chat room server class, this class is constitute of a listen thread and many connect thread class ChatRoomServer: def __init__(self, ip='0.0.0.0', port=9113, encoding='utf-8'): self.hostname = ip self.encoding = encoding self.port = port self.clients = {} self.clientnames = {} def whenconnect(self, clientid, client): log('a connect with Id=%s%s'%('%d Address:'%clientid , client.getpeername())) connect = ServerConnectThread(clientid, client, self.encoding, self.whenreceive, self.whenexit) connect.start() return True def whenreceive(self, client, string): log('frome %d, receive:%s (%d)'%(client.clientid, string, len(string))) if client.clientname: if string[0]=='.': self.handlecmd(client, string[1:]) else: now = datetime.datetime.now() sendstring = '%s %s\r\n %s\r\n'%(now, client.clientname, string) self.sendtoall(sendstring, client) else: if self.clientnames.__contains__(string): client.sendstring('%s is exited!!!\r\n'%string) else: client.clientname = string client.sendstring('Hell, %s!!!\r\n'%client.clientname) self.addclient(client) return True def whenexit(self, client): self.delclient(client) return True def handlecmd(self, client, cmd): log('cmd: %s'%cmd) if cmd=='user': client.sendstring('User list(%d):\r\n'%len(self.clients)) for i in self.clients: clt = self.clients[i] client.sendstring(' %d\t%s\r\n'%(clt.clientid, clt.clientname)) else: client.sendstring('Unknow command: %s:\r\n'%cmd) def start(self): serverlisten = ServerListenThread(self.hostname, self.port, self.whenconnect) serverlisten.start() def sendtoall(self, string, notfor): sends = bytes(string, self.encoding) for i in self.clients: if not(notfor and notfor.clientid==i): self.clients[i].sendbytes(sends) def addclient(self, client): self.sendtoall('%s logined!!!\r\n'%client.clientname, client) self.clients[client.clientid] = client self.clientnames[client.clientname] = client.clientid def delclient(self, client): self.sendtoall('%s logouted!!!\r\n'%client.clientname, client) del self.clients[client.clientid] del self.clientnames[client.clientname] # start a chat room server ChatRoomServer().start() |
有了这个服务器程序之后就可以了(当然前提是你安装的Python解释器),没有客户端的,那么你会问怎么开始聊天呢?
下面开始介绍怎么开始聊天,首先你把这个文件运行起来,如下图可以看到服务器正在等待客户端登陆了:

客户端直接使用telnet命令登陆,注意端口应该和服务器的一样,命令为:telnet 127.0.0.1 9011,自动打开telnet控制台,输入自己的名字吧:

现在你在看看服务器端的控制台界面,可以看到记录了登陆消息:

继续使用telnet登陆另外的用户之后就可以聊天了:

功能很简陋了,不过这让我想起了二三十年前的事,嘿嘿,那时候应该就是这样子聊天的了吧,生在这个时代的我们永远都体会不到那种乐趣了。
希望本文所述对大家的Python程序设计有所帮助。


