最近一段时间在研究OAuth2的使用,想整个单点登录,从网上找了很多demo都没有实施成功,也许是因为压根就不懂OAuth2的原理导致。有那么几天,越来越没有头绪,又不能放弃,转过头来一想,OAuth2是在Security的基础上扩展的,对于Security自己都是一无所知,干脆就先研究一下Security吧,先把Security搭建起来,找找感觉。
说干就干,在现成的SpringBoot 2.1.4.RELEASE环境下,进行Security的使用。
简单的Security的使用就不说了,目前的项目是前后端分离的,登录成功或者失败返回的数据格式必须JSON形式的,未登录时也需要返回JSON格式的提示信息 ,退出时一样需要返回JSON格式的数据。授权先不管,先返回JSON格式的数据,这一个搞定,也研究了好几天,翻看了很多别人的经验,别人的经验有的看得懂,有的看不懂,关键时刻还需要自己研究呀。
下面,上代码:
第一步,在pom.xml中引入Security配置文件
|
1
2
3
4
|
<dependency> <groupId>org.springframework.boot</groupId> <artifactId>spring-boot-starter-security</artifactId> </dependency> |
第二步,增加Configuration配置文件
|
1
2
3
4
5
6
7
8
9
10
11
12
13
14
15
16
17
18
19
20
21
22
23
24
25
26
27
28
29
30
31
32
33
34
35
36
37
38
39
40
41
42
43
44
45
46
47
48
49
50
51
52
53
54
55
56
57
58
59
60
61
62
63
64
65
66
67
68
69
70
71
72
73
74
75
76
77
78
79
80
81
82
83
84
85
86
87
88
89
90
91
92
93
94
95
96
97
98
99
100
101
102
103
104
105
106
107
108
109
110
111
112
113
114
115
116
117
118
119
120
121
122
123
124
125
126
127
128
129
130
131
132
133
134
135
136
137
138
139
140
141
142
143
144
145
146
147
148
149
150
151
152
|
import java.io.PrintWriter;import java.util.HashMap;import java.util.Map;import javax.servlet.http.HttpServletResponse;import org.springframework.beans.factory.annotation.Autowired;import org.springframework.context.annotation.Bean;import org.springframework.context.annotation.Configuration;import org.springframework.http.HttpMethod;import org.springframework.security.authentication.AuthenticationProvider;import org.springframework.security.authentication.BadCredentialsException;import org.springframework.security.authentication.DisabledException;import org.springframework.security.authentication.dao.DaoAuthenticationProvider;import org.springframework.security.config.annotation.web.builders.HttpSecurity;import org.springframework.security.config.annotation.web.builders.WebSecurity;import org.springframework.security.config.annotation.web.configuration.WebSecurityConfigurerAdapter;import org.springframework.security.core.userdetails.UserDetailsService;import org.springframework.security.core.userdetails.UsernameNotFoundException;import com.fasterxml.jackson.databind.ObjectMapper;/** * 参考网址: * https://blog.csdn.net/XlxfyzsFdblj/article/details/82083443 * https://blog.csdn.net/lizc_lizc/article/details/84059004 * https://blog.csdn.net/XlxfyzsFdblj/article/details/82084183 * https://blog.csdn.net/weixin_36451151/article/details/83868891 * 查找了很多文件,有用的还有有的,感谢他们的辛勤付出 * Security配置文件,项目启动时就加载了 * @author 程就人生 * */@Configurationpublic class SecurityConfig extends WebSecurityConfigurerAdapter { @Autowired private MyPasswordEncoder myPasswordEncoder; @Autowired private UserDetailsService myCustomUserService; @Autowired private ObjectMapper objectMapper; @Override protected void configure(HttpSecurity http) throws Exception { http .authenticationProvider(authenticationProvider()) .httpBasic() //未登录时,进行json格式的提示,很喜欢这种写法,不用单独写一个又一个的类 .authenticationEntryPoint((request,response,authException) -> { response.setContentType("application/json;charset=utf-8"); response.setStatus(HttpServletResponse.SC_FORBIDDEN); PrintWriter out = response.getWriter(); Map<String,Object> map = new HashMap<String,Object>(); map.put("code",403); map.put("message","未登录"); out.write(objectMapper.writeValueAsString(map)); out.flush(); out.close(); }) .and() .authorizeRequests() .anyRequest().authenticated() //必须授权才能范围 .and() .formLogin() //使用自带的登录 .permitAll() //登录失败,返回json .failureHandler((request,response,ex) -> { response.setContentType("application/json;charset=utf-8"); response.setStatus(HttpServletResponse.SC_UNAUTHORIZED); PrintWriter out = response.getWriter(); Map<String,Object> map = new HashMap<String,Object>(); map.put("code",401); if (ex instanceof UsernameNotFoundException || ex instanceof BadCredentialsException) { map.put("message","用户名或密码错误"); } else if (ex instanceof DisabledException) { map.put("message","账户被禁用"); } else { map.put("message","登录失败!"); } out.write(objectMapper.writeValueAsString(map)); out.flush(); out.close(); }) //登录成功,返回json .successHandler((request,response,authentication) -> { Map<String,Object> map = new HashMap<String,Object>(); map.put("code",200); map.put("message","登录成功"); map.put("data",authentication); response.setContentType("application/json;charset=utf-8"); PrintWriter out = response.getWriter(); out.write(objectMapper.writeValueAsString(map)); out.flush(); out.close(); }) .and() .exceptionHandling() //没有权限,返回json .accessDeniedHandler((request,response,ex) -> { response.setContentType("application/json;charset=utf-8"); response.setStatus(HttpServletResponse.SC_FORBIDDEN); PrintWriter out = response.getWriter(); Map<String,Object> map = new HashMap<String,Object>(); map.put("code",403); map.put("message", "权限不足"); out.write(objectMapper.writeValueAsString(map)); out.flush(); out.close(); }) .and() .logout() //退出成功,返回json .logoutSuccessHandler((request,response,authentication) -> { Map<String,Object> map = new HashMap<String,Object>(); map.put("code",200); map.put("message","退出成功"); map.put("data",authentication); response.setContentType("application/json;charset=utf-8"); PrintWriter out = response.getWriter(); out.write(objectMapper.writeValueAsString(map)); out.flush(); out.close(); }) .permitAll(); //开启跨域访问 http.cors().disable(); //开启模拟请求,比如API POST测试工具的测试,不开启时,API POST为报403错误 http.csrf().disable(); } @Override public void configure(WebSecurity web) { //对于在header里面增加token等类似情况,放行所有OPTIONS请求。 web.ignoring().antMatchers(HttpMethod.OPTIONS, "/**"); } @Bean public AuthenticationProvider authenticationProvider() { DaoAuthenticationProvider authenticationProvider = new DaoAuthenticationProvider(); //对默认的UserDetailsService进行覆盖 authenticationProvider.setUserDetailsService(myCustomUserService); authenticationProvider.setPasswordEncoder(myPasswordEncoder); return authenticationProvider; } } |
第三步,实现UserDetailsService接口
|
1
2
3
4
5
6
7
8
9
10
11
12
13
14
15
16
17
18
19
20
21
22
23
24
25
26
|
import org.springframework.security.core.userdetails.UserDetails;import org.springframework.security.core.userdetails.UserDetailsService;import org.springframework.security.core.userdetails.UsernameNotFoundException;import org.springframework.stereotype.Component;/** * 登录专用类 * 自定义类,实现了UserDetailsService接口,用户登录时调用的第一类 * @author 程就人生 * */@Componentpublic class MyCustomUserService implements UserDetailsService { /** * 登陆验证时,通过username获取用户的所有权限信息 * 并返回UserDetails放到spring的全局缓存SecurityContextHolder中,以供授权器使用 */ @Override public UserDetails loadUserByUsername(String username) throws UsernameNotFoundException { //在这里可以自己调用数据库,对username进行查询,看看在数据库中是否存在 MyUserDetails myUserDetail = new MyUserDetails(); myUserDetail.setUsername(username); myUserDetail.setPassword("123456"); return myUserDetail; }} |
说明:这个类,主要是用来接收登录传递过来的用户名,然后可以在这里扩展,查询该用户名在数据库中是否存在,不存在时,可以抛出异常。本测试为了演示,把数据写死了。
第四步,实现PasswordEncoder接口
|
1
2
3
4
5
6
7
8
9
10
11
12
13
14
15
16
17
18
19
20
21
|
import org.springframework.security.crypto.password.PasswordEncoder;import org.springframework.stereotype.Component;/** * 自定义的密码加密方法,实现了PasswordEncoder接口 * @author 程就人生 * */@Componentpublic class MyPasswordEncoder implements PasswordEncoder { @Override public String encode(CharSequence charSequence) { //加密方法可以根据自己的需要修改 return charSequence.toString(); } @Override public boolean matches(CharSequence charSequence, String s) { return encode(charSequence).equals(s); }} |
说明:这个类主要是对密码加密的处理,以及用户传递过来的密码和数据库密码(UserDetailsService中的密码)进行比对。
第五步,实现UserDetails接口
|
1
2
3
4
5
6
7
8
9
10
11
12
13
14
15
16
17
18
19
20
21
22
23
24
25
26
27
28
29
30
31
32
33
34
35
36
37
38
39
40
41
42
43
44
45
46
47
48
49
50
51
52
53
54
55
56
57
58
59
60
61
62
63
64
65
66
67
68
69
70
71
72
73
|
import java.util.Collection;import org.springframework.security.core.GrantedAuthority;import org.springframework.security.core.userdetails.UserDetails;import org.springframework.stereotype.Component;/** * 实现了UserDetails接口,只留必需的属性,也可添加自己需要的属性 * @author 程就人生 * */@Componentpublic class MyUserDetails implements UserDetails { /** * */ private static final long serialVersionUID = 1L; //登录用户名 private String username; //登录密码 private String password; private Collection<? extends GrantedAuthority> authorities; public void setUsername(String username) { this.username = username; } public void setPassword(String password) { this.password = password; } public void setAuthorities(Collection<? extends GrantedAuthority> authorities) { this.authorities = authorities; } @Override public Collection<? extends GrantedAuthority> getAuthorities() { return this.authorities; } @Override public String getPassword() { return this.password; } @Override public String getUsername() { return this.username; } @Override public boolean isAccountNonExpired() { return true; } @Override public boolean isAccountNonLocked() { return true; } @Override public boolean isCredentialsNonExpired() { return true; } @Override public boolean isEnabled() { return true; }} |
说明:这个类是用来存储登录成功后的用户数据,登录成功后,可以使用下列代码获取:
|
1
|
MyUserDetails myUserDetails= (MyUserDetails) SecurityContextHolder.getContext().getAuthentication() .getPrincipal(); |
代码写完了,接下来需要测试一下,经过测试才能证明代码的有效性,先用浏览器吧。
第一步测试,未登录前访问index,页面直接重定向到默认的login页面了,测试接口OK。
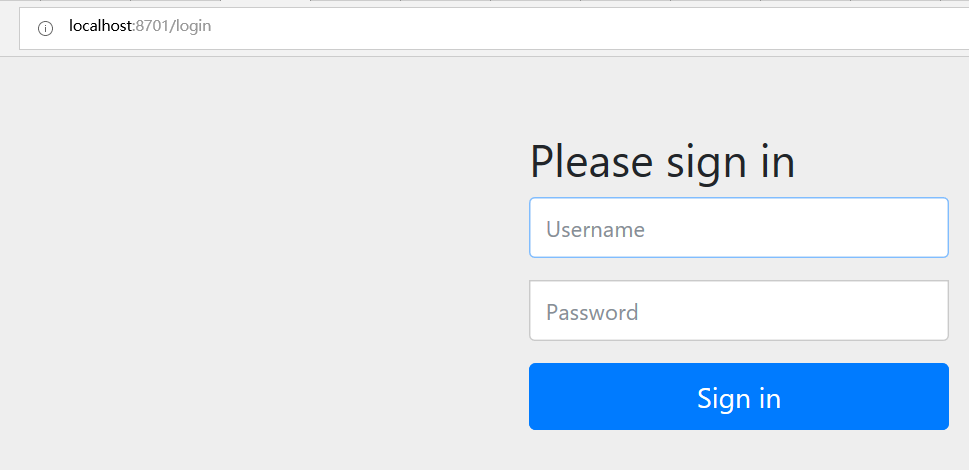
图-1
第二步测试,登录login后,返回了json数据,测试结果OK。

图-2
第三步测试,访问index,返回输出的登录数据,测试结果OK。

图-3
第四步,访问logout,返回json数据,测试接口OK。

图-4
第五步,用API POST测试,用这个工具模拟ajax请求,看请求结果如何,首先访问index,这个必须登录后才能访问。测试结果ok,返回了我们需要的JSON格式数据。
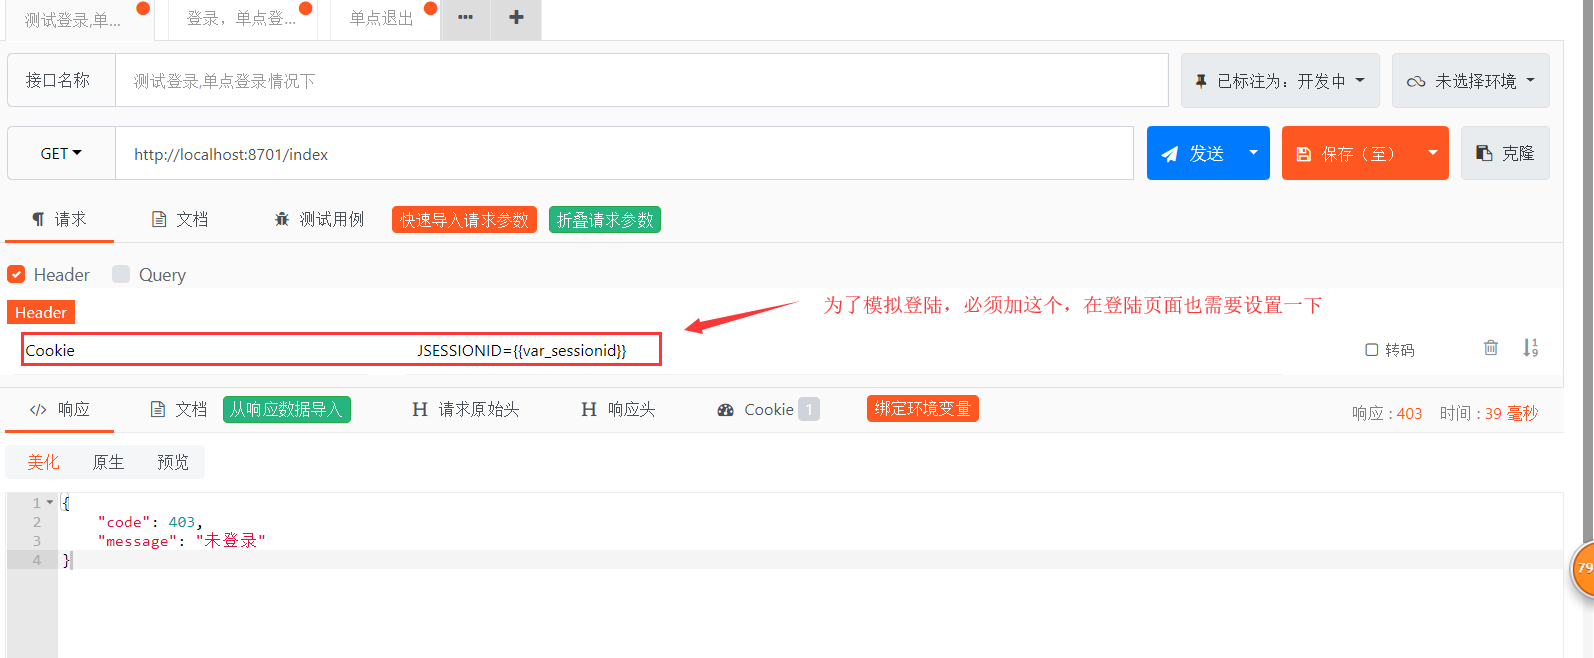
图-5
第六步,在登录模拟对话框,设置环境变量,以保持登录状态。
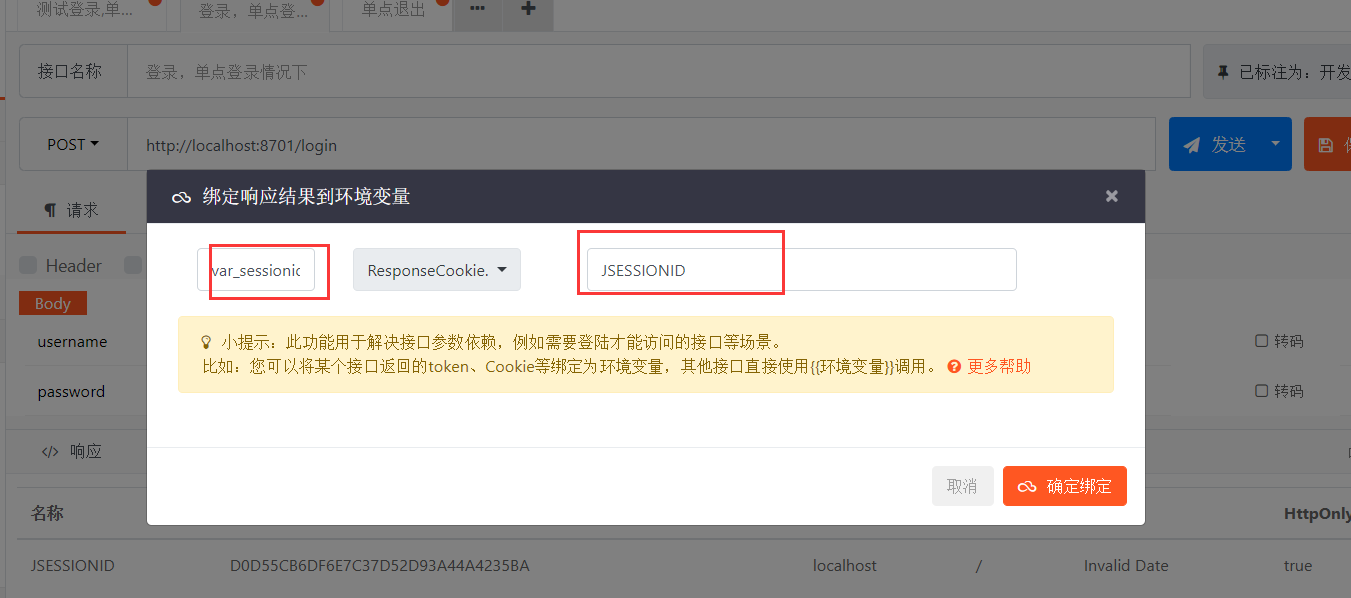
图-6
**第七步,登录测试,返回JSON格式的数据,测试结果OK。
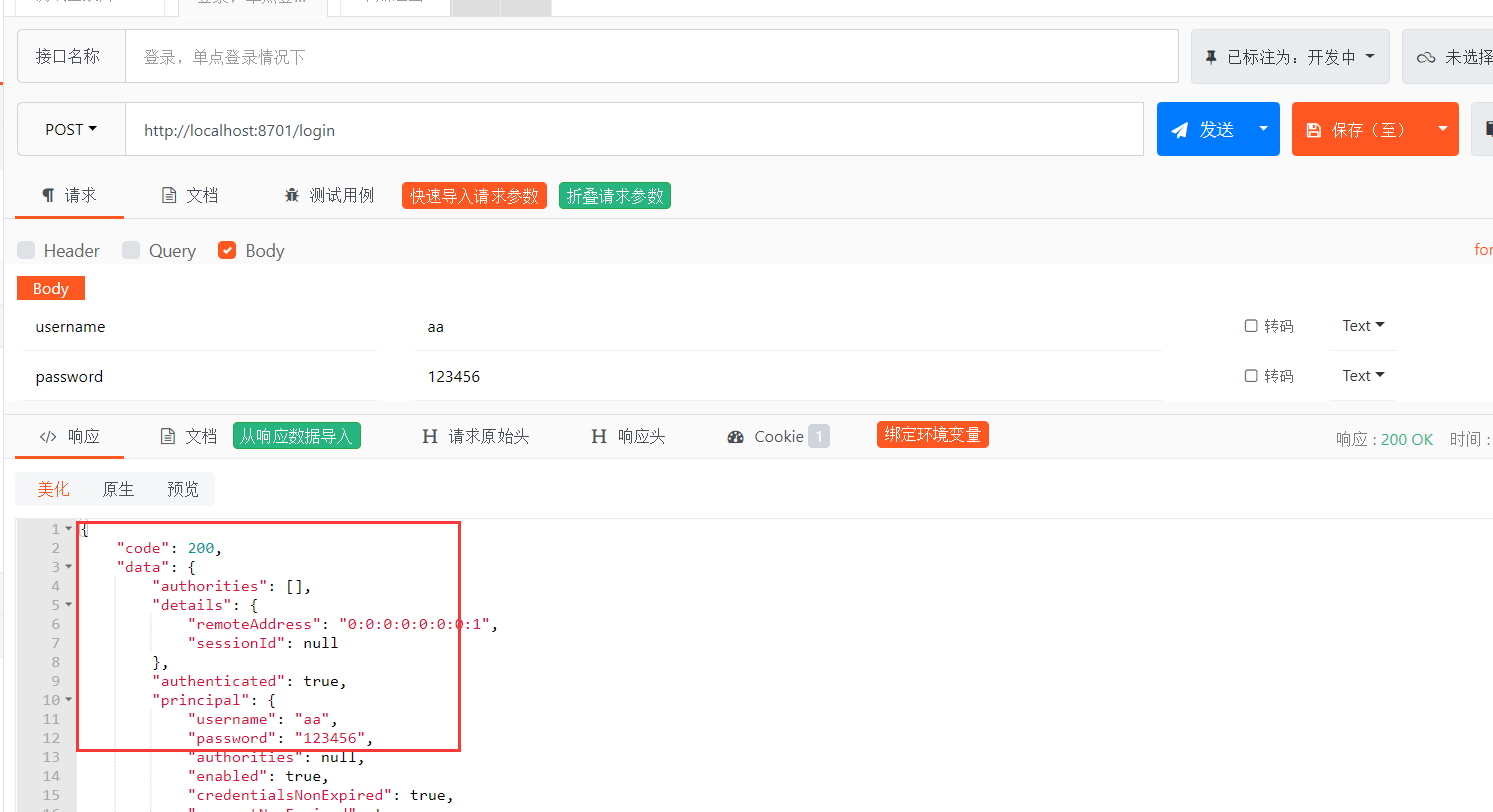
图-7
第八步,在返回到index测试窗口,发送请求,返回当前用户JSON格式的信息,测试结果OK。
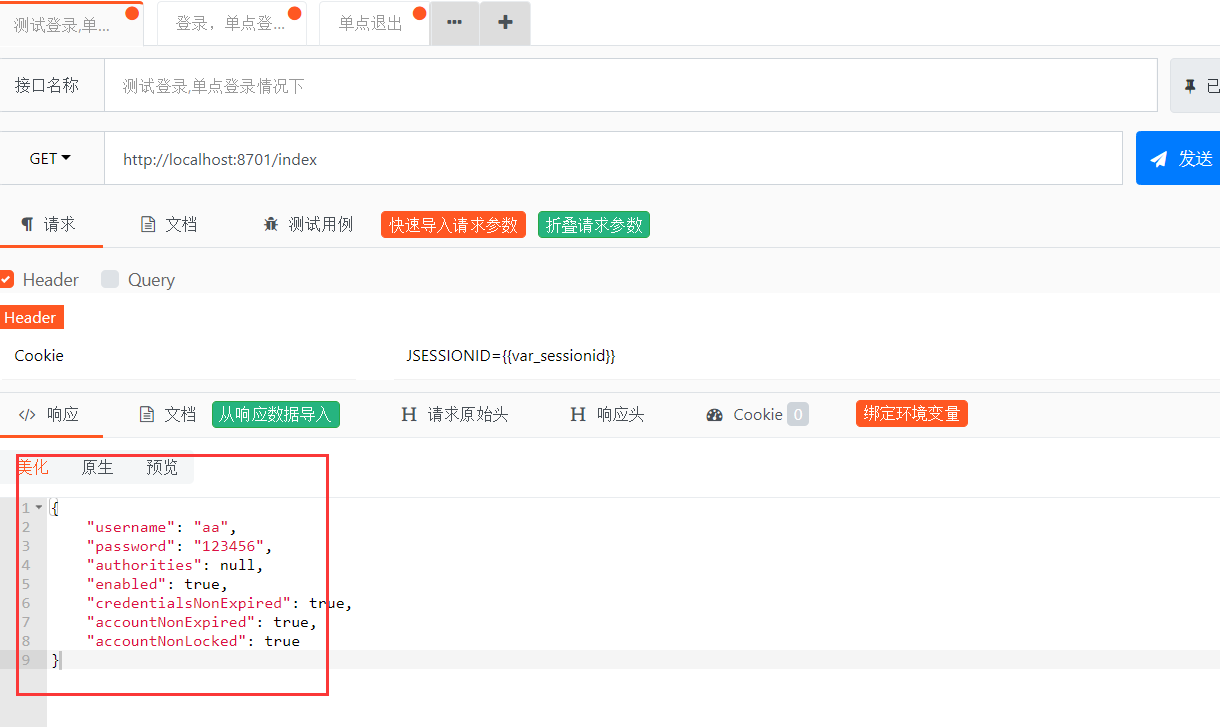
图-8
第九步,测试退出,返回JSON格式数据,测试结果OK
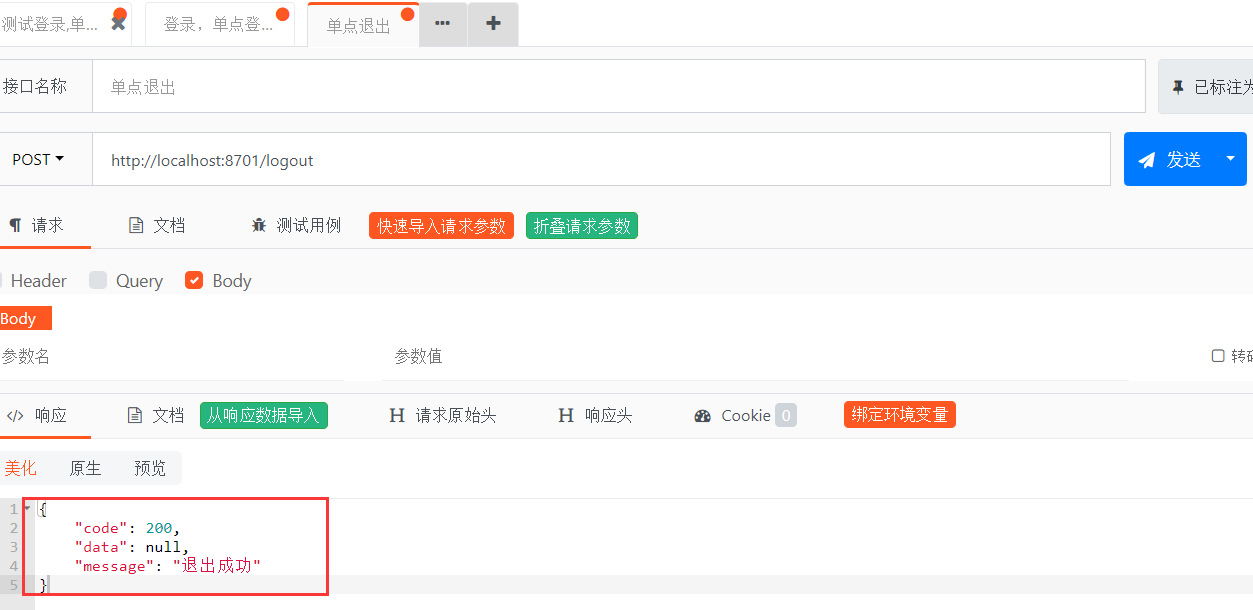
图-9
第十步,退出后,再访问index,出现问题,登录信息还在,LOOK!
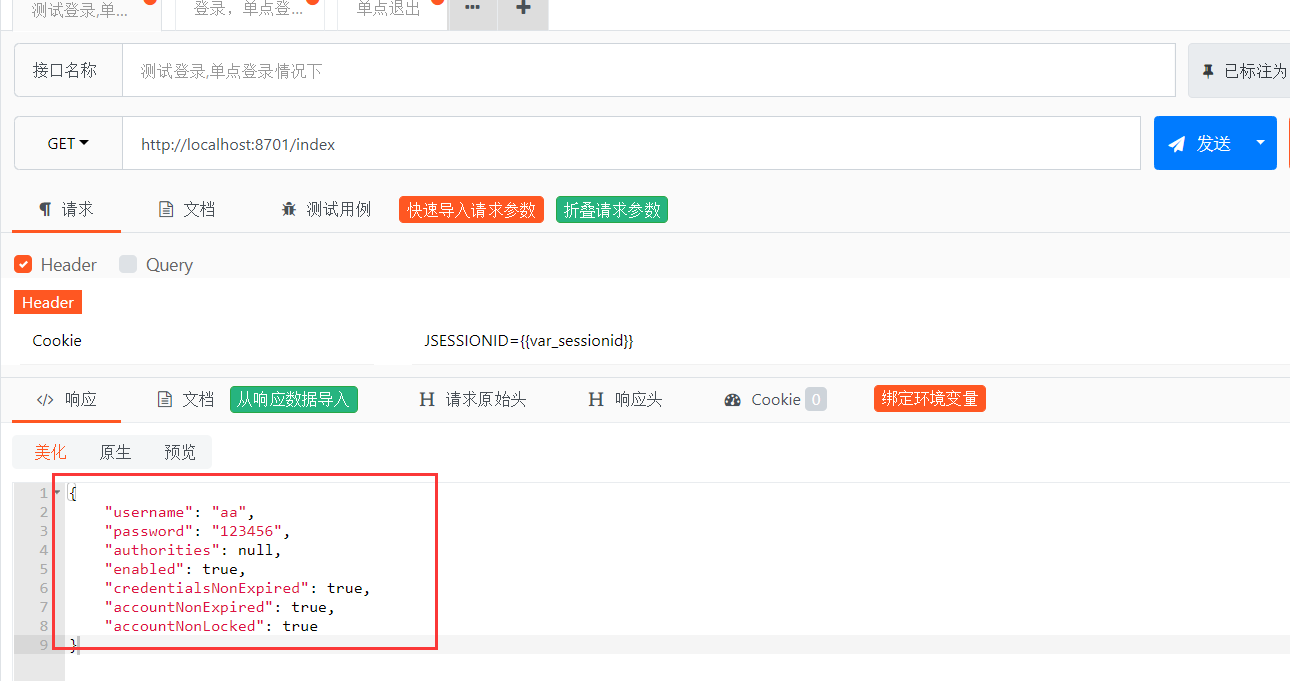
图-10
把头部的header前面的勾去掉,也就是去掉cookie,这时正常了,原因很简单,在退出时,没有清除cookie,这个只能到正式的环境上去测了。API POST再怎么模拟还是和正式环境有区别的。
如果在API POST测试报403错误,那就需要把configuration配置文件里的
|
1
2
3
4
|
//开启跨域访问http.cors().disable();//开启模拟请求,比如API POST测试工具的测试,不开启时,API POST为报403错误http.csrf().disable(); |
到此这篇关于SpringBoot Security前后端分离登录验证的实现的文章就介绍到这了,更多相关SpringBoot Security登录验证内容请搜索服务器之家以前的文章或继续浏览下面的相关文章希望大家以后多多支持服务器之家!
原文链接:https://blog.csdn.net/zs319428/article/details/107089473


