最近有用户反应我们现有的短信+邮件验证,不安全及短信条数限制和邮件收验证码比较慢的问题,希望我们也能做一个类似银行动态口令的验证方式。经过对可行性的分析及慎重考虑,可以实现一个这样的功能。
怎么实现呢,是自己开发一个这样的app?这样成本太高了,为了节约成本,我们使用互联网使用比较多的google身份验证器。使用它,我们只需要开发服务端就可以了。
google身份验证器的原理是什么呢?客户端和服务器事先协商好一个密钥k,用于一次性密码的生成过程,此密钥不被任何第三方所知道。此外,客户端和服务器各有一个计数器c,并且事先将计数值同步。进行验证时,客户端对密钥和计数器的组合(k,c)使用hmac(hash-based message authentication code)算法计算一次性密码,公式如下:
上面采用了hmac-sha-1,当然也可以使用hmac-md5等。hmac算法得出的值位数比较多,不方便用户输入,因
此需要截断(truncate)成为一组不太长十进制数(例如6位)。计算完成之后客户端计数器c计数值加1。用户将这一组十
进制数输入并且提交之后,服务器端同样的计算,并且与用户提交的数值比较,如果相同,则验证通过,服务器端将计数值
c增加1。如果不相同,则验证失败。
|
1
|
|
2
3
4
5
6
7
8
9
10
11
12
13
14
15
16
17
18
19
20
21
22
23
24
25
26
27
28
29
30
31
32
33
34
35
36
37
38
39
40
41
42
43
44
45
46
47
48
49
50
51
52
53
54
55
56
57
58
59
60
61
62
63
64
65
66
67
68
69
70
71
72
73
74
75
76
77
78
79
80
81
82
83
84
85
86
87
88
89
90
91
92
93
94
95
96
97
98
99
100
101
102
103
104
105
106
107
108
109
110
111
112
113
114
115
116
117
118
119
120
121
122
123
124
125
126
127
128
129
130
131
132
133
134
135
136
137
138
139
140
141
142
143
144
145
146
147
148
149
150
151
152
153
154
155
156
157
158
159
160
161
162
163
164
165
|
package com.auth.google; import java.security.invalidkeyexception; import java.security.nosuchalgorithmexception; import java.security.securerandom; import javax.crypto.mac; import javax.crypto.spec.secretkeyspec; import org.apache.commons.codec.binary.base32; import org.apache.commons.codec.binary.base64; /** * * * google身份验证器,java服务端实现 * * @author yangbo * * @version 创建时间:2017年8月14日 上午10:10:02 * * */public class googleauthenticator { // 生成的key长度( generate secret key length) public static final int secret_size = 10; public static final string seed = "g8gjevtbw5ovsv7avl47357438reyhreyuryetredldvks2m0qn7vxrs2im5mdancwgmcd2rvczx"; // java实现随机数算法 public static final string random_number_algorithm = "sha1prng"; // 最多可偏移的时间 int window_size = 3; // default 3 - max 17 /** * set the windows size. this is an integer value representing the number of * 30 second windows we allow the bigger the window, the more tolerant of * clock skew we are. * * @param s * window size - must be >=1 and <=17. other values are ignored */ public void setwindowsize(int s) { if (s >= 1 && s <= 17) window_size = s; } /** * generate a random secret key. this must be saved by the server and * associated with the users account to verify the code displayed by google * authenticator. the user must register this secret on their device. * 生成一个随机秘钥 * * @return secret key */ public static string generatesecretkey() { securerandom sr = null; try { sr = securerandom.getinstance(random_number_algorithm); sr.setseed(base64.decodebase64(seed)); byte[] buffer = sr.generateseed(secret_size); base32 codec = new base32(); byte[] bencodedkey = codec.encode(buffer); string encodedkey = new string(bencodedkey); return encodedkey; } catch (nosuchalgorithmexception e) { // should never occur... configuration error } return null; } /** * return a url that generates and displays a qr barcode. the user scans * this bar code with the google authenticator application on their * smartphone to register the auth code. they can also manually enter the * secret if desired * * @param user * user id (e.g. fflinstone) * @param host * host or system that the code is for (e.g. myapp.com) * @param secret * the secret that was previously generated for this user * @return the url for the qr code to scan */ public static string getqrbarcodeurl(string user, string host, string secret) { string format = "http://www.google.com/chart?chs=200x200&chld=m%%7c0&cht=qr&chl=otpauth://totp/%s@%s?secret=%s"; return string.format(format, user, host, secret); } /** * 生成一个google身份验证器,识别的字符串,只需要把该方法返回值生成二维码扫描就可以了。 * * @param user * 账号 * @param secret * 密钥 * @return */ public static string getqrbarcode(string user, string secret) { string format = "otpauth://totp/%s?secret=%s"; return string.format(format, user, secret); } /** * check the code entered by the user to see if it is valid 验证code是否合法 * * @param secret * the users secret. * @param code * the code displayed on the users device * @param t * the time in msec (system.currenttimemillis() for example) * @return */ public boolean check_code(string secret, long code, long timemsec) { base32 codec = new base32(); byte[] decodedkey = codec.decode(secret); // convert unix msec time into a 30 second "window" // this is per the totp spec (see the rfc for details) long t = (timemsec / 1000l) / 30l; // window is used to check codes generated in the near past. // you can use this value to tune how far you're willing to go. for (int i = -window_size; i <= window_size; ++i) { long hash; try { hash = verify_code(decodedkey, t + i); } catch (exception e) { // yes, this is bad form - but // the exceptions thrown would be rare and a static // configuration problem e.printstacktrace(); throw new runtimeexception(e.getmessage()); // return false; } if (hash == code) { return true; } } // the validation code is invalid. return false; } private static int verify_code(byte[] key, long t) throws nosuchalgorithmexception, invalidkeyexception { byte[] data = new byte[8]; long value = t; for (int i = 8; i-- > 0; value >>>= 8) { data[i] = (byte) value; } secretkeyspec signkey = new secretkeyspec(key, "hmacsha1"); mac mac = mac.getinstance("hmacsha1"); mac.init(signkey); byte[] hash = mac.dofinal(data); int offset = hash[20 - 1] & 0xf; // we're using a long because java hasn't got unsigned int. long truncatedhash = 0; for (int i = 0; i < 4; ++i) { truncatedhash <<= 8; // we are dealing with signed bytes: // we just keep the first byte. truncatedhash |= (hash[offset + i] & 0xff); } truncatedhash &= 0x7fffffff; truncatedhash %= 1000000; return (int) truncatedhash; } } |
测试代码:
|
1
|
|
2
3
4
5
6
7
8
9
10
11
12
13
14
15
16
17
18
19
20
21
22
23
24
25
26
27
28
29
30
31
32
33
34
35
36
37
38
39
|
package com.auth.google; import org.junit.test; /** * * * 身份认证测试 * * @author yangbo * * @version 创建时间:2017年8月14日 上午11:09:23 * * */public class authtest { //当测试authtest时候,把gensecrettest生成的secret值赋值给它 private static string secret="r2q3s52rnxbtftom"; //@test public void gensecrettest() {// 生成密钥 secret = googleauthenticator.generatesecretkey(); // 把这个qrcode生成二维码,用google身份验证器扫描二维码就能添加成功 string qrcode = googleauthenticator.getqrbarcode("2816661736@qq.com", secret); system.out.println("qrcode:" + qrcode + ",key:" + secret); } /** * 对app的随机生成的code,输入并验证 */ @test public void verifytest() { long code = 807337; long t = system.currenttimemillis(); googleauthenticator ga = new googleauthenticator(); ga.setwindowsize(5); boolean r = ga.check_code(secret, code, t); system.out.println("检查code是否正确?" + r); } } |
具体使用方式(ios演示):
第一步:进入iphone的appstore,在搜索框中输入google身份验证器,如下图:
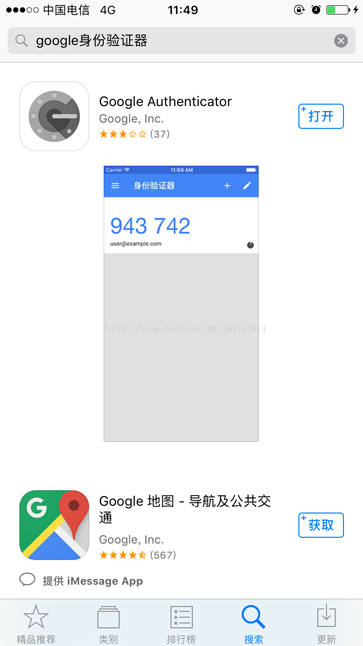
选择上图中的google authenticator 并安装。
第二步:运行下面链接中下载的demo中的authtest的gensecrettest方法,控制台打印的结果如下图:
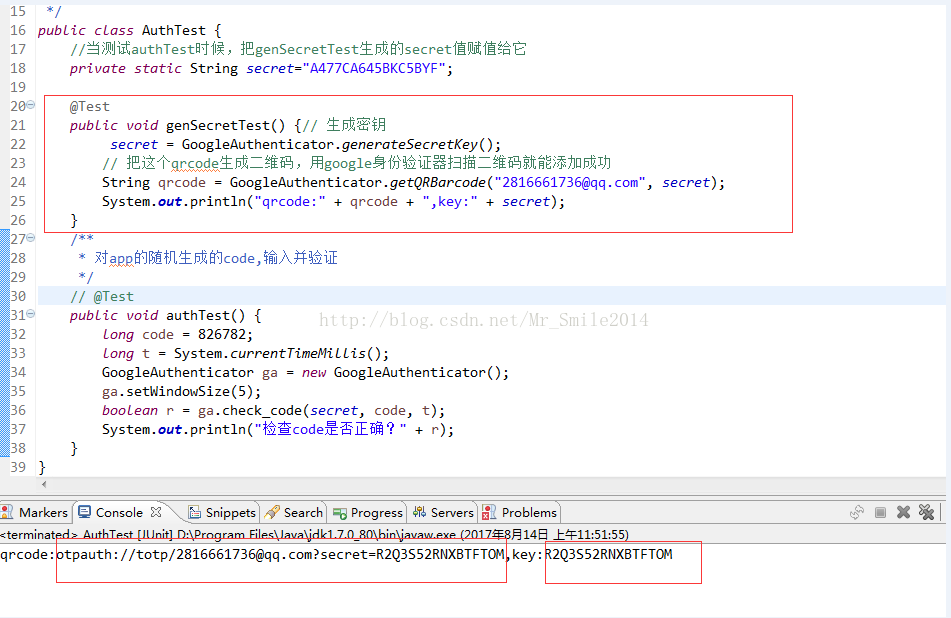
key:为app与服务端约定的秘钥,用于双方的认证。
qrcode:是app扫码能够识别的就是二维码值,把它生成二维码如下图:

第三步:打开google authenticator app软件选择扫描条形码按扭打开相机对二维码扫描加入账号,如下图:

第四步:把app中的数字,在authtest的verifytest进行验证,如下图:
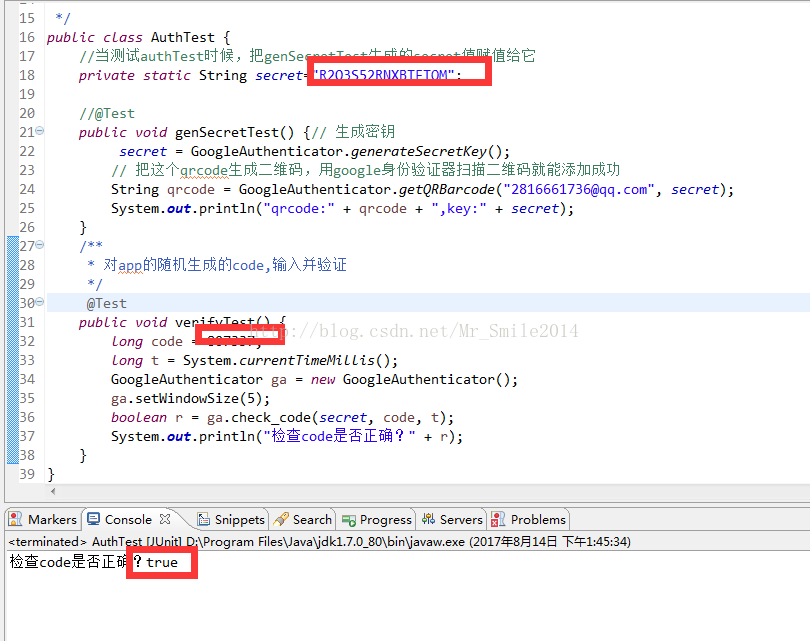
通过上面给大家分享了google身份认证器服务端key的生成和它生成的随机密码的验证。
上面使用的代码已上传到码云,下载地址:googleauth.rar
以上就是本文的全部内容,希望对大家的学习有所帮助,也希望大家多多支持服务器之家。
原文链接:http://blog.csdn.net/mr_smile2014/article/details/77160873


