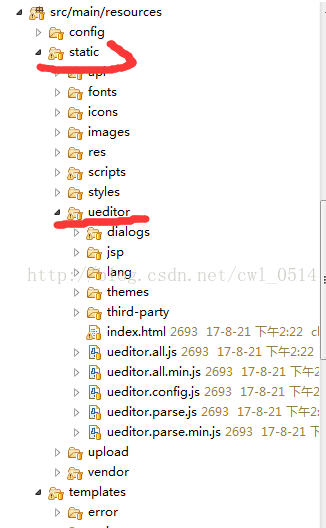
1.先导入ueditor所有的包:在springboot static下

2.导入需要的ueditor的js

3.配置ueditor.config.js的// 服务器统一请求接口路径://, serverurl:(这个路径是个java类,和config.js的内容相同)
4.js里面执行1.var ue = ue.geteditor('editor');函数
5.上传图片:
|
1
2
3
4
5
6
7
8
9
10
11
12
|
/* ueditor里面的上传图片 */ue.editor.prototype._bkgetactionurl=ue.editor.prototype.getactionurl;//action是config.json配置文件的action ue.editor.prototype.getactionurl=function(action){ if (action == 'uploadimage'){ return [[@{/common/upload/image}]]; /* 这里填上你自己的上传图片的action */ }else if(action == 'uploadvideo'){ return [[@{/common/upload/image}]]; }else{ return this._bkgetactionurl.call(this, action); } }; |
6.上传图片的方法:
|
1
2
3
4
5
6
7
8
9
10
11
12
13
14
15
16
17
18
19
20
21
22
23
24
25
26
27
28
29
30
31
32
33
34
35
36
37
38
39
40
41
42
43
44
|
@requestmapping(value = "/upload/image", method = requestmethod.post, produces = mediatype.application_json_value) @responsebody public map<string,object> save(httpservletrequest req){ map<string,object> rs = new hashmap<string, object>(); multiparthttpservletrequest mreq = null; multipartfile file = null; string filename = ""; // 原始文件名 ueditor创建页面元素时的alt和title属性 string originalfilename = ""; try { mreq = (multiparthttpservletrequest)req; // 从config.json中取得上传文件的id file = mreq.getfile("upfile"); if(!file.isempty()){ // 取得文件的原始文件名称 filename = file.getoriginalfilename(); originalfilename = filename; string ext = (filenameutils.getextension(file.getoriginalfilename())).tolowercase(); string storepath = ""; if ("jpg".equals(ext) || "png".equals(ext) || "jpeg".equals(ext) || "bmp".equals(ext)) { storepath = "upload/image/"; }else{ storepath = "upload/video/"; } //将图片和视频保存在本地服务器 string pathroot = req.getsession().getservletcontext().getrealpath(""); string path = pathroot + "/" + storepath; file.transferto(new file(path+filename)); string domain = readproperties.getfiledomain();string httpimgpath = domain + storepath + filename; rs.put("state", "success");// ueditor的规则:不为success则显示state的内容 rs.put("url",httpimgpath); //能访问到你现在图片的路径 rs.put("title", originalfilename); rs.put("original", originalfilename); } } catch (exception e) { e.printstacktrace(); rs.put("state", "文件上传失败!"); //在此处写上错误提示信息,这样当错误的时候就会显示此信息 rs.put("url",""); rs.put("title", ""); rs.put("original", ""); } return rs; } |
总结
以上所述是小编给大家介绍的编辑器ueditor和springboot 的整合方法,希望对大家有所帮助,如果大家有任何疑问请给我留言,小编会及时回复大家的。在此也非常感谢大家对服务器之家网站的支持!
原文链接:http://blog.csdn.net/cwl_0514/article/details/77451135


