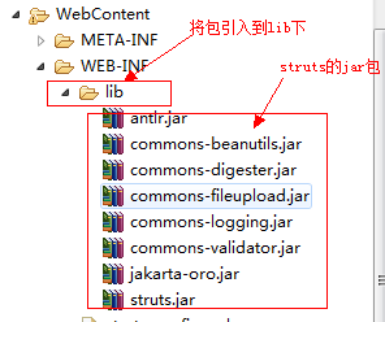
1、实例开始工作—导入jar包,在官网上下载struts1框架包,解压之后导入工程的:

2、之后配置web.xml(这里的具体配置方法可以参见struts1框架包中的实例文件夹webapps中的实例代码中web.xml文件的配置方法):

具体如下:
|
1
2
3
4
5
6
7
8
9
10
11
12
13
14
15
16
17
18
19
20
21
22
23
24
25
26
27
28
29
30
31
32
|
<span style="font-size:18px;"><?xml version="1.0" encoding="utf-8"?> <web-app version="2.4" xmlns="http://java.sun.com/xml/ns/j2ee" xmlns:xsi="http://www.w3.org/2001/xmlschema-instance" xsi:schemalocation="http://java.sun.com/xml/ns/j2ee http://java.sun.com/xml/ns/j2ee/web-app_2_4.xsd"> <welcome-file-list> <welcome-file>index.jsp</welcome-file> </welcome-file-list> <servlet> <servlet-name>action</servlet-name> <servlet-class>org.apache.struts.action.actionservlet</servlet-class> <init-param> <param-name>config</param-name> <param-value>/web-inf/struts-config.xml</param-value> </init-param> <init-param> <param-name>debug</param-name> <param-value>2</param-value> </init-param> <init-param> <param-name>detail</param-name> <param-value>2</param-value> </init-param> <load-on-startup>2</load-on-startup> </servlet> <!-- standard action servlet mapping --> <servlet-mapping> <servlet-name>action</servlet-name> <url-pattern>*.do</url-pattern> </servlet-mapping> </web-app></span> |
首先这个配置文件中最主要的就是做了两件的事情,一个是配置actionservlet,一个是初始化struts-config.xml配置文件参数。
3、配置完了web.xml文件,之后我们就要开始进入项目代码阶段了。
登录页面:
|
1
2
3
4
5
6
7
8
9
10
11
12
13
14
15
16
|
<%@ page language="java" contenttype="text/html; charset=gb18030" pageencoding="gb18030"%> <!doctype html public "-//w3c//dtd html 4.01 transitional//en" "http://www.w3.org/tr/html4/loose.dtd"> <html> <head> <meta http-equiv="content-type" content="text/html; charset=gb18030"> <title>insert title here</title> </head> <body> <form action="login.do" method="post"> 用户:<input type="text" name="username"><br> 密码:<input type="password" name="password"></br> <input type="submit" value="登录"> </form> </body> </html> |
切记那个action后面的路径一定要是.do开头的,因为我们在web.xml中配置的是*.do。这里依旧不介绍为什么随后博客会深入分析。
4、建立两个异常类,一个是用户名未找到、一个是密码错误:
①用户名未找到
|
1
2
3
4
5
6
7
8
9
10
11
12
13
14
15
16
17
|
public class usernotfoundexception extends runtimeexception { public usernotfoundexception() { // todo auto-generated constructor stub } public usernotfoundexception(string message) { super(message); // todo auto-generated constructor stub } public usernotfoundexception(throwable cause) { super(cause); // todo auto-generated constructor stub } public usernotfoundexception(string message, throwable cause) { super(message, cause); // todo auto-generated constructor stub } } |
②密码错误
|
1
2
3
4
5
6
7
8
9
10
11
12
13
14
15
16
17
|
public class passworderrorexception extends runtimeexception { public passworderrorexception() { // todo auto-generated constructor stub } public passworderrorexception(string message) { super(message); // todo auto-generated constructor stub } public passworderrorexception(throwable cause) { super(cause); // todo auto-generated constructor stub } public passworderrorexception(string message, throwable cause) { super(message, cause); // todo auto-generated constructor stub } } |
5、业务处理类代码:
|
1
2
3
4
5
6
7
8
9
10
|
public class usermanager { public void login(string username, string password) { if (!"admin".equals(username)) { throw new usernotfoundexception(); } if (!"admin".equals(password)) { throw new passworderrorexception(); } } } |
6、建立loginactionform类,这个类继承actionform类,简单说一下这个类,这个类主要是负责收集表单数据的,在这里一定要注意表单的属性必须和actionform中的get和set方法的属性一致。这里依旧不深入解释,随后博客都会涉及到。
|
1
2
3
4
5
6
7
8
9
10
11
12
13
14
15
16
17
18
19
20
21
22
23
24
|
import org.apache.struts.action.actionform; /** * 登录actionform,负责表单收集数据 * 表单的属性必须和actionform中的get和set的属性一致 * @author administrator * */@suppresswarnings("serial") public class loginactionform extends actionform { private string username; private string password; public string getusername() { return username; } public void setusername(string username) { this.username = username; } public string getpassword() { return password; } public void setpassword(string password) { this.password = password; } } |
7、loginaction类的建立,这个是负责取得表单数据、调用业务逻辑以及返回转向信息。
|
1
2
3
4
5
6
7
8
9
10
11
12
13
14
15
16
17
18
19
20
21
22
23
24
25
26
27
28
29
30
31
32
33
34
35
|
import javax.servlet.http.httpservletrequest; import javax.servlet.http.httpservletresponse; import org.apache.struts.action.action; import org.apache.struts.action.actionform; import org.apache.struts.action.actionforward; import org.apache.struts.action.actionmapping; /** * 登录action * 负责取得表单数据、调用业务逻辑、返回转向信息 * * @author administrator * */public class loginaction extends action { @override public actionforward execute(actionmapping mapping, actionform form, httpservletrequest request, httpservletresponse response) throws exception { loginactionform laf=(loginactionform)form; string username=laf.getusername(); string password=laf.getpassword(); usermanager usermanager=new usermanager(); try{ usermanager.login(username, password); return mapping.findforward("success"); }catch(usernotfoundexception e){ e.printstacktrace(); request.setattribute("msg", "用户名不能找到,用户名称=["+username+"]"); }catch(passworderrorexception e){ e.printstacktrace(); request.setattribute("msg", "密码错误"); } return mapping.findforward("error"); } } |
8、既然有转向,那么我们还要建立两个页面,一个是登录成功页面,一个登录失败页面。
①登录成功页面
|
1
2
3
4
5
6
7
8
9
10
11
12
|
<%@ page language="java" contenttype="text/html; charset=gb18030" pageencoding="gb18030"%> <!doctype html public "-//w3c//dtd html 4.01 transitional//en" "http://www.w3.org/tr/html4/loose.dtd"> <html> <head> <meta http-equiv="content-type" content="text/html; charset=gb18030"> <title>insert title here</title> </head> <body> ${loginform.username },登录成功 </body> </html> |
②登录失败页面
|
1
2
3
4
5
6
7
8
9
10
11
12
13
14
15
|
<%@ page language="java" contenttype="text/html; charset=gb18030" pageencoding="gb18030"%> <!doctype html public "-//w3c//dtd html 4.01 transitional//en" "http://www.w3.org/tr/html4/loose.dtd"> <html> <head> <meta http-equiv="content-type" content="text/html; charset=gb18030"> <title>insert title here</title> </head> <body> <%-- <%=request.getattribute("msg") %> --%> ${msg } </body> </html> |
9、最后要进行struts-config.xml的配置。
<?xml version="1.0" encoding="iso-8859-1" ?>
<!doctype struts-config public
"-//apache software foundation//dtd struts configuration 1.2//en"
"">
<struts-config>
<form-beans>
<form-bean name="loginform" type="com.bjpowernode.struts.loginactionform"/>
</form-beans>
<action-mappings>
<action path="/login"
type="com.bjpowernode.struts.loginaction"
name="loginform"
scope="request"
>
<forward name="success" path="/login_success.jsp" />
<forward name="error" path="/login_error.jsp"/>
</action>
</action-mappings>
</struts-config>
经过配置之后实例就已经做完了,感兴趣童鞋可以自己手动运行一下。


