1.新建maven项目
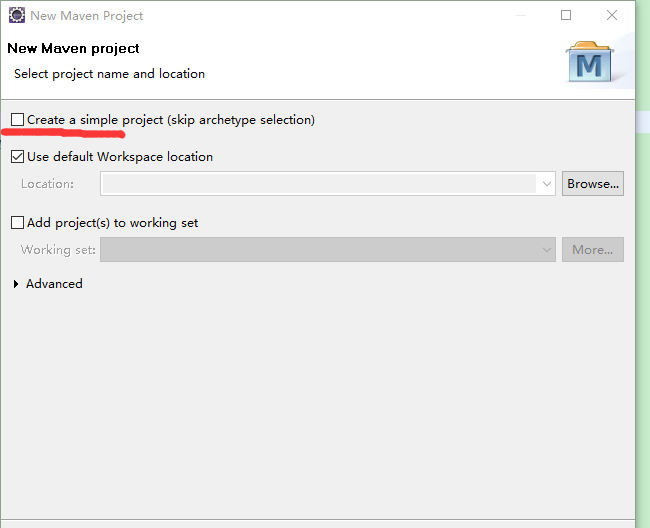
先新建一个maven项目,勾选上creat a simple project,填写groupid,artifactid

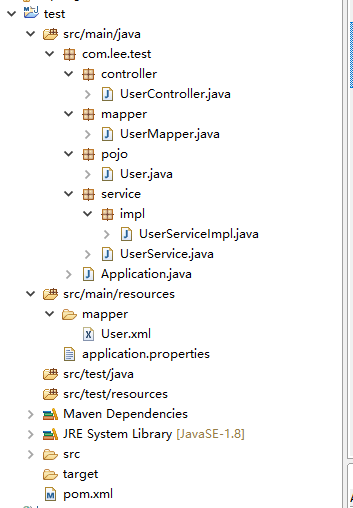
2.建立项目结构

3.添加依赖
|
1
2
3
4
5
6
7
8
9
10
11
12
13
14
15
16
17
18
19
20
21
22
23
24
25
26
27
28
29
30
31
32
33
34
35
36
37
38
39
40
41
42
43
44
45
46
47
48
49
50
|
<parent> <groupid>org.springframework.boot</groupid> <artifactid>spring-boot-starter-parent</artifactid> <version>2.0.3.release</version> <relativepath/> <!-- lookup parent from repository --></parent><properties> <project.build.sourceencoding>utf-8</project.build.sourceencoding> <project.reporting.outputencoding>utf-8</project.reporting.outputencoding> <java.version>1.8</java.version></properties><dependencies> <dependency> <groupid>org.springframework.boot</groupid> <artifactid>spring-boot-starter</artifactid> </dependency> <dependency> <groupid>org.springframework.boot</groupid> <artifactid>spring-boot-starter-test</artifactid> <scope>test</scope> </dependency> <dependency> <groupid>org.springframework.boot</groupid> <artifactid>spring-boot-starter-web</artifactid> </dependency> <dependency> <groupid>org.mybatis.spring.boot</groupid> <artifactid>mybatis-spring-boot-starter</artifactid> <version>1.3.2</version> </dependency> <dependency> <groupid>mysql</groupid> <artifactid>mysql-connector-java</artifactid> </dependency> <dependency> <groupid>junit</groupid> <artifactid>junit</artifactid> </dependency></dependencies><build> <plugins> <plugin> <groupid>org.springframework.boot</groupid> <artifactid>spring-boot-maven-plugin</artifactid> </plugin> </plugins></build> |
4.代码编写
在包的最外层添加启动类
|
1
2
3
4
5
6
7
8
9
10
11
|
package com.lee.test;import org.springframework.boot.springapplication;import org.springframework.boot.autoconfigure.springbootapplication;import org.springframework.cache.annotation.enablecaching;@springbootapplication@enablecachingpublic class application { public static void main(string[] args) { springapplication.run(application.class, args); }} |
实体类
|
1
2
3
4
5
6
7
8
9
10
11
12
13
14
15
16
17
18
19
20
21
22
23
24
25
26
27
28
29
30
31
32
33
34
35
36
37
38
|
package com.lee.test.pojo;import org.springframework.stereotype.component;@componentpublic class user { private int id; private string name; private string telephone; public int getid() { return id; } public void setid(int id) { this.id = id; } public string getname() { return name; } public void setname(string name) { this.name = name; } public string gettelephone() { return telephone; } public void settelephone(string telephone) { this.telephone = telephone; }} |
mapper接口
|
1
2
3
4
5
6
7
8
9
10
11
12
13
14
|
package com.lee.test.mapper;import java.util.list;import org.apache.ibatis.annotations.mapper;import com.lee.test.pojo.user;@mapperpublic interface usermapper { list<user> getuser(int id);} |
service接口
|
1
2
3
4
5
6
7
8
9
10
|
package com.lee.test.service;import java.util.list;import com.lee.test.pojo.user;public interface userservice { public list<user> getuser(int id);} |
service接口实现
|
1
2
3
4
5
6
7
8
9
10
|
package com.lee.test.service;import java.util.list;import com.lee.test.pojo.user;public interface userservice { public list<user> getuser(int id);} |
controller层
|
1
2
3
4
5
6
7
8
9
10
11
12
13
14
15
16
17
18
19
20
21
22
23
24
|
package com.lee.test.controller;import java.util.list;import org.springframework.beans.factory.annotation.autowired;import org.springframework.web.bind.annotation.requestmapping;import org.springframework.web.bind.annotation.requestparam;import org.springframework.web.bind.annotation.restcontroller;import com.lee.test.pojo.user;import com.lee.test.service.userservice;@restcontrollerpublic class usercontroller { @autowired private userservice userservice; @requestmapping("/getuser") public list<user> getuser(@requestparam("id") int id) { return userservice.getuser(id); }} |
还有mapper.xml的实现
|
1
2
3
4
5
6
7
|
<?xml version="1.0" encoding="utf-8"?><!doctype mapper public "-//mybatis.org//dtd mapper 3.0//en" "http://www.mybatis.org/dtd/mybatis-3-mapper.dtd"><mapper namespace="com.lee.test.mapper.usermapper"> <select id="getuser" parametertype="java.lang.integer" resulttype="com.lee.test.pojo.user"> select * from t_user where id = #{id} </select></mapper> |
最后是一些配置在application.properties中
|
1
2
3
4
5
|
spring.datasource.driverclassname=com.mysql.jdbc.driverspring.datasource.url=jdbc:mysql://localhost:3306/test?useunicode=true&characterencoding=utf-8spring.datasource.username=rootspring.datasource.password=rootmybatis.mapper-locations: classpath:mapper/*.xml |
以上就是本文的全部内容,希望对大家的学习有所帮助,也希望大家多多支持服务器之家。
原文链接:http://www.cnblogs.com/leexboo/p/10468024.html


