何为 Starter ?
想必大家都使用过 SpringBoot,在 SpringBoot 项目中,使用最多的无非就是各种各样的 Starter 了。那何为 Starter 呢?你可以理解为一个可拔插式的插件(组件)。或者理解为场景启动器。
通过 Starter,能够简化以前繁杂的配置,无需过多的配置和依赖,它会帮你合并依赖,并且将其统一集成到一个 Starter 中,我们只需在 Maven 或 Gradle 中引入 Starter 依赖即可。SpringBoot 会自动扫描需要加载的信息并启动相应的默认配置。例如,如果你想使用 jdbc 插件,你只需引入 spring-boot-starter-jdbc 即可;如果你想使用 mongodb,你只需引入 spring-boot-starter-data-mongodb 依赖即可。
SpringBoot 官方提供了大量日常企业应用研发各种场景的 spring-boot-starter 依赖模块。这些依赖模块都遵循着约定成俗的默认配置,并允许我们根据自身情况调整这些配置。
总而言之,Starter 提供了以下功能:
- 整合了模块需要的所有依赖,统一集合到 Starter 中。
- 提供了默认配置,并允许我们调整这些默认配置。
- 提供了自动配置类对模块内的 Bean 进行自动装配,注入 Spring 容器中。
Starter 命名规则
Spring 官方定义的 Starter 通常命名遵循的格式为 spring-boot-starter-{name},例如 spring-boot-starter-data-mongodb。Spring 官方建议,非官方 Starter 命名应遵循 {name}-spring-boot-starter 的格式,例如,myjson-spring-boot-starter。
自定义一个 Starter
了解了 Starter 的含义以及应用场景后,我们可以尝试手写一个 Starter,加深对它的了解以及能在实际工作中,开发出自己的 Starter,提高我们的开发效率。
可能有人会问 Starter 能干嘛呢?其实在我们的日常开发工作中,总有一些独立于业务系统之外的配置模块,它是可以在不同项目中进行复用的。如果在每个项目中都编写重复的模块代码,不仅浪费时间和人力,而且还和项目耦合。所以我们将这些可独立于业务代码之外的功能配置模块封装成一个 Starter,在需要用到此功能模块的项目中,只需要在其 pom.xml 文件中引用依赖即可,SpringBoot 帮我们完成自动装配,而且我们还可以在配置文件中调整 Starter 中默认的配置信息。
假设我们现在需要实现这样一个功能:
-
根据用户提供的 Java 对象,将其转换为 JSON 形式,并且在 JSON 字符串中添加指定的前辍和后辍。
-
用户可以动态改变前辍和后辍,即可在 yml 或 properties 配置文件中自定义。
举个栗子,假如用户输入下面这个类的对象 person:
class Person {
 private String name;
 private int age;
 private String address;
 public Person(String name, int age, String address) {
  super();
  this.name = name;
  this.age = age;
  this.address = address;
 }
 // 省略get和set方法
}
Person person = new Person("Mr.nobody", 18, "拉斯维加斯");
并假设用户在 application.yml 配置文件中配置的前辍为 @,后辍为 %,则最终生成的字符串为:
@{"address":"拉斯维加斯","age":18,"name":"Mr.nobody"}%
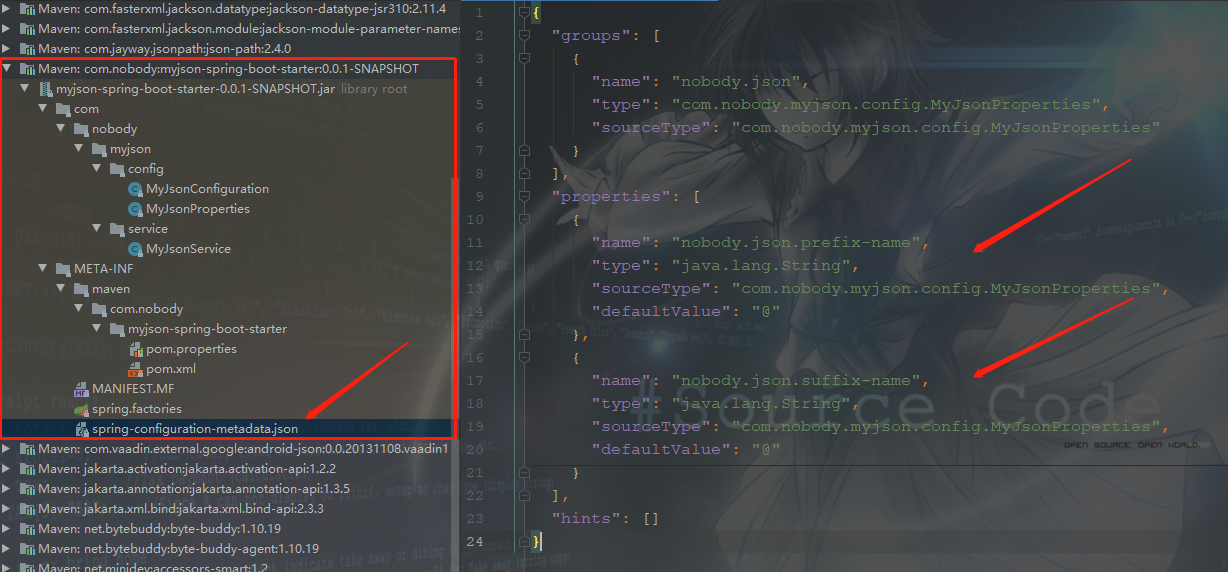
首先新建一个 Maven 工程(当然也可以其他类型例如 Gradle 工程),在 pom.xml 文件中引入如下依赖。fastjson 依赖是我们业务用到将 Java 对象转换为 JSON 字符串;spring-boot-configuration-processor 依赖是可选的,加入此依赖主要是打包时,自动生成配置元信息文件 META-INF/spring-configuration-metadata.json,并放入到 jar 中。方便使用者了解到一些配置元信息。
<?xml version="1.0" encoding="UTF-8"?>
<project xmlns="http://maven.apache.org/POM/4.0.0" xmlns:xsi="http://www.w3.org/2001/XMLSchema-instance"
	xsi:schemaLocation="http://maven.apache.org/POM/4.0.0 https://maven.apache.org/xsd/maven-4.0.0.xsd">
	<modelVersion>4.0.0</modelVersion>
	<groupId>com.nobody</groupId>
	<artifactId>myjson-spring-boot-starter</artifactId>
	<version>0.0.1-SNAPSHOT</version>
	<name>myjson-spring-boot-starter</name>
	<description>Demo project for Spring Boot Starter</description>
	<properties>
		<java.version>1.8</java.version>
	</properties>
	<dependencies>
		<dependency>
			<groupId>org.springframework.boot</groupId>
			<artifactId>spring-boot-starter</artifactId>
			<version>2.3.8.RELEASE</version>
		</dependency>
		<dependency>
			<groupId>org.springframework.boot</groupId>
			<artifactId>spring-boot-configuration-processor</artifactId>
			<version>2.3.8.RELEASE</version>
			<optional>true</optional>
		</dependency>
		<dependency>
			<groupId>com.alibaba</groupId>
			<artifactId>fastjson</artifactId>
			<version>1.2.73</version>
		</dependency>
		<dependency>
			<groupId>org.springframework.boot</groupId>
			<artifactId>spring-boot-autoconfigure</artifactId>
			<version>2.3.8.RELEASE</version>
		</dependency>
	</dependencies>
</project>
业务处理类,实现 Java 对象转换为带有指定前后缀的 JSON 字符串。
package com.nobody.myjson.service;

import com.alibaba.fastjson.JSON;

/**
 * @Description 业务处理类
 * @Author Mr.nobody
 * @Date 2021/2/27
 * @Version 1.0
 */
public class MyJsonService {
 // 前缀
 private String prefixName;
 // 后缀
 private String suffixName;

 /**
  * 将Java对象转为带有指定前后缀的JSON字符串
  *
  * @param o 需要转换的Java对象
  * @return 转换后的字符串
  */
 public String objectToMyJson(Object o) {
  return prefixName + JSON.toJSONString(o) + suffixName;
 }

 public String getPrefixName() {
  return prefixName;
 }

 public void setPrefixName(String prefixName) {
  this.prefixName = prefixName;
 }

 public String getSuffixName() {
  return suffixName;
 }

 public void setSuffixName(String suffixName) {
  this.suffixName = suffixName;
 }
}
配置类,定义需要的配置信息和默认配置项,并指明关联配置文件的配置项前缀。它可以把相同前缀的配置信息通过配置项名称映射成实体类的属性中。

package com.nobody.myjson.config;

import org.springframework.boot.context.properties.ConfigurationProperties;

/**
 * @Description 配置类(类名一般为模块名+Properties) nobody.json为Starter使用者通过yml配置文件动态修改属性值的变量名前缀
 * @Author Mr.nobody
 * @Date 2021/2/27
 * @Version 1.0
 */
@ConfigurationProperties(prefix = "nobody.json")
public class MyJsonProperties {

 // Starter使用者没在配置文件中配置prefixName属性的值时的默认值
 public static final String DEFAULT_PREFIX_NAME = "@";

 // Starter使用者没在配置文件中配置suffixName属性的值时的默认值
 public static final String DEFAULT_SUFFIX_NAME = "@";

 private String prefixName = DEFAULT_PREFIX_NAME;

 private String suffixName = DEFAULT_SUFFIX_NAME;

 public String getPrefixName() {
  return prefixName;
 }

 public void setPrefixName(String prefixName) {
  this.prefixName = prefixName;
 }

 public String getSuffixName() {
  return suffixName;
 }

 public void setSuffixName(String suffixName) {
  this.suffixName = suffixName;
 }
}
自动装配类,使用 @Configuration 和 @Bean 来进行自动装配,注入 Spring 容器中。
package com.nobody.myjson.config;

import com.nobody.myjson.service.MyJsonService;
import org.springframework.boot.autoconfigure.condition.ConditionalOnClass;
import org.springframework.boot.autoconfigure.condition.ConditionalOnMissingBean;
import org.springframework.boot.context.properties.EnableConfigurationProperties;
import org.springframework.context.annotation.Bean;
import org.springframework.context.annotation.Configuration;

/**
 * @Description 自动装配类
 * @Author Mr.nobody
 * @Date 2021/2/27
 * @Version 1.0
 */
@Configuration // 标识此类是配置类
@ConditionalOnClass(MyJsonService.class) // 表示只有指定的class在classpath上时才能被注册
@EnableConfigurationProperties(MyJsonProperties.class) // 激活@ConfigurationProperties
public class MyJsonConfiguration {

 private MyJsonProperties myJsonProperties;

 // 自动注入配置类
 public MyJsonConfiguration(MyJsonProperties myJsonProperties) {
  this.myJsonProperties = myJsonProperties;
 }

 // 创建MyJsonService对象,注入到Spring容器中
 @Bean
 @ConditionalOnMissingBean(MyJsonService.class) // 当容器没有此bean时,才注册
 public MyJsonService myJsonService() {
  MyJsonService myJsonService = new MyJsonService();
  myJsonService.setPrefixName(myJsonProperties.getPrefixName());
  myJsonService.setSuffixName(myJsonProperties.getSuffixName());
  return myJsonService;
 }
}
在 src/main/resources/META-INF目录下新建 spring.factories 文件,输入以下内容:
org.springframework.boot.autoconfigure.EnableAutoConfiguration=

	com.nobody.myjson.config.MyJsonConfiguration
SpringBoot 项目启动时,类加载器会从 META-INF / spring.factories 加载给定类型的工厂实现的完全限定类名。也就是说类加载器得到工程中所有 jar 包中的 META-INF/spring.factories 文件资源,从而得到了一些包括自动配置相关的类的集合,然后将它们实例化,放入 Spring 容器中。
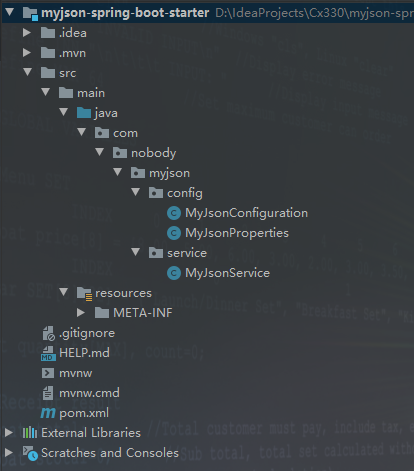
最终项目结构如下:
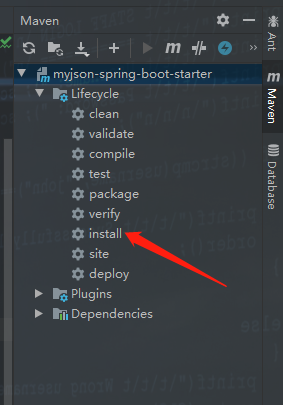
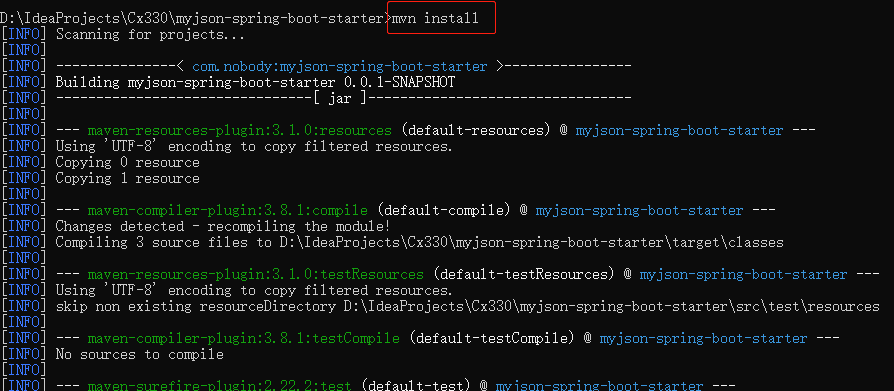
在开发工具 IDEA 通过 Maven 的 install 命令进行构建打包。或者在项目的目录下,打开命令行窗口,使用mvn install命令进行构建打包。打包后,会在工程的 target 目录下生成一个 jar 包,并且在 maven 本地仓库也会生成相应的 jar 包。


使用自定义的 Starter
经过上面几个步骤,我们自定义的 Starter 就开发好了,以下是在其他工程进行引入使用。在需要引用此 Starter 的工程的 pom.xml 文件中引入此依赖。
dependency>
 <groupId>com.nobody</groupId>
 <artifactId>myjson-spring-boot-starter</artifactId>
 <version>0.0.1-SNAPSHOT</version>
</dependency>
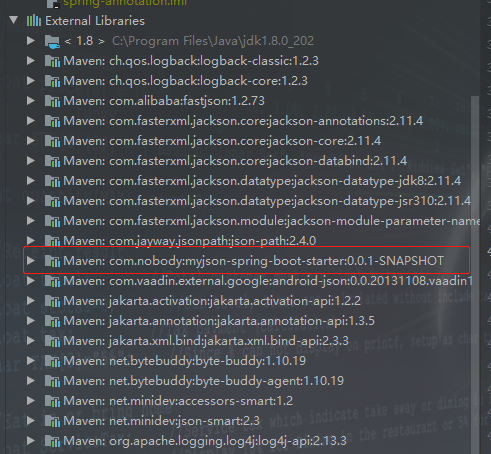
刷新依赖,就能在项目的依赖库中看到此依赖了。
展开,还能查看此 Starter 可以配置的属性项有哪些,如下:
然后在需要用到的类中进行注入使用即可。
package com.nobody.controller;

import org.springframework.beans.factory.annotation.Autowired;
import org.springframework.web.bind.annotation.GetMapping;
import org.springframework.web.bind.annotation.RequestMapping;
import org.springframework.web.bind.annotation.RestController;

import com.nobody.domain.Person;
import com.nobody.service.MyJsonService;

@RestController
@RequestMapping("demo")
public class DemoController {

 // 注入我们Starter中的服务类
 @Autowired
 private MyJsonService myJsonService;

 @GetMapping()
 public String test() {
  Person p = new Person("Mr.nobody", 18, "拉斯维加斯");
  // 调用服务方法
  return myJsonService.objectToMyJson(p);
 }
}
启动项目,在浏览器中访问此接口,得到如下结果:

如果我们在 application.yml 文件中添加以下配置信息,然后再访问接口的结果如下,也验证了我们可以自定义 Starter 中默认的配置项。
nobody:
 json:
 prefixName: HH
 suffixName: KK

当我们引入此 Starter 时,SpringBoot 会自动装配,将实例化的 bean 放入 Spring 容器。但我们是否可控制 bean 要不要实例化并放入容器呢?答案是可以做到的。
我们只需要在自动装配类或者类内的方法,通过 @ConditionalOnXXX 注解就能控制。例如如下所示,使用 Starter 使用者在他的项目的配置文件中填写 nobody.json.enable 的值为 false,则就不会自动生成 MyJsonService 实例了。默认不填或者 nobody.json.enable 的值为 true 时,能自动生成 bean 放入容器。这样用户就能自己控制 bean 的实例化了。
// 创建MyJsonService对象,注入到Spring容器中
@Bean
@ConditionalOnProperty(name = "nobody.json.enable", matchIfMissing = true)
@ConditionalOnMissingBean(MyJsonService.class) // 当容器没有此bean时,才注册
public MyJsonService myJsonService() {
 MyJsonService myJsonService = new MyJsonService();
 myJsonService.setPrefixName(myJsonProperties.getPrefixName());
 myJsonService.setSuffixName(myJsonProperties.getSuffixName());
 return myJsonService;
}
此演示项目已上传到Github,如有需要可自行下载,欢迎 Star 。
https://github.com/LucioChn/myjson-spring-boot-starter
以上就是如何手写一个Spring Boot Starter的详细内容,更多关于手写Spring Boot Starter的资料请关注服务器之家其它相关文章!
原文链接:https://www.cnblogs.com/luciochn/p/14458876.html


