简介:
动态的给一个对象添加一些额外的职责,就增加功能来说,装饰模式比生产子类更加灵活——《大话设计模式》;
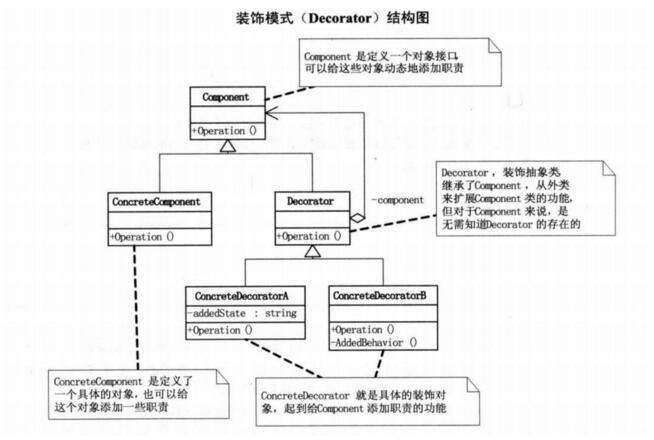
结构图:

优点:
- 装饰类和被装饰类可以独立发展,不会相互耦合;
- 动态的扩展一个对象的功能;
- 可以对一个对象进行多次装饰,让其具备更多的功能;
缺点:
- 多层装饰比较复杂,相应增加调试和维护的成本;
- 将产生许多小对象,势必会占用很多系统资源,一定程度上影响程序性能;
应用场景:
1.当系统需要新功能的时候,是向旧的类中添加新的代码。这些新的代码通常是装饰原有类的核心职责或主要行为,在主类中增加新字段,新方法,新逻辑,从而增加了主类的复杂度,而这些新加入的代码,只是为了满足一些在特定情况下才会执行的特殊行为的需要。装饰器模式就能很好的提供一个解决方案,它把每个要装饰的功能单独放在一个类中,并让这个类包装它所要装饰的对象,因此,当需要执行特殊行为时,客户端代码就可以在运行时根据需要有选择的,有顺序的使用装饰功能包装对象了。——《大话设计模式》
2.不想增加子类的情况下,扩展一个类。
注意事项:
- 被装饰类[Component]尽量保持单一职责,不要使其拥有太多功能;
- 装饰模式的装饰顺序很重要;
示例:
1.结构类的实现
被装饰抽象类和被装饰具体类
|
1
2
3
4
5
6
7
8
9
10
11
12
13
14
15
16
17
18
19
20
21
22
23
24
25
|
/// <summary>/// 元件类/// 被装饰的抽象对象/// </summary> public abstract class Component { /// <summary> /// 对象的抽象操作 /// </summary> public abstract void Operation(); } /// <summary> /// 具体元件 /// </summary> public class ConcreteComponent : Component { /// <summary> /// 对象的具体操作 /// </summary> public override void Operation() { Console.WriteLine("元件具体操作!"); }} |
装饰抽象类和具体装饰类
|
1
2
3
4
5
6
7
8
9
10
11
12
13
14
15
16
17
18
19
20
21
22
23
24
25
26
27
28
29
30
31
32
33
34
35
36
37
38
39
40
41
42
43
44
45
46
47
48
49
50
51
52
53
54
55
56
57
58
59
60
61
62
63
64
65
66
67
68
69
70
71
72
73
74
75
76
77
|
/// <summary>/// 装饰类 /// 装饰操作的抽象类 /// </summary> public abstract class Decorator : Component { /// <summary> /// 被装饰的元件 /// </summary> protected Component component; /// <summary> /// 设置元件 /// </summary> /// <param name="component">被装饰的对象</param> public void SetComponent(Component component) { this.component = component; } /// <summary> /// 装饰操作 /// 重新Operation(),实际执行的是Component的Operation() /// </summary> public override void Operation() { if (component != null) { component.Operation(); } } } /// <summary> /// 具体装饰类A /// </summary> public class ConcreteDecoratorA : Decorator { /// <summary> /// 装饰A独有的属性 /// 区别其他装饰类 /// </summary> private string addedState; /// <summary> /// 装饰类B的操作 /// </summary> public override void Operation() { base.Operation(); addedState = "我是装饰A"; Console.WriteLine(addedState); } } /// <summary> /// 具体装饰类B /// </summary> public class ConcreteDecoratorB : Decorator { /// <summary> /// 装饰类B的独有操作 /// 区别其他装饰类 /// </summary> private void AddedBehavior() { Console.WriteLine("装饰类B的独有操作"); } /// <summary> /// 装饰类B的操作 /// </summary> public override void Operation() { base.Operation(); AddedBehavior(); Console.WriteLine("装饰类B的操作"); }} |
客户端
|
1
2
3
4
5
6
7
8
|
ConcreteComponent cc = new ConcreteComponent();Decorator cda = new ConcreteDecoratorA();Decorator cdb = new ConcreteDecoratorB();cda.SetComponent(cc);cdb.SetComponent(cda);cdb.Operation(); Console.WriteLine("*********************************"); |
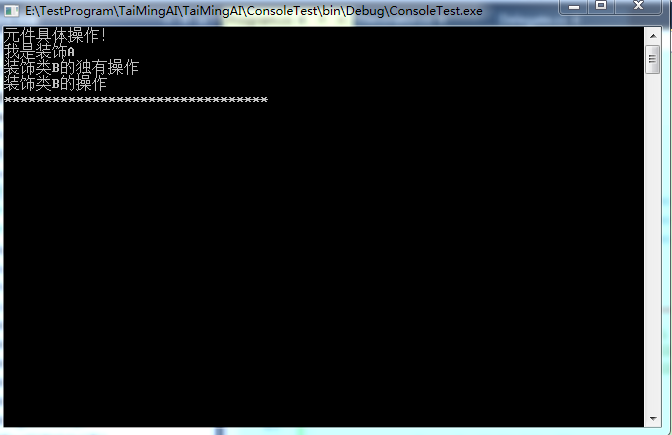
执行结果

2.装饰器模式之DOTA英雄学习技能
英雄每次上级,会得到一个技能点学习技能。具体的英雄就相当于【ConcreteComponent】,技能栏就相当于【Decorator】,具体的技能就相当于【ConcreteDecoratorA】,【ConcreteDecoratorB】
英雄
|
1
2
3
4
5
6
7
8
9
10
11
12
13
14
15
16
17
18
19
20
21
22
23
24
|
/// <summary>/// 英雄抽象类/// </summary>public abstract class Hero{ public string HeroName; public abstract void LearnSkill();}/// <summary>/// 具体英雄/// 剑圣/// </summary>public class JUGG : Hero{ public JUGG(string heroName) { HeroName = heroName; } public override void LearnSkill() { Console.WriteLine(HeroName + "学习了以上技能"); }} |
技能
|
1
2
3
4
5
6
7
8
9
10
11
12
13
14
15
16
17
18
19
20
21
22
23
24
25
26
27
28
29
30
31
32
33
34
35
36
37
38
39
40
41
42
43
44
45
46
47
48
49
50
51
52
53
54
55
56
57
58
59
|
/// <summary>/// 技能栏,继续学技能/// </summary>public abstract class SkillDecorator : Hero{ private Hero hero; public string skillName; public SkillDecorator(Hero hero, string skillName) { this.hero = hero; this.skillName = skillName; } public override void LearnSkill() { if (hero != null) { hero.LearnSkill(); } }}/// <summary>/// 具体的技能Q/// </summary>public class QSkill : SkillDecorator{ public QSkill(Hero hero, string skillName) : base(hero, skillName) { } public override void LearnSkill() { LearnQSkill(); base.LearnSkill(); } /// <summary> /// Q 技能 特性 /// </summary> public void LearnQSkill() { Console.WriteLine("学习了{0}技能!", skillName); }}/// <summary>/// 具体的技能W/// </summary>public class WSkill : SkillDecorator{ public WSkill(Hero hero, string skillName) : base(hero, skillName) { } public override void LearnSkill() { LearnWSkill(); base.LearnSkill(); } /// <summary> /// W 技能 特性 /// </summary> public void LearnWSkill() { Console.WriteLine("学习了{0}技能!", skillName); }} |
客户端
|
1
2
3
4
|
Hero jugg = new JUGG("剑圣");SkillDecorator q = new QSkill(jugg, "剑刃风暴");SkillDecorator w = new WSkill(q, "治疗守卫");w.LearnSkill(); |
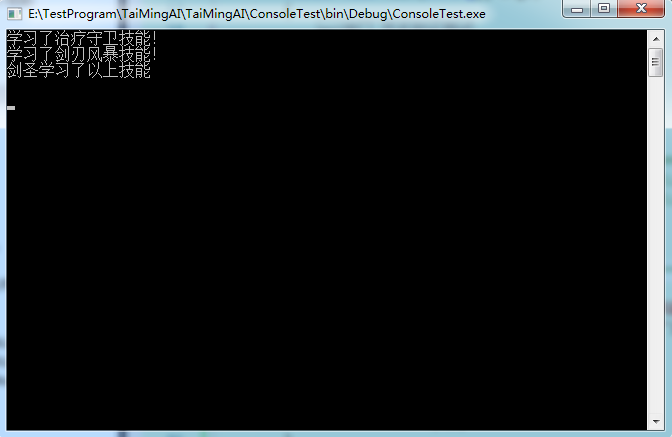
结果

以上就是本文的全部内容,希望对大家的学习有所帮助,也希望大家多多支持服务器之家。
原文链接:https://www.cnblogs.com/sayook/archive/2018/05/28/9101376.html


