一用户
1.1用户注册
1.2用户登陆
首先在Models里添加用户登陆模型类UserLogin,该类只要用用户名,密码和验证码三个字段。
|
1
2
3
4
5
6
7
8
9
10
11
12
13
14
15
16
17
18
19
20
21
22
23
24
25
26
27
28
29
|
/// <summary> /// 用户登陆模型 /// </summary> public class UserLogin { /// <summary> /// 用户名 /// </summary> [Display(Name = "用户名", Description = "4-20个字符。")] [Required(ErrorMessage = "×")] [StringLength(20, MinimumLength = 4, ErrorMessage = "×")] public string UserName { get; set; } /// <summary> /// 密码 /// </summary> [Display(Name = "密码", Description = "6-20个字符。")] [Required(ErrorMessage = "×")] [StringLength(20, MinimumLength = 6, ErrorMessage = "×")] [DataType(DataType.Password)] public string Password { get; set; } /// <summary> /// 验证码 /// </summary> [Required(ErrorMessage = "×")] [StringLength(6, MinimumLength = 6, ErrorMessage = "×")] public string VerificationCode { get; set; } } |
在UserController里添加Login action; 代码看如下:
|
1
2
3
4
5
6
7
8
9
|
public ActionResult Login() { return View(); } [HttpPost] public ActionResult Login(UserLogin login) { return View(); } |
使用Cookie保存登陆账号,密码等信息,修改public ActionResult Login(UserLogin login)。修改完成代码如下:
- [HttpPost]
- public ActionResult Login(UserLogin login)
- {
- //验证验证码
- if (Session["VerificationCode"] == null || Session["VerificationCode"].ToString() == "")
- {
- Error _e = new Error { Title = "验证码不存在", Details = "在用户注册时,服务器端的验证码为空,或向服务器提交的验证码为空", Cause = "<li>你注册时在注册页面停留的时间过久页已经超时</li><li>您绕开客户端验证向服务器提交数据</li>", Solution = "返回<a href='" + Url.Action("Register", "User") + "'>注册</a>页面,刷新后重新注册" };
- return RedirectToAction("Error", "Prompt", _e);
- }
- else if (Session["VerificationCode"].ToString() != login.VerificationCode.ToUpper())
- {
- ModelState.AddModelError("VerificationCode", "×");
- return View();
- }
- //验证账号密码
- userRsy = new UserRepository();
- if (userRsy.Authentication(login.UserName, Common.Text.Sha256(login.Password)) == 0)
- {
- HttpCookie _cookie = new HttpCookie("User");
- _cookie.Values.Add("UserName", login.UserName);
- _cookie.Values.Add("Password", Common.Text.Sha256(login.Password));
- Response.Cookies.Add(_cookie);
- return RedirectToAction("Default","User");
- }
- else
- {
- ModelState.AddModelError("Message", "登陆失败!");
- return View();
- }
- }
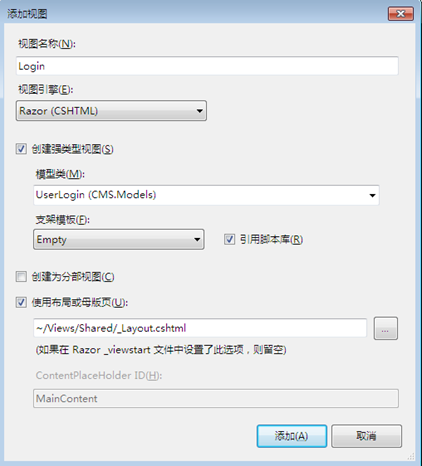
在public ActionResult Login() 上右键添加强类型视图

完成后代的Login.cshtml
|
1
2
3
4
5
6
7
8
9
10
11
12
13
14
15
16
17
18
19
20
21
22
23
24
25
26
27
28
29
30
31
32
33
34
35
36
37
38
39
40
41
42
43
44
45
46
47
48
49
50
51
52
53
54
55
56
57
58
59
60
61
62
|
@model CMS.Models.UserLogin@{ ViewBag.Title = "用户登陆"; Layout = "~/Views/Shared/_Layout.cshtml";} <div class="banner"> <img src="~/Skins/Default/Images/banner.jpg" /> </div> @using (Html.BeginForm()) { @Html.ValidationSummary(true) <div class="form"> <dl> <dt>用户登陆</dt> <dd> <div class="label">@Html.LabelFor(model => model.UserName):</div> <div class="ctrl">@Html.EditorFor(model => model.UserName) @Html.ValidationMessageFor(model => model.UserName) @Html.DisplayDescriptionFor(model => model.UserName) </div> </dd> <dd> <div class="label">@Html.LabelFor(model => model.Password):</div> <div class="ctrl">@Html.PasswordFor(model => model.Password) @Html.ValidationMessageFor(model => model.Password) @Html.DisplayDescriptionFor(model => model.Password) </div> </dd> <dd> <div class="label">验证码:</div> <div class="ctrl"> @Html.TextBoxFor(model => model.VerificationCode) @Html.ValidationMessageFor(model => model.VerificationCode) <img id="verificationcode" alt="" src="@Url.Action("VerificationCode", "User")" /> <a id="trydifferent" style="cursor: pointer">换一张</a> </div> </dd> <dd> <div class="label"></div> <div class="ctrl"> <input type="submit" value="登陆" />@Html.ValidationMessage("Message"); </div> </dd> </dl> <div class="clear"></div> </div>}<script type="text/javascript"> $("#trydifferent").click(function () { $("#verificationcode").attr("src", "/User/VerificationCode?" + new Date()); })</script>@section Scripts { @Scripts.Render("~/bundles/jqueryval") } |
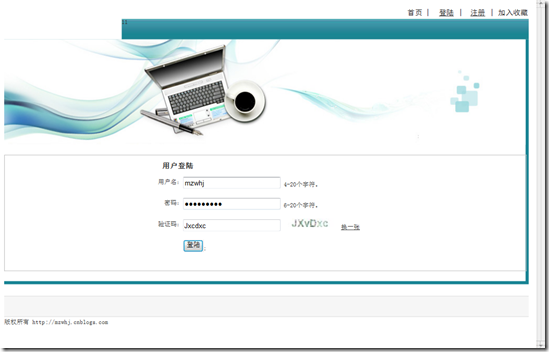
浏览器中查看一下登陆页面

点下登陆测试一下。OK登陆成功
验证用户是否已经登陆,这块和权限验证一起从AuthorizeAttribute继承个自定义验证类
在项目里添加Extensions文件夹,添加一个类UserAuthorizeAttribute 继承自AuthorizeAttribute,重写AuthorizeCore方法用来实现用户是否已经登陆的验证,权限验证在写权限功能时在补充
|
1
2
3
4
5
6
7
8
9
10
11
12
13
14
15
16
17
18
19
20
21
22
23
24
25
26
27
28
29
30
|
using Ninesky.Repository;namespace System.Web.Mvc{ /// <summary> /// 用户权限验证 /// </summary> public class UserAuthorizeAttribute :AuthorizeAttribute { /// <summary> /// 核心【验证用户是否登陆】 /// </summary> /// <param name="httpContext"></param> /// <returns></returns> protected override bool AuthorizeCore(HttpContextBase httpContext) { //检查Cookies["User"]是否存在 if (httpContext.Request.Cookies["User"] == null) return false; //验证用户名密码是否正确 HttpCookie _cookie = httpContext.Request.Cookies["User"]; string _userName = _cookie["UserName"]; string _password = _cookie["Password"]; httpContext.Response.Write("用户名:"+_userName); if (_userName == "" || _password == "") return false; UserRepository _userRsy = new UserRepository(); if (_userRsy.Authentication(_userName, _password) == 0) return true; else return false; } }} |
以后只要在需要登陆后才能操作的Action或Controller上加[UserAuthorize]就可实现验证是否已经登录了。
退出功能,在UserController添加Logout Action
- /// <summary>
- /// 退出系统
- /// </summary>
- /// <returns></returns>
- public ActionResult Logout()
- {
- if (Request.Cookies["User"] != null)
- {
- HttpCookie _cookie = Request.Cookies["User"];
- _cookie.Expires = DateTime.Now.AddHours(-1);
- Response.Cookies.Add(_cookie);
- }
- Notice _n = new Notice { Title = "成功退出", Details = "您已经成功退出!", DwellTime = 5, NavigationName="网站首页", NavigationUrl = Url.Action("Index", "Home") };
- return RedirectToAction("Notice", "Prompt", _n);
- }
以上就是本文的全部内容,希望对大家的学习有所帮助,也希望大家多多支持服务器之家。
原文链接:http://www.cnblogs.com/mzwhj/archive/2012/10/30/2746494.html


